Make video compression with a smaller size for iPad
Apr 05, 2016 06:34 pm / Posted by Charles Brown
Storage space on your iPad comes at a premium, and you can't fill it up with a bunch of big video files. This article will mainly introduce you the best 4 Video Compressors for iPad and how to use them compress video (MKV, MTS, AVI, etc.) with zero quality loss while reserving a reduced file size for easy playback and storage on iPad.
Gained millions of thousands of people's attention, iPad is really a great device to play video/music/games, browser the internet, check emails and so on. To make video size smaller for save your iPad space so you can install more iPad games, music or have smooth video playback on iPad saving storage, you need a top Video Compressor for iPad to compress large movies to iPad for playback with best video/audio settings.

Top 1 Video Compressor for iPad to Compress Video in 4 Ways
Being perfectly compatible with Windows 10/8/8.1/7/XP, etc. the stellar clean iPad video compressor, iFastime Video Converter Ultimate, enables users to easily achieve video compression with a smaller size for iPad in four ways:
1. Convert/Compress video to other formats which has higher compression:
Tough iPad supports MP4, MOV, M4V, here MP4 is top recommended since it has a fame for good compression with relatively smaller size. Use this tool to convert/compress MKV/MTS/AVI to iPad playable MP4 and out the same video quality in another video file.
2. Lower the video resolution:
As iPad only support H.264 video (up to 720p/1080p) and MPEG-4 video (640 x 480), you can compress any 4K/1080p/720p/480p video, etc to fit for iPad with this top video compression software for iPad.
3. Reduce the bit rate:
Lower bit rate, smaller size, lower quality. So compress the source video by reducing its bit rate to get a smaller size for playback on iPad, but you will get inferior video quality.
4. Cut unwanted parts of the video:
This best iPad video compressor allows you to trim video by setting start time and end time so that you can remove unnecessary areas of the video. You can click "Edit selected task" icon to find the trim function. This is the last way to get a more compressed video.
Free Download iFastime Video Converter Ultimate:
Convert/Compress MKV/MTS/AVI/FLV/MPG/Tivo movies for iPad
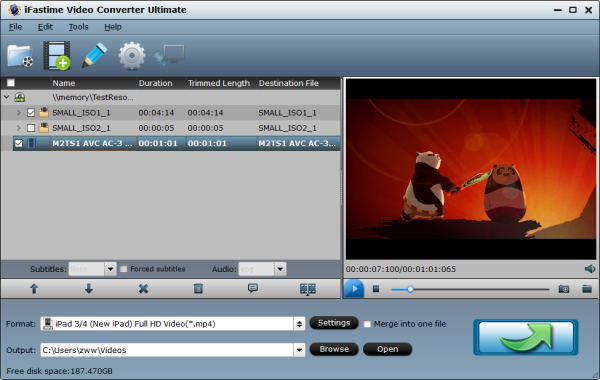
Step 1: Add video files
Launch the best video compressor app for iPad and add source video files (.avi, .mkv, .mts, .mpg, .flv, .tivo, etc) into it by clicking "Add video" button. Its "Merge into one file" feature allows you merge or join many separate videos into a single playable file encoded to your preference.
Tip: To add Tivo files, you need to click "Tools > Options > Tivo" to enter Media Access Key, and press "OK" to confirm at first.
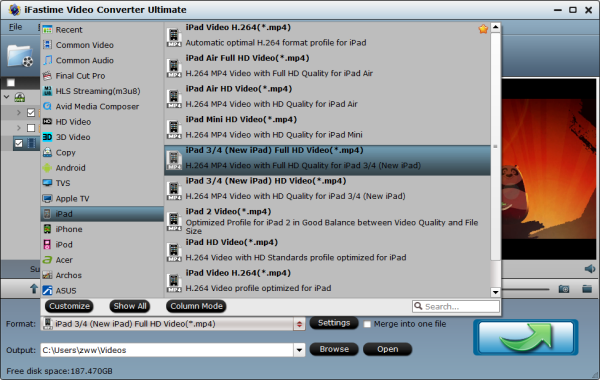
Step 2: Choose iPad supported MP4 as target format
Click Format menu and select iPad model you have from "iPad" category like "iPad 3/4 (New iPad) Full HD Video(*.mp4)" to get videos with optimized settings for playing on your any iPads.
Step 3: Compress video for iPad
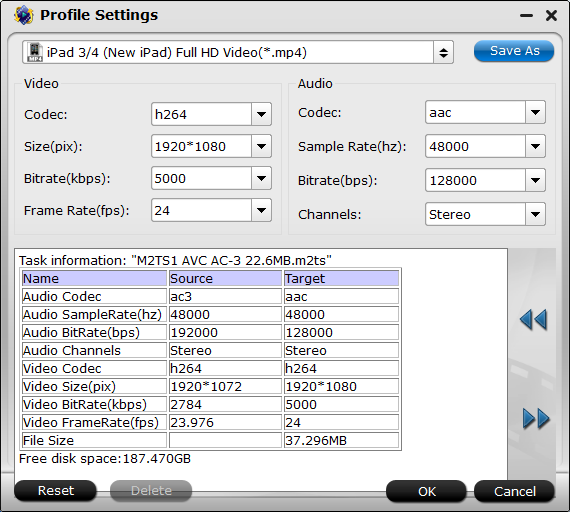
a. Hit the Settings button to custom a suitable profile for iPad with iOS 9 by adjusting video and audio settings. Also, you can have a look at the estimated file size. If you still wanna get a much smaller file, you can lower the video bitrate including downsaling 4K video to 1080p/720p.
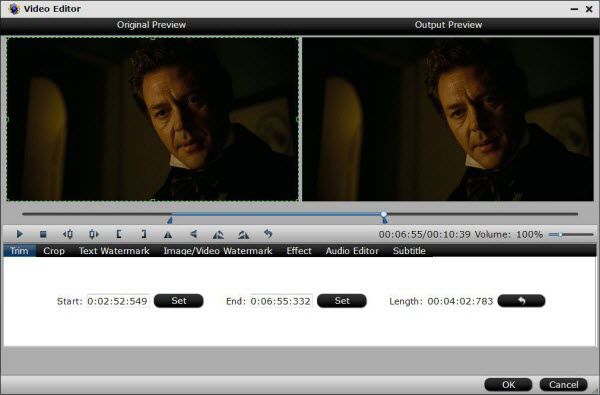
b. You can also trim source videos before converting. To start with, click the "Edit selected task" button. In the new window, the video editor generates Original Preview and Output Preview for you. Then, find the "trim" tab, in the timeline, set the start time point and the end time point in the "start" and "end" boxes. And, finally click the "Ok" button to finish editing. You can also change your new clip length by clicking "Reset Trim" button.
Tip:
If you don't mind cutting a large movie into several clips, you can also apply the video split function.
Step 4: Start converting/compressing
Hit the "Start conversion" button; it will start to convert and compress 1080p videos to Surface with Windows 8 Pro immediately. After the conversion, you can easily get the resulted video files for iPad via tapping the Open button. Afterwards, you can add MKV/MTS/AVI/FLV/MPG/Tivo to iPad via iTunes with easy playback in smaller size.
Don't worry about the iPad's video format and storage limit any more. This compressor also adopts advanced AV-sync conversion technology, which can perfectly convert videos without any out-of-sync problems.
Top 2 Video Compressor for iPad to Compress Video with best settings
You can use Handbrake to shrink big video files down to smaller ones; more will fit, and you binge watch longer. It is important that you have the latest handbrake and you update the presets (the gear at the bottom of the presets allows updating.) If you've been using handbrake for more than a year, one of two common errors are not picking the right preset or not having the preset updated.
How to Use Handbrake to Shrink Large Video Files down to Play on iPad
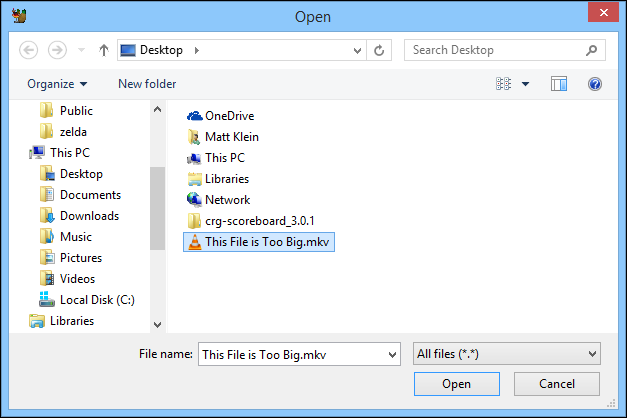
So, let's first choose the file we want to downsize and get started. The file we've picked today is an .MKV file, around twenty-one minutes long, and weighing in at just over 220MB.

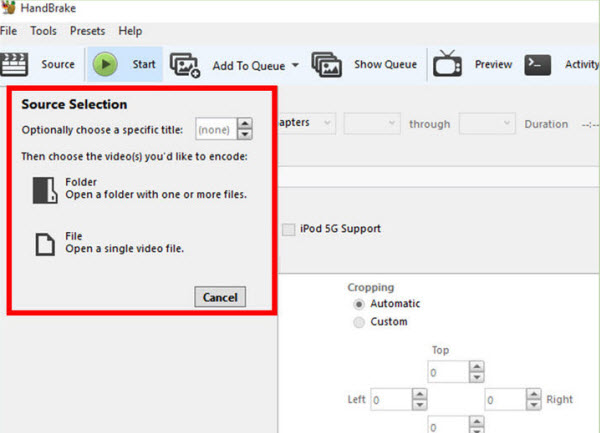
First, we click the "Source" button on Handbrake, and then choose "Folder" or "File".
Select the file in question in the File Explorer window, and click "Open."
There's only nine choices under the Devices presets, but they're some of the most popular platforms out there. For this demonstration, we're going to simply choose the "iPhone & iPod touch" preset since Apple has very specific guidelines for what your video has to be to work on the iPad Air/Mini/Pro. Handbrake will go ahead and make the necessary changes to the output settings.

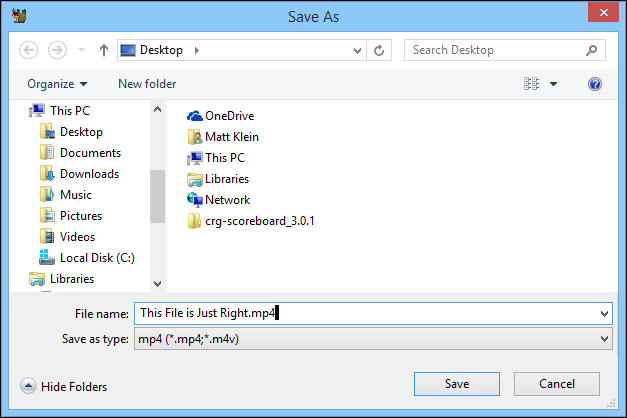
With everything configured and ready to go, click "Browse" and choose the location for your destination. Give your new file a fitting name, and click "Save."
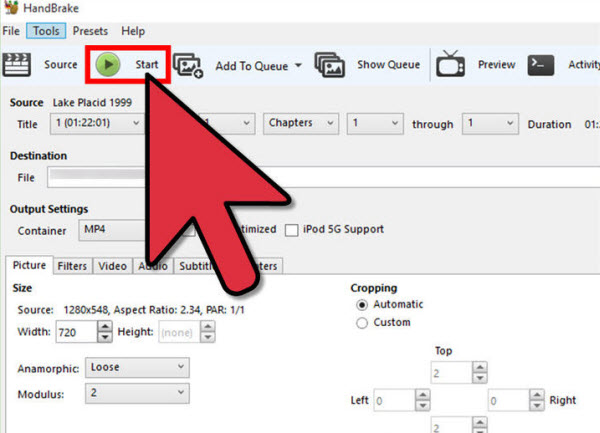
With our file chosen, our preset selected, and our destination picked and named, we will go ahead and click the green "Start" button on the top row.
Handbrake will now start the transcoding process. Depending on the speed of your computer and the size of the file, this can take anywhere from a few minutes, to a few hours. You can get some idea of how long it will take by checking the bottom of the Handbrake application. It will give you important status information on the progress of your job(s).

As we can see, this particular job is going to take about thirty minutes, so we can do other things. Do remember however, if you use your computer for other tasks while you're transcoding a file, it could lengthen the time it takes to complete.
Our job is done and we right-click on our new file. Excellent news, we've managed to save over 120MB!
If we can do that with one file, just think of how much space you will save spread out over several or several dozen files.
Tip:
Additionally, I've had success with some of the free converters from the Apple App Store (just search video convert.) Another strong free converter (cross platform just in case you're on windows) is the Miro Converter.
Most of the free converters (including handbrake) are generally using the same engine - ffmpeg. Handbrake was originally unique because it could decode DVD VOBs and get around copy protection. It's great, but there are gobs of other well done ffmpeg free converters. The common Pro Converters (in alphabetical order) Adobe Media Encoder, Apple Compressor, Sorenson Squeeze and Telestream Episode, will absolutely work all the time - it's their product.
On iTunes sync
I've (personally) become a little frustrated on the pro video side with itunes; the sync process/time is at best annoying. I'm a fan of the third party players (like gPlayer, flex player, CineXPlayer) as I can add a video in the apps tab of itunes without having to sync the entire device. One, which I can't recall at the moment, will give you the option to use the hardware chip (or not).
Note: If you need full pre-settings about video quality, resolution and bit rate, which will save you much time, Handbrake is not a good choice for you.
Top 3 Video Compressor for iPad to Compress Video on Mac
With iMovie, a video editing tool offered by Apple, you are allowed to fix shaky videos shot by your own, crop video, add music, trim movies and more. Use it to resize your new iPad movies to free up more space. (Learn tips for Editing MP4 files with iMovie)
1. Resize file for iPad
Editing video in iMovie is just like dragging files to your Mac desktop, however the Mac video editor is a little complex in resizing file.
2. Import videos to iPad using iTunes
Open iTunes on your Mac (or PC) -> Connect your iPad to Mac then iTunes would detect the device and list it under Device category in the left colum -> Find the target video on your Mac and drag it to the iTunes movie library -> After the video added to the iTunes library, drag it to the iPad in the left colum of the iTunes. Done!
3. To play video on iPad, you can:
- Tap on iPad icon on your iPad to open the built-in media player on iPad.
- Choose video category and find the video, tap on it to play.
Top 4 Video Compressor for iPad to Compress Video on Windows
For Windows users, Windows Movie Maker is a free video editing tool to downsize video file size for iPad:
Open up WMM -> browse and open your source video -> Save movie to a specific device like iPad with small/resolution/only audio option or Create custom setting to fine tune the video width/height/bit rate/frame rate and audio kbps/kHz. Also, kindly note that in Movie Maker, you have the option to save your file as a project file - a format that owns quite smaller file size, because all it contains are the file names, the list of edit points etc., no actual video, photos or music at all. (See 4K XAVC-S in Windows Movie Maker Workflow)
Note: Windows Movie Maker is powerful just as iMovie, but both are not for beginners.
Conclusion: To convert and compress your movie's format for iPad with a click, choose iFastime Video Converter Ultimate. With it, you can easily optimize the video resolution to fit iPad--from 1280×720 to 960×640 and so on. For control plus ease of use, this option is a standout. For mac users, here is the mac version.
Have more questions about how to make video compression with a smaller size for iPad, please feel free to contact us>>
Related Articles
One thought on “Make video compression with a smaller size for iPad”
Leave a Reply
You must be logged in to post a comment.
Ultimate media solution to convert all SD, HD, 2K, 4K videos to play, edit, share on Windows 10.
Price: $45.95
This is one of the best programs around due to it’s simplicity and ease of use. I”d recommend it to anyone (and everyone).