How to use Wondershare Dr.Fone for iOS (Mac)
This world's 1st data recovery program will provide you three mode to recover deleted photos, text messages, contacts, notes, iMessages, videos, call history, calendars, reminders and safari bookmarks, whatsapp data, app data and more from iOS devices, follow the tutorial to recover your deleted iPhone iPad iPod data on Mac.
Note: Once you delete or lost data from iOS devices, don't use the device before you recover those lost data, any operation may generate new data, the new data will overwritten your lost data, and make it unrecoverable.
Download
Download the virus-free Wondershare Dr.Fone for iOS (Mac) from product page (The download link is here). It's fully compatible with Mac OS X 10.10, 10.9, 10.8, and former versions.
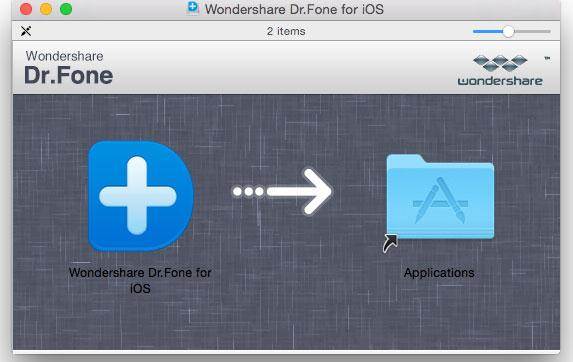
Install
Double-click the *.dmg package file and drag the icon to the Applications folder on Mac.
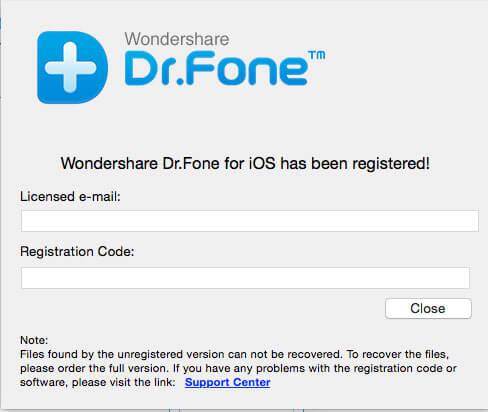
Register
After running the app, you are asked to register the software. So copy and paste the registration code and email after you have purchased the license. Of click "Buy now" to pay for it if you haven't purchase the license. After that, c lick "Activate" to update the software to the full version. Note that the free trial version only allows you to scan your iPhone, iPad, or iPod touch, iTunes backup file and iCloud backup file for the data to see whether they are what you want or not.
Update
To updata to the latest version, run the program and click the name. Then choose "Check for Updates" to check for the update. If an update is available, click "Update Now" to get the latest version.
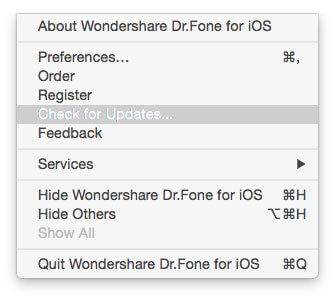
Or Choose to download the latest version from the pop-up after lanching the program once there is an update available.
Uninstall
Drag the icon of Wondershare Dr.Fone for iOS from the desktop or Applications folder to the dustbin.
See "Recover from iOS Device" mode supported files and devices:
| Device Model | Supported File Types |
| iPhone 4, iPhone 3GS, iPad 1, iPod touch 4 |
Camera Roll, Photo Library, Photo Stream, Contacts, Messages, Message Attachments, Calls History, Calendar, Notes, Reminders, Voice Memos, Voicemail, Safari Bookmarks, WhatsApp History, App Photos, App Videos, App Documents, WhatsApp Attachments |
| iPhone 6S/6S Plus, iPhone 6/6 Plus, iPhone 5S, iPhone 5C, iPad 2, The New iPad, iPod touch 5, iPad with Retina display, iPad mini, iPad Air, iPad mini 2, iPad mini 3, iPad Air 2 | Deleted files & Existing files: Contacts, Messages, Call History, Calendar, Notes, Reminders, Safari Bookmarks, WhatsApp History |
| Existing files: Camera Roll, Photo Stream, Message Attachments, Voice Memos, WhatsApp Attachments, Voicemail, App Photos, App Videos, App Documents, |
How To Recover Data from iOS Device
1. Load the problem and connect your iOS device to computer
After you run the software and connect your iOS device on your Mac computer, you'll see the window as below. For iPhone 4/3GS, iPad 1 and iPod touch 4, you can switch to "Advanced Mode" to get a deeper scan.
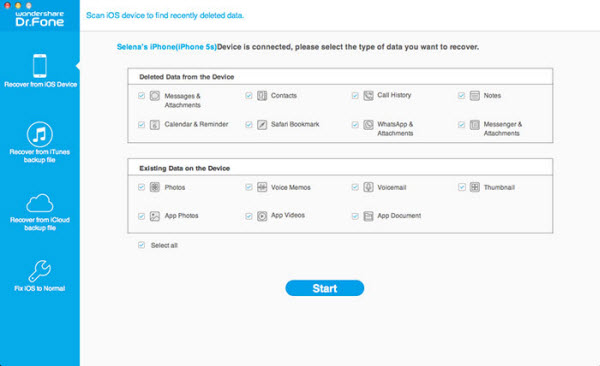
2. Scan your iOS device to find deleted data
After the software detect your device, click "Start Scan" to scan your iOS devices directly.
For iPhone 4/3GS, iPad 1 and iPod touch 4, you need to enter DFU mode and scan it, Follow the steps below.
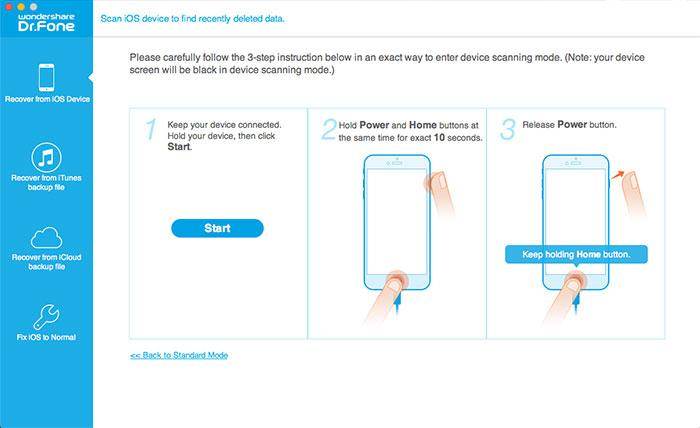
1. Hold your device and click "Start" on the window of the software.
2. Hold the "Power" and "Home" buttons on your device at the same time for exactly 10 seconds.
3. When 10 seconds have passed, release the "Power" button right away, but keep holding the "Home" button for another 15 seconds.
After you enter DFU mode successfully, the iPhone data recovery software will scan your device automatically.
3. Preview and recover your deleted iDevice data
When the scan is finished, you can click camera roll, contacts, messages or other categories on the left side and preview all deleted and existing data, they will display different colors, you can click Only display the deleted items to separate them, then you can choose the suitable data, click the "Recover " button to save them on your computer, for some text contents like messages, notes, contacts, the software will give your the tips to transfer deleted data to computer or back to divice, you can choose one depending on your needs.
See "Recover from iTunes Backup" mode supported files and devices:
| Device Model | Supported File Types |
| iPhone 4, iPhone 3GS, iPad 1, iPod touch 4, iPhone 6S/6S Plus, iPhone 6/6 Plus, iPhone 5S, iPhone 5C, iPad 2, The New iPad, iPod touch 5, iPad with Retina display, iPad mini, iPad Air, iPad mini 2, iPad mini 3, iPad Air 2 |
Camera Roll, Photo Stream, Contacts, Messages, Message Attachments, Calls History, Calendar, Notes, Reminders, Voice Memos, Voicemail, Safari Bookmarks, WhatsApp History, App Photos, App Videos, App Documents, WhatsApp Attachments |
How To Recover Data from iTunes Backup
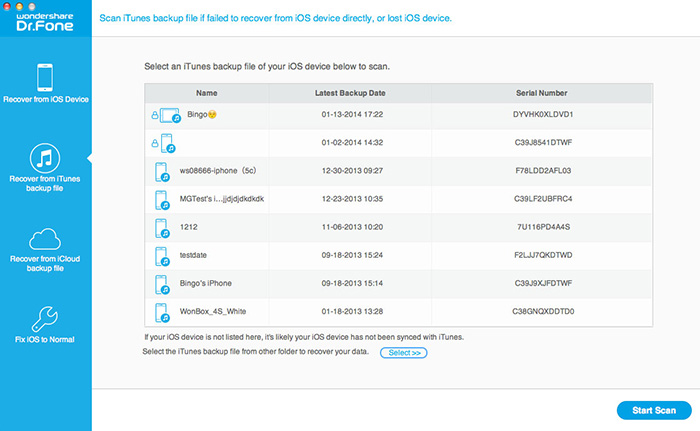
1. Choose suitable iTunes backup and extract it
After you run the problem, you can switch to "Recover from iTunes Backup File" on the top of the primary window, all iTunes backup files which you've synced with iTunes before will dispaly as a list automatically. You can choose the suitable one and click "Start Scan" to extract it.
2. Preview and save data from iTunes backup to your Mac
Now you will be able to see all backed up data, which include your call history, notes, videos, contacts photos, etc. choose files that you want to get back and check to restore.

See "Recover from iCloud Backup" mode supported files and devices:
| Device Model | Supported File Types |
| iPhone 4, iPhone 3GS, iPad 1, iPod touch 4, iPhone 6S/6S Plus, iPhone 6/6 Plus, iPhone 5S, iPhone 5C, iPad 2, The New iPad, iPod touch 5, iPad with Retina display, iPad mini, iPad Air, iPad mini 2, iPad mini 3, iPad Air 2 |
Camera Roll, Contacts, Messages, Message Attachments, Calls History, Calendar, Notes, Reminders, Voice Memos, Voicemail, Safari Bookmarks, WhatsApp History, App Photos, App Videos, App Documents, WhatsApp Attachments |
How To Recover Data from iCloud Backup
It is very easy to restore your iPhone from iCloud if you have already made some backup in your iCloud. But you may not select to recover parts of the contents. At the very beginning you should ensure that you have already backed up all the data in your iPhone to iCloud, then you can erase all of the data in your iPhone. And then reset or turn on your iPhone.
1. Download and scan your iCloud backup
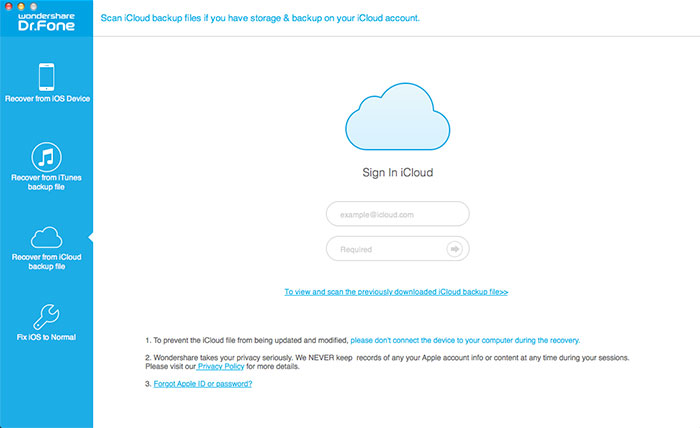
Choose the recovery mode of "Recover from iCloud Backup File" and login in your iCloud account.
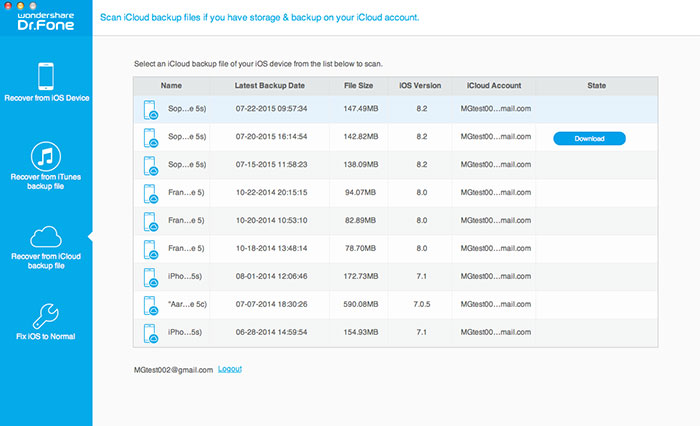
After you login iCloud, the software will find and display all iCloud backup files in your account, you can select the suitable one and click "Download" button to get it downloaded. When the download is complete, download button will become the scan button, click it to extract iCloud backup.
3. Preview and recover the data you want
After the scan is finished, you can preview all data in scan rsult, then mark any data you want and click the "Recover" button to save them on your computer or back to iDevices.
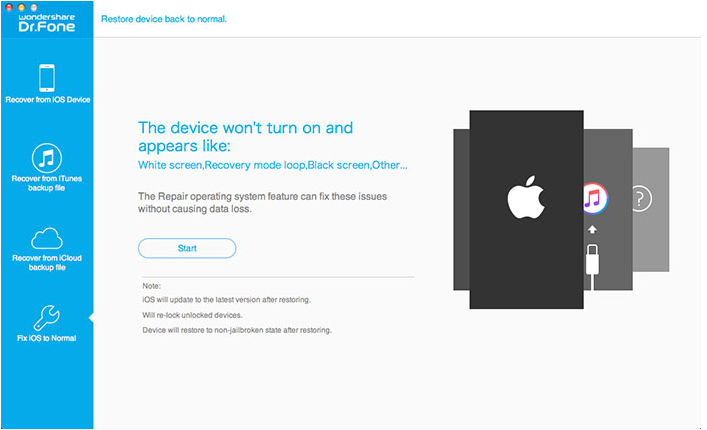
How To Repair Operating System
1. Launch the program and choose the Repair Operating System feature
After installation, launch the program on your computer and click the last tap "Repair Operating System" in the primary window of iOS Data Recovery. Then connect your iOS device to your computer via a USB cable. When your iPhone iPad or iPod touch is detected, click "Next" to continue the process.
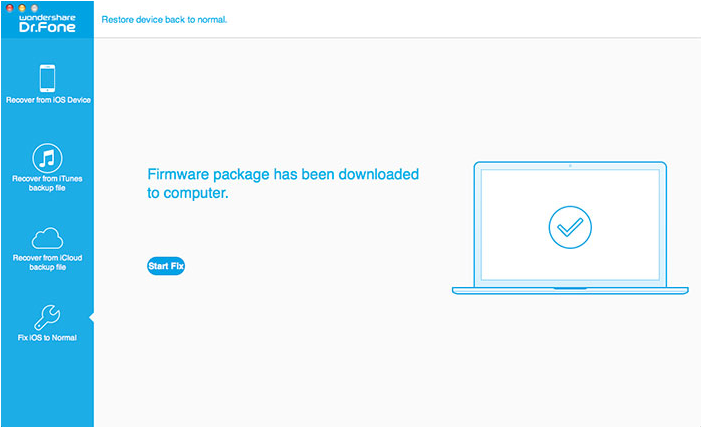
2. Download and select firmware
To fix the unnormal operating system, you need to download the firmware for your iPhone, iPad or iPod touch. The program will automatically recognize your iDevice, and offering you the latest iOS version to download. Click "Next" to continue if you have downloaded the firmware for your iOS device. In the next window, click on the "Browse" button to locate the firmware that you've downloaded to your computer.
3. Fix the abnormal operating system
If done, you are allowed to click "Start Fix" at the bottom of the window, to let the program to get your iPhone, iPad or iPod touch out of abnormal state, including recovery mode, Apple logo looping, getting your iOS device to normal state or work properly. In less than 10 minutes, it will tell you that your device is restarting to normal mode. The whole process will not spend too much of your time, please do not disconnect your iOS device during this repair porcess.
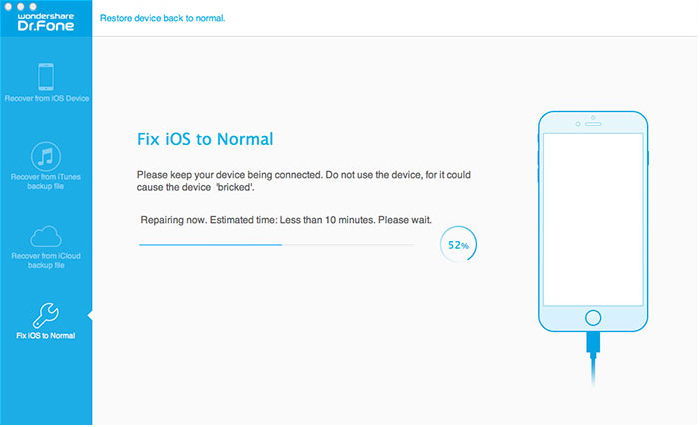
Note: After fixing the abnormal operating system of your iOS device, it will be updated to the latest iOS version. And if your iOS device is a jailbroken one, then it will be updated to non-jailbroken. If you have unlocked your iOS device before, then it will be re-locked again. Besides, in order to reduce the risk of data loss, it's necessary to periodically back up data from iPhone iPad or iPod to PC or iTunes.

With the help of Wondershare Dr.Fone for iOS(Mac), you are able to get back lost contacts, messages, photos, notes, etc. from iPhone, iPad and iPod touch on Mac.
Price: $79.95 $63.96