How can I load video clips to Non-linear editing software (FCP, iMovie, etc.)
Dec 28, 2015 06:10 pm / Posted by Charles Brown
There are a ton of programs you can use to edit your own video collection for better presentation or preservation, from the simple Windows Movie Maker, to the most advanced Adobe Premiere and Final Cut. In this tutorial, I'll show you how to get started importing media file into non-linear editing software like FCP, iMovie, Avid Media Composer, Premiere Pro, FCE, Apple Aperture, Adobe After Effects, DaVinci Resolve, Windows Movie Maker, Sony Vegas, Pinnacle Studio, CyberLink PowerDirector, GoPro Studio, etc. for editing with ease.
Part I: Mac Non-linear editing software
How to Import media files into Final Cut Pro?
For FCP 7:
1. Importing Video: Getting Started
Before you begin, make sure you've created a new project, and check to see if your scratch disks are set to the correct location!
2. Importing Digital Files
Importing digital files is perhaps the easiest method of bringing footage into FCP. Whether the video files you want to import were originally shot on your iPhone, grabbed from the internet, or are left over from a past event, they can most likely be imported into FCP for editing. FCP 7 supports a wide range of video formats, so it's worth it to attempt an import even if you're unsure about the file extension of your video.
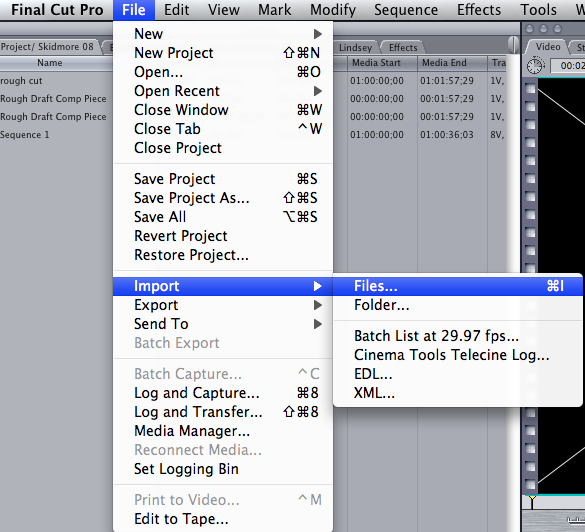
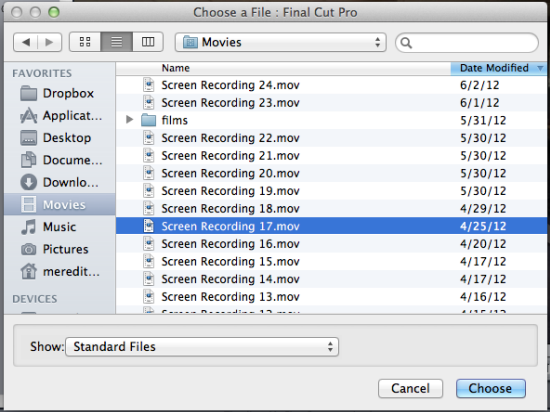
With FCP open, go to File > Import and then choose either Files or Folder. This will bring up the standard finder window, from which you can choose your media. If the file you want isn't highlighted or if you can't select it, this means that the format is not compatible with FCP 7.
If you have many video files saved to a folder choose Folder. This will save you some time so that you don't have to import each individual video. If you're working with one or several video files in different location, choose File. This will let you import each video one by one.
Tip: It may take a few seconds or even minutes depending on the file size. If the file is on an external hard drive, it will take even longer. Be patient.
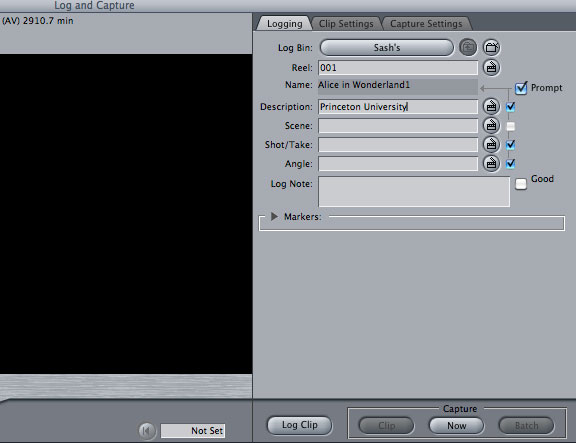
3. Logging and Capturing
Logging and Capturing is a process you will use to get footage off of a tape-based video camera. Begin by connecting your camera via the firewire port on your computer. Now, turn your camera to playback or VCR mode. Make sure your camera has enough battery to complete the capture. Logging and capturing happens in real-time, so if you shot an hour of video, it's going to take an hour to capture it.
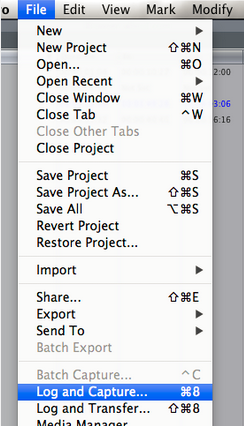
Once your camera is in playback mode, go to File > Log and Capture.
This will bring up the Log and Capture window. The Log and Capture window will have the same video controls as the Viewer and Canvas window, including play, fast-forward, and rewind. Since your camera is in playback mode, you'll control the deck of your camera through Final Cut Pro - don't try to press play or rewind on your camera! It's a good idea to cue up the clip in your camera before you start the log and capture process.
Press the play button to cue your video to the appropriate place. When you arrive at the beginning of your desired clip, press capture. Upon pressing capture, FCP automatically creates a new video clip which you'll be able to see in your browser. The video file will be stored on your hard drive in the location you chose when you set your scratch disks.
Press Esc when you're done capturing, and stop video playback. Once you've captured all your clips, close the log and capture window and remove your camera device.
4. Logging and Transferring
The Log and Transfer process is very similar to the Log and Capture process. Instead of capturing video footage from a device, you're going to be translating raw digital video files so that they can be read by Final Cut Pro.
To begin, go to File > Log and Transfer. This will bring up the Log and Transfer box shown above. The Log and Transfer window should automatically detect the files on your computer or external hard drive that are eligible for Final Cut.
When logging and transferring, you can preview all of your video clips before they are transferred. You can set in and out points using the i and o keys on your keyboard. Once you've select your desired clip, click "Add Clip to Queue", which you'll see under the video playback box. Every clip you add to this queue will become a new video clip in the FCP browser once it's transferred.
![]()
If for some reason your desired file does not appear, navigate to the folder icon at the top-left of the window. This icon will bring up the standard file browser, and you can select your desired file here.
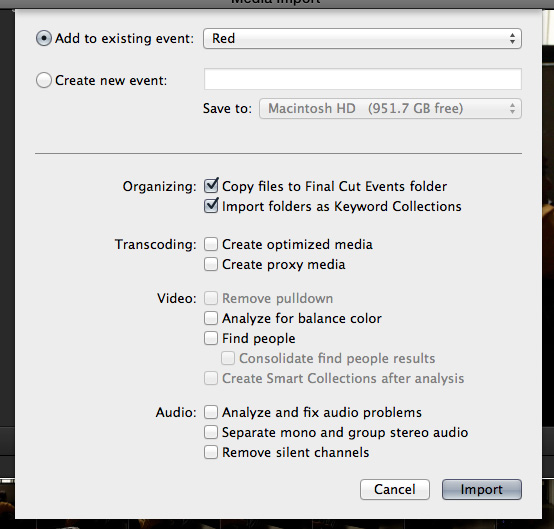
For FCP X:
1. Click the Import Icon which you’ll find under the Event Library as shown:

2. Once you click that, you will get this popup box:
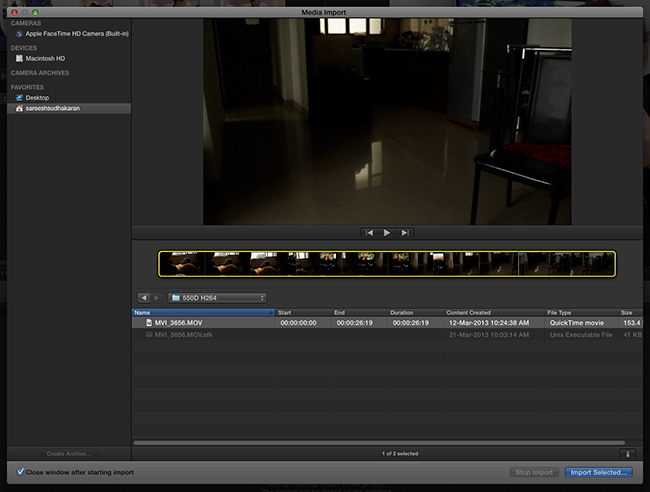
3. The browser is fairly straightforward – find the files you want, select them and hit Import Selected…. You'll get this:
Now start to organize your media files in FCP X!
How to Import media files into iMovie?
1. Open your iMovie program.
If you would like to use an existing project to add video to, choose the project from the "Project Library" located in the upper right hand corner of the iMovie window. If you would like to create an entirely new project, go to the "File" menu and select "New Project." The iMovie program will prompt you to name your new project and choose an aspect ratio for your movie; either "Widescreen," "iPhone," or "Standard."
2. Set your camera to the correct mode for video export. This mode setting will typically say "PC" or "Computer."
3. Plug your video recording device into your computer using the designated USB or Firewire cord for your specific device.
4. Select the "Video Import" button designated by a video camera icon located directly above the "Event Library" menu. A window will automatically open showing all of the footage found on your video device.

If your video device is memory based, the window will show your video footage as thumbnail clips allowing you to scroll through the footage and skips scenes as you would a DVD. Memory based video devices allow you to use the playback controls to preview any of the thumbnail clips available in your video footage window.
If your video device is tape based, your video footage window will have fast forward and rewind buttons in order for you to cue the tape, scan through your footage, and select the correct clips.
5. Import your video footage into the iMovie project you are editing in.
To import all of the footage from your video device into the iMovie program, select the "Import All" option at the bottom right hand corner of the video footage screen. If you only want to import some of your video footage, switch the "Automatic" option to "Manual" at the bottom left hand corner of the video footage window. This will allow you to then scroll through your footage clips to select and de-select the video clips you wish to import into your iMovie project. If the clip has a checkmark under it, it is selected for import. If the clip does not have a checkmark, it is not selected for import. After you have sorted through and unchecked the clips you do not want, click on the "Import Checked" button located on the bottom right hand corner of the screen.
6. Decide where you want your video clips to be stored within the iMovie program.
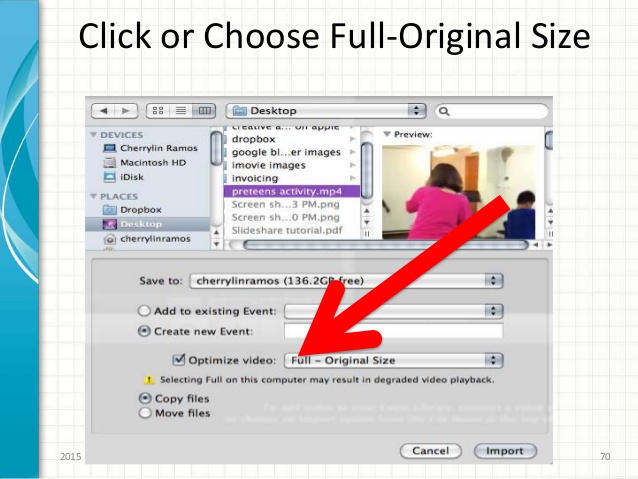
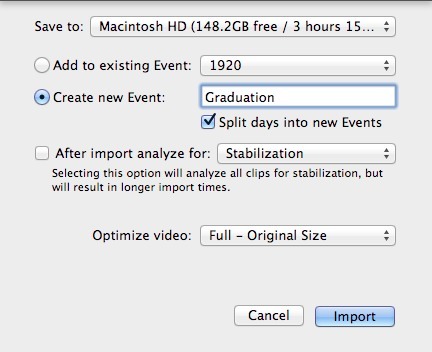
Here you will again be allowed to choose to add the clips to either an existing iMovie project event, or create a new event. If you have a 1080i video, you can choose to either import your video at either the "Full 1920x1080" resolution or as "Large 960x540" half resolution; the "Large" option still views as a high quality picture, but imports the video as a smaller file size therefore allowing more space on your computer and iMovie project.
7. Click on the "Import" button to commence importing the video footage you have selected. The iMovie program will show the progress of the imports on the main iMovie window. Once all of your selected video footage has been imported, the project is ready for watching and editing from the computer.
How to Import media files into Avid Media Composer?
1. Specify the Drive with the Media Creation Setting
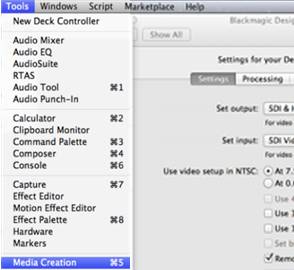
Click on the Tools tab in the main menu on the top of your screen and choose Media Creation. Alternatively, you can pres Ctrl+5. This will open the Media Creation window, where you can choose the drive where you want to create the files which you are going to import. Click OK.
2. Go to Project Window
Click on the Format tab in your project window and under Project Type, select the quality you want for your imported files. The highest quality possible is 1080p/23.976. This will again depend whether you are importing a video, audio or HD file.
3. Highlight and Right Click Import Bin
When you are working in Media Composer, you will have the Import bin window just below the Clips window, on the left of the Source Viewer panel. Click on the Import Bin to highlight it, and then right click inside the Import Bin. Choose Import from the drop down menu.
4. Choose Location of Your Media File
The Import dialogue box will open and you can browse and select the file you want to import. There is a box at the bottom of dialogue box named Video Drive/Audio Drive, where a particular drive is selected. Make sure that the drive appearing in this box is the same as you chose in Step 1. In the Video Resolution box, you can again choose a quality which you prefer for the imported file. You can ignore this if you are importing an audio file.
5. Choose Options in Import Settings
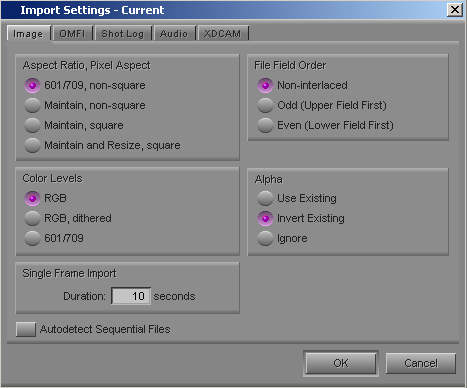
Click on the Options button in the Import dialogue box, and it will open a window for Import Settings. There are different tabs here, and you may click on each tab to specify all the particular settings you want. These settings cover various areas as to how your image is sized and to what channel it is played on. You can experiment with these settings to get your file just the way you want it. Once you have chosen your settings, click on OK.
6. Load Imported File
You will find your imported file in the Import bin, and it has also been created in the Manage Media Files location. You can load it into the Source Viewer by clicking on the file in the Import bin and dragging it into the monitor panel.
How to Import media files into Premiere Pro?
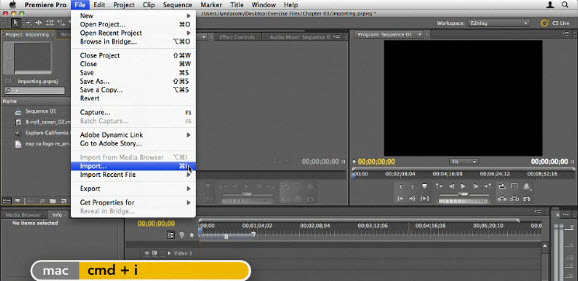
To bring up the import window, use one of these methods:
- Select File > Import from the main menu.
- Keyboard shortcut Ctrl+I (Windows), Cmd+I (Mac).
- Double-click inside the Project Panel.
- Once the import window is open...
To import a single file: Locate and select the file, then click Open.
To import multiple files: Hold down the Control key to select multiple files, then click Open.
To import a folder of files: Locate and select the folder you want to import, then click Folder. A new bin is created in the Project window, containing the contents of the folder.
How to Import media files into FCE?
See this Final Cut Express Video Tutorial: Importing Files
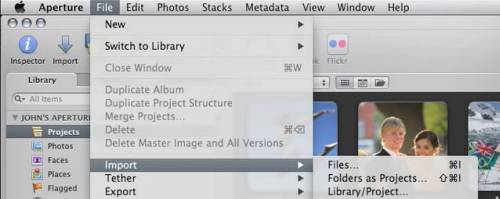
How to Import media files into Apple Aperture?
Click File > Import > Files...
How to Import media files into Adobe After Effects?
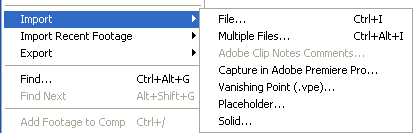
There are several ways to import files:
- From the main menu, select File > Import > File (keyboard shortcut Ctrl/Cmd+I). This opens the import dialogue box and allows you to select one or more files from a particular folder. To select multiple files, click while holding down the Shift key for contiguous files or the Ctrl/Cmd key for non-contiguous (separated) files.
- Select File > Import > Multiple Files (keyboard shortcut Ctrl/Cmd+Alt+I) to import multiple files located in different folders. The standard dialogue box appears, but after you click Open the box remains and you can navigate to another folder to select more files. Keep doing this until all files are selected, then click Done.
You can also bring up the dialogue boxes from the project panel:
Right-click anywhere in the project panel and select either Import > File or Import > Multiple Files.
Double-click anywhere in the project panel to bring up the standard import dialogue box.
Adobe Bridge
As in other CS3 applications, you can also import files using Adobe Bridge. This is a separate file-browsing application that is great for previewing files before importing them
To open Adobe Bridge from within After Effects, select File > Browse from the main menu. In Bridge, single-click a file to preview. Double-click to import.
How to Import media files into DaVinci Resolve?
DaVinci Resolve can be used to either:
- Create Dailies, Proxies or Intermediary codecs, or
- Color grade locked edits
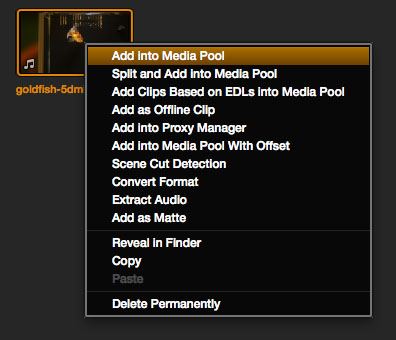
- Find the file in the Library panel.
- Double click your clip or Right-click and select ‘Add into Media Pool.’
- The clip is added to your Media Pool.
- You can also import entire directors or a range of clips into the Media Pool.
To import RAW files you will first need to decide how they are debayered (demosaiced). For that you go to the Project Settings and select 'Camera Raw'
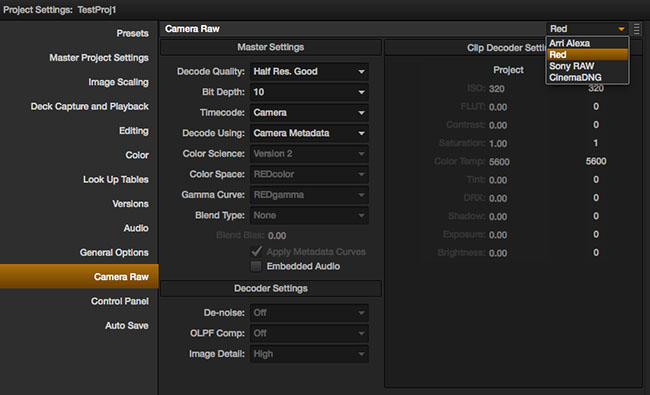
You can set the defaults on how you want to treat each supported RAW format. Resolve supports debayering up to 16-bit, which is as good as it gets currently.
Once you’ve imported your clips, you can:
- Log them.
- Apply LUTs, gamma curves or whatever.
- Color grade if you must.
- Export for further use.
You can also change clip attributes on the fly. To cut a long story short, you can do anything and everything to get the clip to ‘agree’ with your project settings.
Resolve gives you a lot of control over your import process, and it is beyond the scope of this article to go into them all, especially when the manual does a stellar job of explaining each workflow.
Once you import your media, you can view metadata regarding it in the Metadata panel. You can also edit metadata (not all file formats allow editing metadata). If the option is available, you will be able to edit it.
What about audio? You can import separate audio files and link them via:
- Timecode – they are synced automatically.
- If no timecode exists, you’ll need to manually sync your audio. Then you can link your video and audio so they don’t drift out of sync again.
The newcomer is not encouraged to try every one of these import settings, simply because it is overwhelming. Unless you have experience with multiple workflows, some of these features and options will not even make sense. I suggest finding exactly what you’re interested in right now, learning to make that work well, and then sticking to it.
Part II: Windows Non-linear editing software
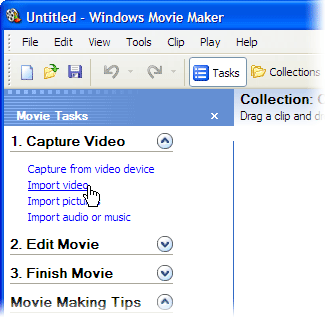
How to Import media files into Windows Movie Maker?- Click File, and then click Import Media Items.
- Navigate to the location that contains the digital media files you want to import, and then click Import.
How to Import media files into Sony Vegas?
Once you've set up your Project, you will need to import clips. Before you do, take a look at Sony’s simple but powerful Project Media Window:
Each folder is called a 'Bin', and you can create as many as you want by selecting the Media Bin>Right Click>Create New Bin.
This is important, because once you've setup your project into bins, you can search (Right Click on a bin>Search Media Bins…) these bins and you can even save your results into a 'Smart Bin' for future use!
There are two simple ways to import video into Sony Vegas:
- File>Import…>Media…
- Click the Import Icon (next to the lighting icon)
Once you have imported your video clip, you can right click it and select Properties… to view its properties. You will also get a snapshot of it at the lower end of the Project Media Window, as shown in the above image.
How to Import media files into Pinnacle Studio?
Step 1: Launch the Pinnacle Studio Program
By default, there should be a shortcut on the desktop. Double clicking on the shortcut will launch the program. On a Windows based system, another way is by clicking the Start button and looking for the application under the Pinnacle folder. Click on Studio or a similarly named application to launch the program.
Step 2: Start a New Movie Project
After launching the program, a window will appear which will ask you whether you want to open an existing project or create a new one. Name the project and save it.
Step 3: Import the Video Using the Capture Tab
Once the program has launched successfully, you should be able to see three tabs on the top left corner of the screen. Click the Capture Tab. A window should open, which will give you options on what type of content can be captured. The options include: Videotape or Video Source, Data Disc or Memory Card and Video DVD. Select the option which fits the type of source.
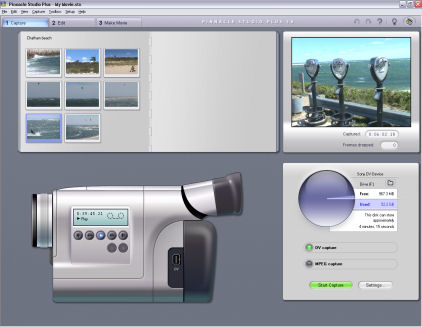
When the Videotape or Video Source option is selected, it opens the Capture screen. A video camera icon on the lower left acts as a player which is able to control the video camera. On the right side is a window which displays the amount of free space available on the drive selected and the type of capture. Capture options include DV and MPEG. Choose MPEG to save space. Select Start Capture. A new window will open, which will allow you to name the clip, change the destination drive, and decide when the capture should stop. Click Start Capture to start and Stop Capture to manually stop the process.
With selecting the Data Disc or Memory Card option, a new window will open. This will show the files saved on the card or disc. Select the files you need to import. Rename files or change the destination directory as needed. Click the Import button to start saving the process. This process works for both video cameras and still cameras which use memory cards or data discs.
Another option is by clicking the Video DVD option. It will open a window, which will allow you to select the file in the DVD disc and change the destination directory. Press the Import button to start the process. Repeat the process and click the Capture button whenever you need to import additional video clips.
Step 4: Start Editing and Save
Once the video clips have been imported and saved onto the computer's hard drive, then you can start editing. Remember to save before closing the program, and you are on your way to making your first video.
How to Import video into CyberLink PowerDirector?
- Open whichever version of the CyberLink PowerDirector software you have installed on your computer. A shortcut icon for CyberLink PowerDirector will be in the "Programs" folder that you can access through your "Start" menu.
- Click on the yellow "Import" button toward the top center portion of the main CyberLink PowerDirector software window.
- Select "Import Media File(s)." This will open a new "Open" dialog box on-screen.
- Point the "Open" dialog box to the place on your hard drive where the video clip(s) you want to import into CyberLink PowerDirector are held. Once you have done that, click on the icon of a video clip one time to select it.
- Click "Open." That video file will now be imported into CyberLink PowerDirector.
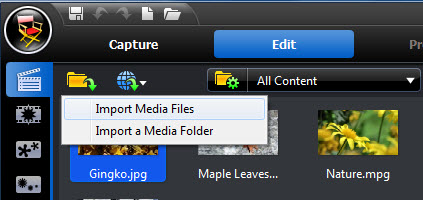
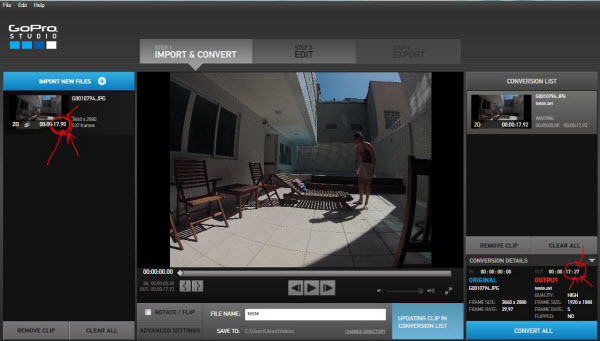
How to Import video into GoPro Studio?
- If you files you want to add are not yet in the Media Bin, follow these instructions:
- Click on the Media button in the Media Bin. This will open a window that allows you to browse for the video files that you want to import.
- Locate and select the files that you want to use in your project. Click Open.
- The video files should now be added to your Media Bin.
- Drag the files from the Media Bin to your Storyboard.
Important Note: Keep in mind to choose compatible video clips for adding to the timeline when you are using above methods. Read the supported format to use the editors FCP, iMovie, Avid Media Composer, Premiere Pro, FCE, Apple Aperture, Adobe After Effects, DaVinci Resolve, Windows Movie Maker, Sony Vegas, Pinnacle Studio, CyberLink PowerDirector, GoPro Studio, etc.. first.
That means if you want to load incompatible video formats including AVCHD .MTS, MXF, XDCAM, 4K XAVC-S, XAVC-L, H.265, MPG, MKV, MP4, MOV or VOB, etc. into these non-linear editing software, you'd better transcode them to an editable format first.
Solution to Convert unsupported video format to compatible format for editing
To achieve the goal, iFastime Video Converter Ultimate for Mac and iFastime Video Converter Ultimate are here you can use. With it, users can effortlessly encode unsupported videos to FCP, iMovie, FCE, Avid Media Composer, Premiere Pro friendly codec like Apple ProRes, AIC, DNxHD, MPEG-2, etc.. In addition, it has superb fast conversion speed and provides loss-less output video quality.
Main features:
- 1 click to convert your unsupported videos for editing on PC or Mac.
- Convert all popular formats: Complete support for more than 200+ different, popular formats.
- Custom Video: Personalize videos with diversified video editing tools.
- Optimized Presets: Allows you to optimize the output the way you want
- Extract Audio: Extract audio from video to MP3, MKV, M4V, WAV, etc.
Now download the software and follow the guide below to start conversion.
Free Download iFastime Video Converter Ultimate for Mac:
Tutorial: Open unsupported videos in FCP, iMovie, FCE, Avid Media Composer, Premiere Pro, etc. timeline
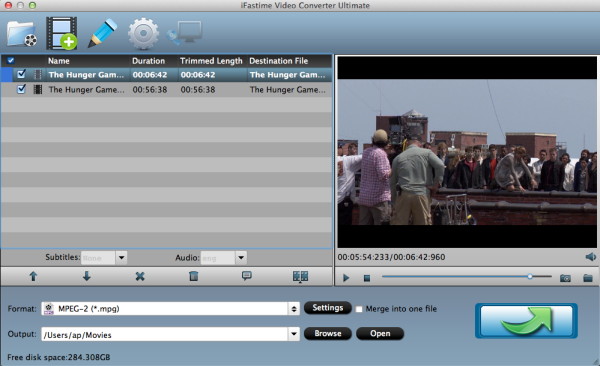
Step 1: Load unsupported video files
Run the best video Converter on computer and click "Add video" button to load them for conversion. You can check the "Merge into one" box to join several files together.
Note: For adding camcorder videos, you need to connect camcorder to computer and then copy the content from your camcorder to the PC/Mac before conversion.
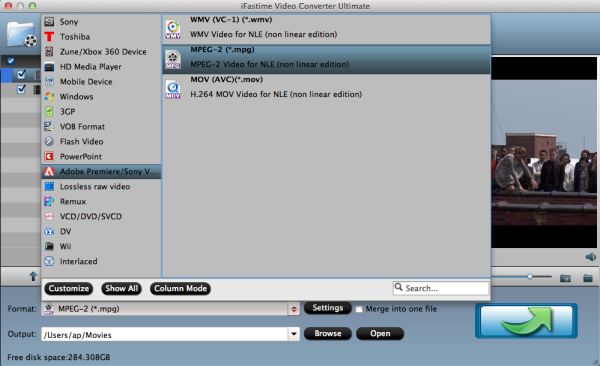
Step 2: Choose a format for FCP, iMoive, FCE, Avid Media Composer, Premiere Pro, etc.
Click "Format" drop-down bar to select a proper video format. "iMovie and Final Cut Express > Apple Intermediate Codec(AIC) (*.mov)" is the best compatible video format you need for editing videos in iMovie/FCE. And for Final Cut Pro, Final Cut Pro >> Apple ProRes 422 is optimal. Follow "Avid Media Composer" > "Avid DNxHD(*.mov)" to set DNxhd.mov format for editing in Avid MC. Choose Adobe Premiere/Sony Vegas -> MPEG-2(*.mpg) as output format for editing videos in Adobe Premiere Pro with natively supported video codec, and so on.
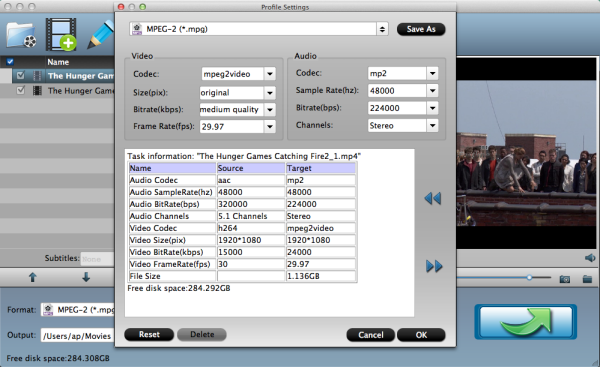
Step 3: Set proper video/ audio parameters
Click the "Settings" button and set proper video/ audio parameters. You can reset set the video size, bitrate and frame rate, audio sample rate, audio channel. If you would like to use default settings, simply skip this step.
Step 4: Start Conversion on PC, Mac
When you finish all settings, click the "Start conversion" button to start the unsupported video to FCP, iMovie, FCE conversion. After the conversion, you can click "Open" button to get the generated files effortlessly.
Now, it's much easier for you to add video files for further editing in Windows or Mac editors: FCP, iMovie, Avid Media Composer, Premiere Pro, FCE, Apple Aperture, Adobe After Effects, DaVinci Resolve, Windows Movie Maker, Sony Vegas, Pinnacle Studio, CyberLink PowerDirector, GoPro Studio, etc., right? Whether you're new or are a seasoned digital video professional just looking to better acquaint yourself with these non-linear editing software, you're sure to enjoy this tutorial. Have a try!
Related Articles:
- Top 10 4K Video Cameras
- Sony RX100 Vs. Sony A7S Mark II
- How can I use After Effects to edit MP4?
- Compress/Convert 4K to 1080P/720P HD
- How to Get MOV, MKV, WMV, FLV, MP4 into GoPro Studio
Have more questions about how to load video clips to Non-linear editing software (FCP, iMovie, etc.), please feel free to contact us>>
One thought on “How can I load video clips to Non-linear editing software (FCP, iMovie, etc.)”
Leave a Reply
You must be logged in to post a comment.
Categories
Perfectly handle an extensive list of video file types with impressive output quality on Mac OS X.
Price: $45.95
Just what I needed. Thanks.