Use Plex to stream local media to Chromecast/iOS/Android/Apple TV/NAS
Apr 20, 2016 06:31 pm / Posted by Charles Brown
As an amazing media-streaming app, Plex is already available on a wide variety of platforms like Chromecast, Apple TV, NAS device, Android, iOS, etc., it will soon be the easiest way to blast local (and pirated) content from your laptop or elsewhere to watch on the big screen using Plex. In this article we'll show you how to set up Plex on your home network and start streaming over your home network using your PC, Mac, Android/iOS tablet and smartphone, Chromecast, Apple TV and even NAS device.
Part 1. Why Plex media server?
In the market, there are many media servers like Roku, NVIDIA SHIELD, Emby Media Server, Raspberry Pi. Most of them are free. Some are open-sourced.
Take Chromecast as an example. Since we need a media server and a web app that supports Chromecast, the choice actually is very limited. Based on the apps listed on the official Chromecast apps page, the possible free solution is only Plex. Of course, if you check Play store, you can find some decent free apps that support local media streaming to Chromecast, e.g., BubbleUPnP.
But there are two problems in using these apps to stream local contents to Chromecast:
- You still need a local media server.
- The video format is limited by Chromecast supported media, for example, all RMVB files, most mkv files, some AVI files cannot be casted with these apps unless the media server also transcodes for the media.
With Plex, the free Plex media server and the free web app (for PC) will solve both problems. Please note, Plex web app for PC is free, but the app for Android is not free. Anyway, as we intend to stream local media to Chromecast, it is not necessary to use Android app.
Part 2. Plex Transcoding and how it differs from a DLNA media server
Plex is actually a combination of two things: a server where all of your media sits and a client, which you use to access your data. The server is completely free and is also DLNA compliant, which means that any DLNA device (TV, smartphone, games console, etc) can connect to it and start streaming content. Plex works and acts like any DLNA server you may already have, such as the one built into your NAS.
However, it's the client that makes it act differently. When the client connects to the server it can describe which video formats it can play. If the video that you're requesting isn't a supported format the Plex server can take the file and re-encode it live into a format that the client understands. The combination of the Plex server and client means that any file can play on any device without first having to re-encode them manually.
This isn't that useful when considering just mobiles and tablets. Both types of devices are fast enough to play Full HD videos and it's easy enough to get apps that will play practically any video format. However, transcoding is extremely important when using Chromecast or Apple TV as both devices have extremely limited video format support.
To use these devices with a media server you need a compatible app to access the content, which you then Cast to Chromecast or AirPlay to Apple TV. In both cases, the Chromecast or Apple TV takes over the stream, connects to the original content and starts playing it. But if the video is not a supported format you won't see anything on your TV, regardless of whether your phone or tablet can play the content. One solution is to convert all of your videos into a compatible format, but this can be time consuming, particularly if you've got a large media collection.
With Plex it's different and easier. Your phone or tablet talks to the Plex server and requests the video in a format that's viewable by the Chromecast or Apple TV, so when you Cast or AirPlay it everything works seamlessly. It's this convenience that makes Plex a lot different to the bog-standard DLNA media server your may already have.
Part 3. How to set Plex server for using
1. Installing the Plex Server
Installing the Plex Server differs depending on whether you're using a NAS or a desktop computer/laptop, but we'll take you through all of the methods and the relative benefits of using each type of server. Once the server is installed configuring it is the same regardless of the type of server that you install, so we'll show you configuration in the next section.
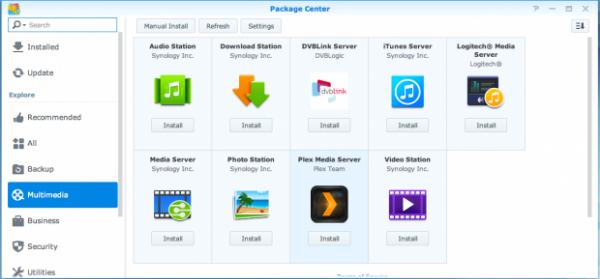
2. Install Plex Server on your NAS
Plex Media Server can be installed on some NAS devices, including models from Netgear, Qnap and Synology but support is limited (a full list of NAS devices that support Plex check out the Plex NAS Compatibility Google Doc). Installation varies from device-to-device, but Synology has one of the easiest installation routines, with Plex available from the Package Manager - if you're having any trouble installing the Plex Server on your NAS you should consult the Plex forums for assistance with your particular model.
NAS devices traditionally don't have very powerful processors, so they're not all capable of transcoding video. Synology has the best overall support, with the DS214play and DS415play, which can transcode video up to 1080p; some other NAS models can transcode video up to 720p; the cheaper models can't transcode at all. You can see Synology NAS transcoding support for more information. Once the server's installed on a NAS, the configuration process is the same as for any other server and is done through your web browser.
3. Install Plex Server on your PC or Mac
You can either run the Plex server on your main desktop computer or laptop or use an old or unused one. If opting for the latter you'll need to make sure it is fast enough. The minimum system requirement for Plex varies depending on whether you need transcoding or not. Transcoding is the process of taking a file and making it playable on another device – either in another format or at a different resolution. Taking a full HD file and playing it on a smartphone, for example, will require transcoding in most cases.
Transcoding requires a bit of oomph. Plex recommends an Intel Core 2 Duo processor 2.4GHz or better, at last 2GB of memory and Windows XP or Max OSX Snow Leopard 10.6.3 (64-bit) or later. If you don't need transcoding you can cut down the processor speed to 1.6GHz and halve the RAM, but you might get some stuttering and other issues when attempting to play videos.
After your free Plex Media Server download, you can install the software on Mac OS X, Windows, Linux. Installation on all three operating systems is straight-forward, just follow the simple instructions. If you're prompted to create a Plex account, do so, as it's essential that you have this if you want to use Chromecast.
4. Configure the Plex Server
Plex is a little more complicated than other media servers, as it's that little bit more intelligent. Getting all of your videos set up, the server ready for transcoding and a few other little tweaks will make the experience a lot nicer. We'll take you through everything you need to know.
5. Organize your files
Before you do anything with the server it's important to organize all of your files properly, as Plex is clever in the way that it organizes videos. In the Server you tell Plex which folders contains Movies, TV Shows or Home Videos. If you use either of the first two options Plex will analyse each video file to work out which film or TV show it is, downloading a thumbnail and description to match. If you get your categorization wrong or bundle all of your content together, Plex gets confused and you may end up with your home movies getting strange titles and descriptions.
It's important that you put all Movies, TV Shows and Home Videos into separate folders, with sub-folders for each bit of content. So, if you've got every episode of terrorist-thwarting America fest 24 then they should all be in the TV Shows folder, in one folder called 24, then separated into sub folders by season and then finally given a clear name. So that would be TV/24/Season 06/24 s01e01.mp4.
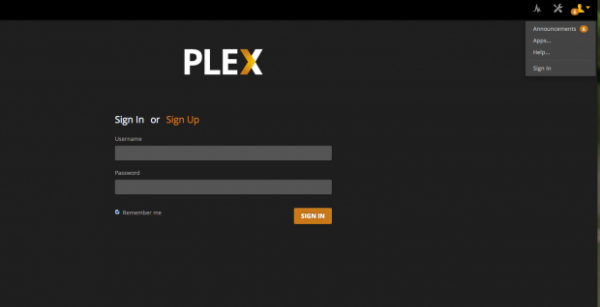
6. Connect to the Plex Server and sign in
Once you've organised your files, you can connect to the Plex Server to configure it. Configuration is all done through the web interface, which you access through a browser. On any computer connected to the same local network as your Plex Server open a web browser and put the address in as http://<ipaddressofyourserver>:32400/web. If you were connecting to your NAS, for example, this may be, http://192.168.0.100:32400/web. If you're trying to access the server from the same computer it's installed on you can use http://127.0.0.1:32400/web, as this is a special IP address that means 'this computer'.
When you connect for the first time you may see a spinning icon and a message telling you that Plex is configuring itself. It will scan the local hard disk for compatible files and attempt to set up an initial media library. It's worth leaving it to do its job to see what it finds. Once done your first job is to sign in to your Plex account. Click the icon of the person and click Sign In. Enter your Plex username or registered email address and password; if you didn't register you can sign-up for a free Plex account.
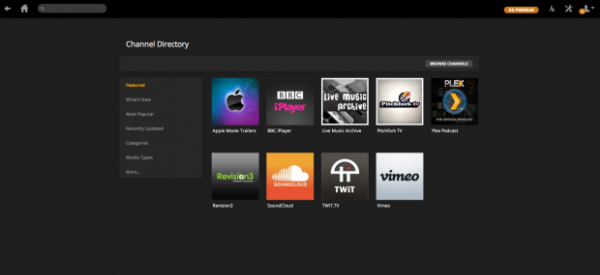
7. Add libraries and channels to the Plex Server
Now you're ready to add your own media to the server. Plex may already have discovered content on your server; for example, on a Mac, it detects the iTunes and iPhotos libraries automatically. It probably won't have found your other media files, but they're easy to add. Click the Home icon (looks like a house). Your own content is organised into Libraries. Click the '+' icon next to other Libraries, then choose the type of content (Movies, TV Shows, Home Videos, Photos and Music), then browse to the folder that contains these files. Note, Plex will scan sub-directories, so you only need to add the master containing folder. Plex will then scan the content, downloading thumbnails and descriptive text, as required.

You can also install Channels, which are external sources of video Plex can then stream this content from the internet to your chosen device. There's a lot of Channels, but in the UK, BBC iPlayer is probably the most interesting one. To browse through the list of options and select the ones you want, click the Home button, the click Channels and click Install Channels (on a Synology NAS click the '+' icon next to channels). You'll get a list of categories, which you can use to browse the content you want to add.
8. Configure transcoding
By default, the Plex Media Server is configured to only transcode content when it has to. This is likely to be the best option in most cases. However, if you're not getting the results you want, or your computer's making a noise like it's about to take off, you can adjust things. Click on Settings, Server, Transcoder. Here you can choose to prefer 'Higher speed encoding' (worse quality, but faster), 'Higher quality encoding' (high quality, but more strain on the CPU), or to max everything out and 'Make my CPU hurt'.
![]()
9. Streaming from Plex
With the server set up, you're ready to start streaming media. Your Plex Server is DLNA compliant so any media streamer will be able to see it and play media from it. However, the interface isn't as nice and transcoding isn't supported. For the full experience you need to use a Plex app. For desktop these are free with Plex Home Theatre for Windows and OS X and the Windows 8.1 Plex App. For mobile devices you have to pay for the client, but there's support for most platforms, with Plex for iPhone and iPad (£2.99), Plex for Android (£2.92) and Plex for Windows Phone 8 (£3.49). There are also apps for connected devices, such as Plex for Roku and Plex for Samsung TV.
With all of these devices, as long as you're on the same network as your server, you just open up the Plex client and it will detect the server automatically letting you play all of your content. If you want to use Plex with Chromecast or Apple TV the instructions vary be device, but we'll take you through each one.
10. Streaming from Plex to Chromecast
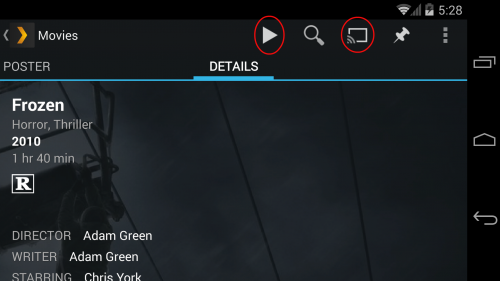
In order to use Plex with Chromecast you can use mobile apps, which you have to pay for, or a computer, which is free. For mobile, you can use the iOS or Android apps (the Windows Phone app currently doesn't support it). Just open up the app, browse to the content you want to play, then tap the Cast button (like a TV with a wireless signal). You can then choose the Chromecast that you want to send the content to.
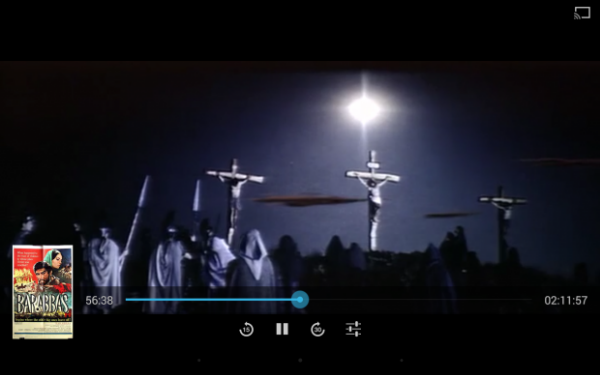
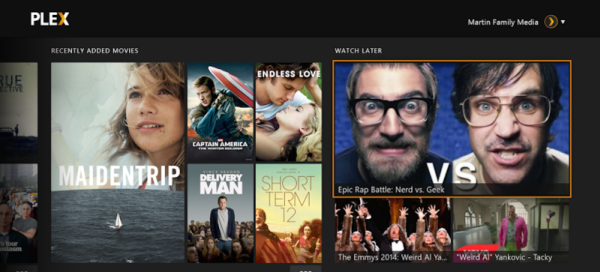
The grab above shows Plex playing a video on Android. From here you can tap the button in the top-right corner to send the video to your Chromecast. Once the content's playing on Chromecast you can control playback and use your phone or tablet for other tasks.
If you want to use a computer you can only do it through the web browser, as the desktop apps do not support Chromecast. You'll need to use Chrome and the Google Cast Chrome extension. You'll also need to link your Plex Media Server to a Plex account. This will allow you to remotely access Plex via Chromecast. On either the computer running the Plex Server or any other computer on your home network go to https://plex.tv/web and login to your Plex account.
Plex will now be able to see your Chromecast, allowing you to watch anything on Plex. Select what you want to watch or listen to and click on the Chromecast icon in the top right corner. Select your Chromecast and the content will start playing on your TV. If you have any problems check out Plex's own Chromecast support pages. When playing through Chromecast your device becomes a remote control
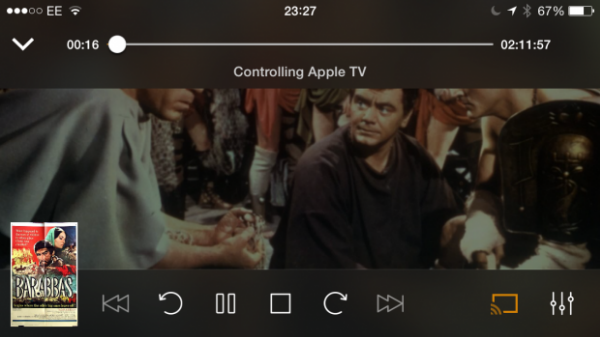
11. Plex and Apple TV
Watching Plex on Apple TV requires the Plex iOS app, as the Android, Windows Phone 8 and desktop apps do not support transmitting via AirPlay. Once installed on your iOS device open the app, connect to your Plex Media Server and find what you want to watch. Hit the Cast/AirPlay button (the TV with the wireless signal) and select your Apple TV. Plex will then fetch the file from the Media Server and send it through to the Apple TV, letting you use your iOS device as a remote control. You can also use your tablet or phone normally without interrupting the stream.
Part 4. The software tools you may need
Once you get your Plex server installed and set, you can begin transferring movies to your media server. First, remember that your Chromecast/NAS/Apple TV only plays certain types of media files, so the files you transfer must be playable.
The easiest way to convert your movies perferred format by your devices before streaming. For most users, Handbrake is a free open-source front-end to libavcodec, the leading audio/video codec library.
Libavcodec, in turn is part of the FFmpeg project, a complete, cross-platform solution to record, convert and stream audio and video. FFmpeg is a tool best used by video-professionals. Handbrake, which is available for Linux, Mac, and Windows, gives you access to some of FFmpeg's power but it's much more suited for use by people who just want to easily and quickly convert videos for watching from Plex.
Specifically, Handbrake can import most video formats and transform them into the MP4 and MKV (Matroska video format) containers. Most, but not all media servers and extenders support MP4. Fewer still support MKV.
Handbrake does not, however, include software to decrypt the video and audio on a Blu-ray, DVD into a format it can then translate into a format you can stream. For that you'll need another program, like iFastime Video Converter Ultimate- an best all-in-one video converter for Plex to convert any SD, HD or 4K video in MP4 MOV AVI FLV MKV format for storage on Plex so as to playback on iPhone iPad Android device, NAS, Chromecast, Apple TV with 200+ preset profiles provided in 6X faster.
More incredibly, this all-conquering video converter makes it hassle-free to rip any Blu-rays and DVDs including encrypted DVDs for iTunes, QuickTime, iPhone, iPad, Android, Apple TV, etc. bypass all copy protections. The copy feature ensures you 1:1 disc copy to BDMV/Video_ts folder or M2TS/VOB file to protect them from scratches, damages, or loss for backing up with outstanding quality. Refer to the Mac version of Handbrake alternative.
Free Download iFastime Video Converter Ultimate:
Part 5. From Blu-ray/DVD/Video to Plex media server for streaming
Once you have your programs at hand, it's time to start converting.
First, you put the DVD in your computer. If you're trying to convert a Blu-Ray disk, insert Blu-ray into BD drive and make sure you have lots of room, the unencrypted files can take up to 60GBs of space.
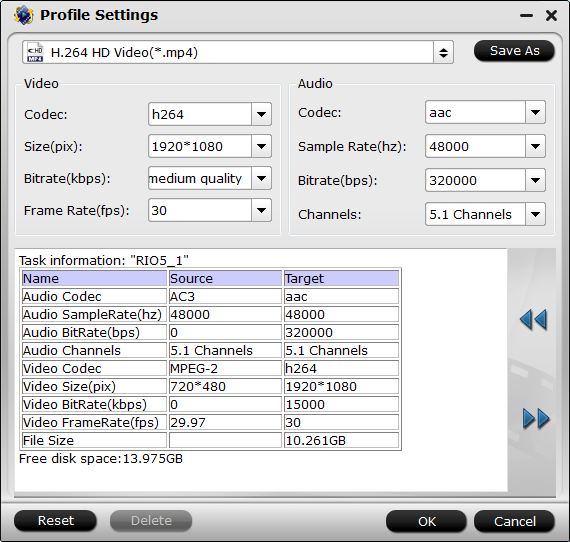
Next, you start up iFastime Video Converter Ultimate and choose what files you'll need to convert to produce a watchable video.
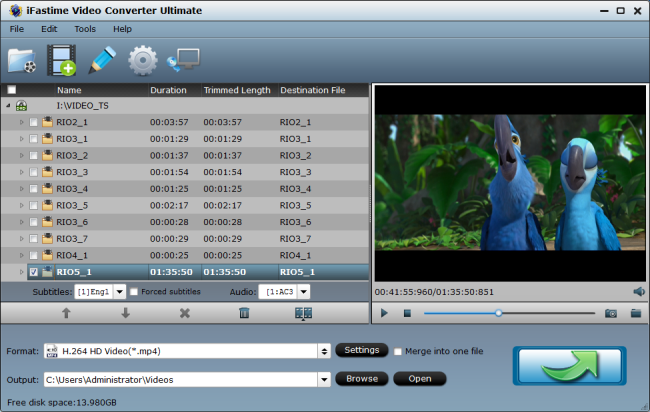
Then, you need to select which format you'll be translating your movie to from its preset menu. Most of its preset outputs are for Apple/iOS/Androie devices. If you don't use any of those, I always choose Common Video or HD Video.
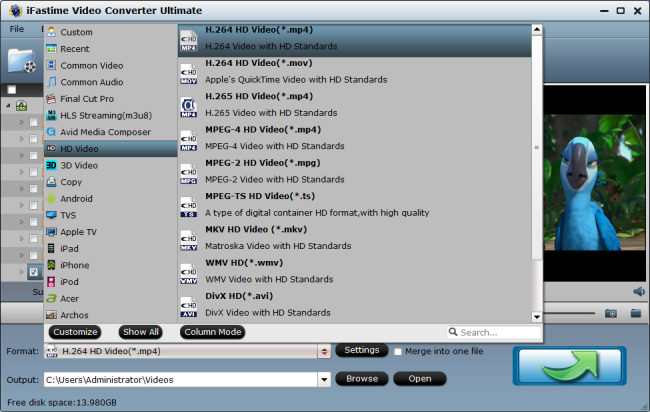
If you're a read video expert, or want to be one, you can manually adjust video/audio codec, bitrate.I've known some people to be tempted to try to make a movie higher definition than its source material. That doesn't work. You can downgrade its quality, from say 4K to 1080p/720p to save space, but you can't make a video better than its source material.
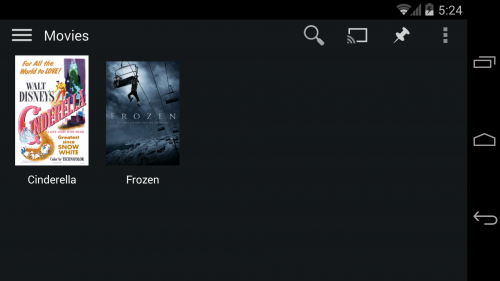
Once the videos are converted you can then add them to your Plex media server's library.
Simply refresh your device's Plex server menu. You should see your converted movie appear in the file list. In either case, place your video library on a very large drive. Video files are big. The average standard definition movie in my library is almost 2GBs in size and my 720p HD movies clock in at abut 7GBs. Even a TB drive starts to look small with these files!
Once loaded into your Plex server, you should be ready to watch your own private movie collection on your whenever you want. Enjoy!
Or click the movie, click Chromecast icon, and press play. (See how to Stream Any Video to Chromecast from mobile devices or computer)
Related Articles:
- Get MP4 to play on Android devices
- Play MKV with DTS on Apple TV 4 via Plex on NAS
- Play 4K UHD on iPad (Air 2/Mini 4/Pro) with iOS 9
- Copy DVD to WD My Cloud NAS Drive for TV Streaming
- Store Blu-ray to NAS for home monitors streaming with 5.1 audio
Have more questions about how to use Plex to stream local media to Chromecast/iOS/Android/Apple TV/NAS, please feel free to contact us>>
Categories
Ultimate media solution to convert all SD, HD, 2K, 4K videos to play, edit, share on Windows 10.
Price: $45.95