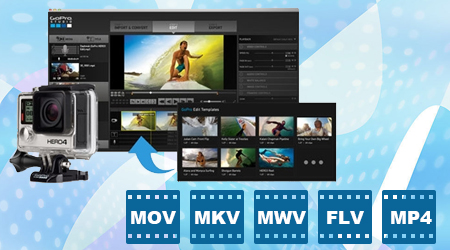
Easy Solve GoPro Studio won’t import videos files on Windows/Mac
When adding MOV, MKV, WMV, FLV, MP4 videos into GoPro Studio, many people just encounter various problems, such as "GoPro Studio won't import videos", "GoPro Studio crashes", "GoPro Studio can't output files", etc. The following content just aims to explain why GoPro Studio doesn't play these movies as well as provide an easy way to get any movies (including MOV from Canon and Nikon DSLRs in Windows 8 and Windows 10, non-GoPro and some MP4, MOV) into GoPro Studio.
About GoPro Studio:
As one of the main products that are provided by the GoPro, GoPro Studio software has made all the things easy to do whether it is importing the GoPro media, playback videos, viewing videos/photos, creating professional quality videos, speeding it up or slowing it down, crop, and making image adjustments (like removing the fisheye lens distortion, or adjusting color or contrast)
About Editing Videos in GoPro Studio:
Before you begin:
- Make sure you've downloaded and installed GoPro Studio for Windows or GoPro Studio for Mac.
- Import videos from GoPro to your computer
1. Import and convert files for the project
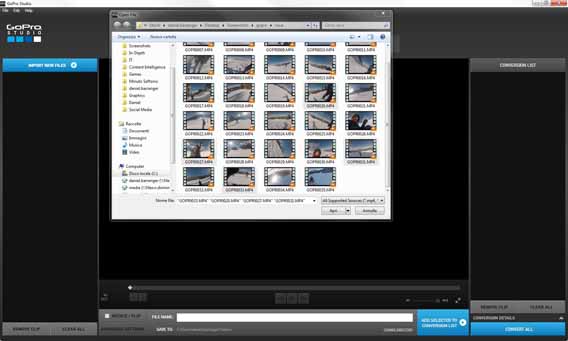
First, you have to import the video files you recorded. To do this, open GoPro Studio and click on the blue Import new files button in the top left corner. Choose the files you want to include and hit Open.
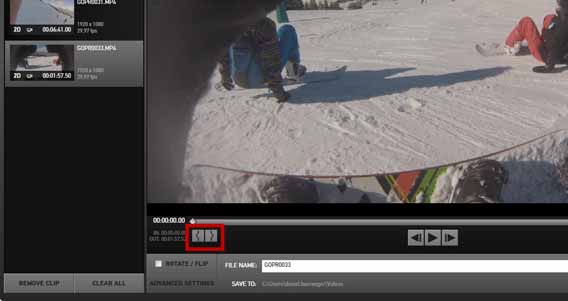
Before you begin assembling the video, you can already start cutting any unnecessary sections that you want to delete. Click on one of the thumbnails in the left column and then on Play, in the bottom center, to start watching the clips.
On the left you'll see two play buttons: you can use these to select sections of the file that you want to keep. The one on the left will determine the beginning of the clip, while the one on the right sets the end of the clip. You can choose several clips for one single movie.
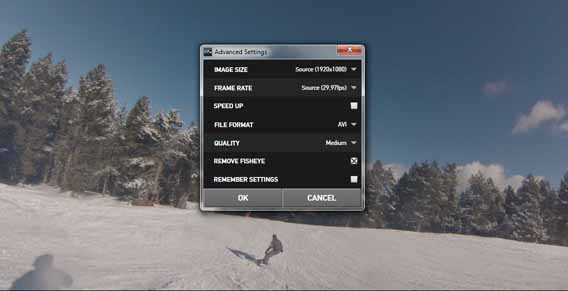
Select segmentsUse the Advanced settings button to change the video settings. You can choose the video size and frames per second, increase the speed of the video, change the format, adjust the quality, or remove the "fish eye" effect typical of GoPro videos. Select the last option, Remember Settings, to make sure that the program will remember the settings you've chosen for the next video you want to edit. Press OK.
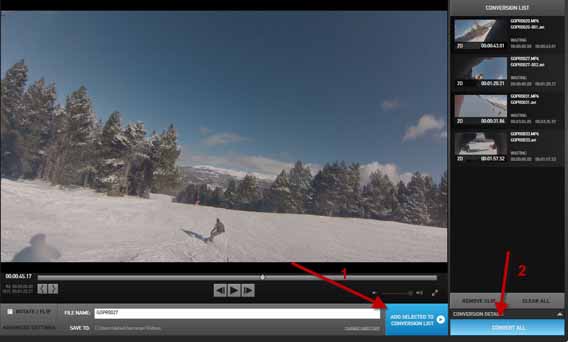
To move the video to the conversion list, click Add Clips to conversion list (1) in the bottom right of the screen. Repeat these steps for all the videos you'd like to add, although you can go back and add more videos during the editing phase by pressing on the Import & Convert tab at the top. When you're done and your video files have been added to the right column, click on Convert to (2) below.
When the videos are ready to be converted, the Proceed to step 2 option will appear at the bottom right of the screen. Click it to move on to the next step.
Step 2. Edit the video
Next, add the video. Select the video you want to import first, and again drag and drop it to the timeline next to the clip you added earlier. In the right column, you can adjust various parameters such as the speed of the video, the duration of the fade, the audio levels, white balance settings, and the frame. At the bottom, there are also presets to give it a vintage or night vision feel.
Step 3. Export video
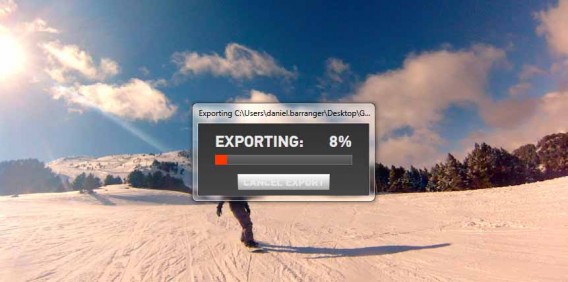
When you've finished editing the video, all you have to do is export it by clicking on the Export tab. Next, a window will open, where you can choose which video format you want to export it to. There are lots of video types, each suitable for different needs and devices.
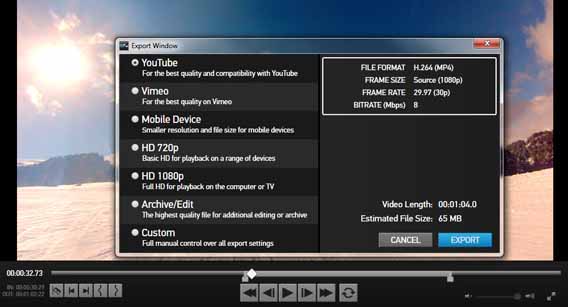
If, for example, you want to upload it on to YouTube, you have to choose the first option. If you want to see it on your computer or project it onto your TV at home, you need to select 1080p HD . Through the Custom option, you can set the parameters that you want. Once you've decided on them, hit Export.
Tips: If you files you want to add are not yet in the Media Bin, follow these instructions:
- Click on the Media button in the Media Bin. This will open a window that allows you to browse for the video files that you want to import.
- Locate and select the files that you want to use in your project. Click Open.
- The video files should now be added to your Media Bin.
- Drag the files from the Media Bin to your Storyboard.
About Formats:
Before editing any videos in GoPro Studio, you may ask "What Type of Media Files Can I Add to a GoPro Studio Project?"
According to GoPro Studio support website, GoPro Studio has strict requirements of video formats, it only supports
Step 1: Import & Convert
The following formats can be imported into "Step 1: Import & Convert" and converted into GoPro CineForm files for use in "Step 2: Edit".
- MP4 video files from the original HD Hero Original, HD Hero 2, HERO3, and HERO3+.
- MOV video files from Canon and Nikon DSLRs (except in Windows 8)
- JPG files from GoPro HD Hero, Hero 2 and Hero 3 cameras (.jpgs from other sources may work, but have not been tested nor are they officially supported)
- Video formats: GoPro CineForm AVI or MOV files (MOV only on Mac)
- Audio formats: MP3, WAV, AIFF, M4A and CAF
And as we can see, GoPro Studio does not support the video formats mentioned in the title, which are AVI, MKV, WMV, FLV, RM, MPG and some MP4 or MOV videos.
Other limitations:
Below tips will explains why your video file might not be importing properly into GoPro Studio.
Make sure that you are not trying to import the footage directly from an SD card. First copy the files to a folder on your computer.
- Make sure that you have the latest version of Quicktime installed.
- Next, make sure that there are no non-English characters in the name of the the file being imported, or the folder path where the file is saved.
- Do not rename the file(s) prior to importing into GoPro Studio.
- Make sure that you are trying to import the file into the correct "Room". GoPro Studio will not allow you to import the wrong file type into the wrong Room.
- All files, including MP4 files generated by GoPro cameras, should only be imported into the Step 1: Import Room.
- Files which have already been converted into GoPro Cineform AVI or MOV files, should only be imported into the Step 2: Edit Room.
- If you have confirmed that you are trying to import your files into the correct room, try playing the files with QuickTime Player or Windows Media Player to confirm that the files are not damaged.
- If your MP4 files still don't import into the Step 1: IMPORT Room, make sure that they were not processed through some other application or import method, like iPhoto or iMovie. Files processed through iPhoto or iMovie are modified by those applications to the point where GoPro Studio doesn't recognize them as GoPro camera footage. In this case copy the files directly from the SD card to your computer and then import into GoPro Studio.
- If your files are stored on an external drive, try copying your files to an internal drive and then import into Studio.
- Try creating a new project and then import.
This is why we always have GoPro Studio issues while editing or converting GoPro footage : won't import videos, crashes, can't output files... Then how to edit those incompatible videos in GoPro Studio?
To solve this dilemma, you need to take a little up front time and set up a workflow that will convert your video into a more editing-friendly format, such a GoPro Studio's MP4 or MOV. iFastime Video Converter Ultimate is the solid tool to help users make the Video to GoPro Studio transcoding on Windows PC (Windows 10 included).
This program features high efficiency and seamless conversion. With it, you can transcode AVI, MKV, WMV, FLV, RM, MPG and some MP4 or MOV video to GoPro Studio compatible MP4 or MOV format. Besides, its also exports advanced encoders like AVI, MOV, MPEG-2, DNxHD, etc. allowing you to convert video to seamlessly fit Adobe Premiere, Avid Media Composer, Windows Movie Maker, Pinnacle Studio, PowerDirector, etc. If you're editing Videos in GoPro Studio on Mac, try iFastime Video Converter Ultimate for Mac. If not, download it from below:
Free Download or Purchase iFastime Video Converter Ultimate:
How to convert and import videos to GoPro Studio
Step 1. Add videos
Install and run the Video to GoPro Studio Converter on your computer, then click "Add Video" button to browse and load your rvideos which you've transferred to your Windows PC.
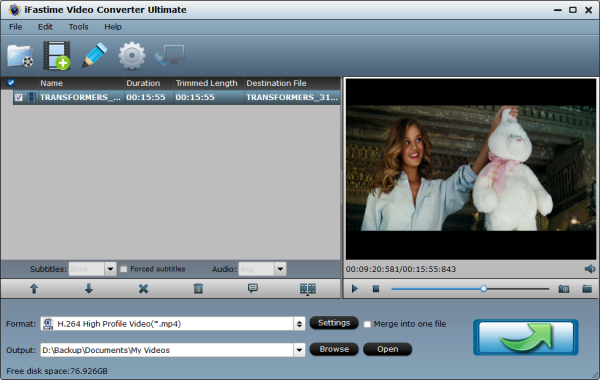
Note: Batch conversion is supported, so you can load more than one file to save time. You can also combine all the files together with this software.
Step 2. Select GoPro Studio friendly format
Click Format bar and choose your desired format. To add videos to GoPro Studio, you can choose to .mp4, .mov, etc compressed format from "Common Video" or "HD video" as the target format.
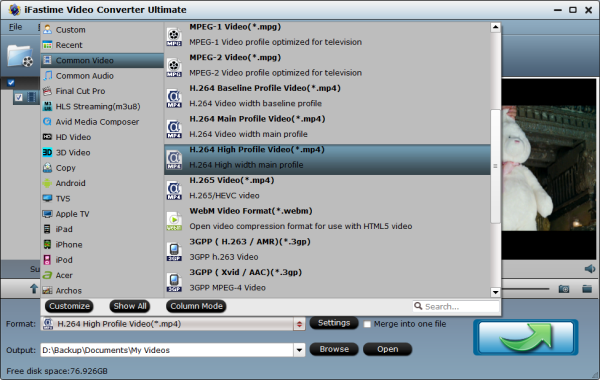
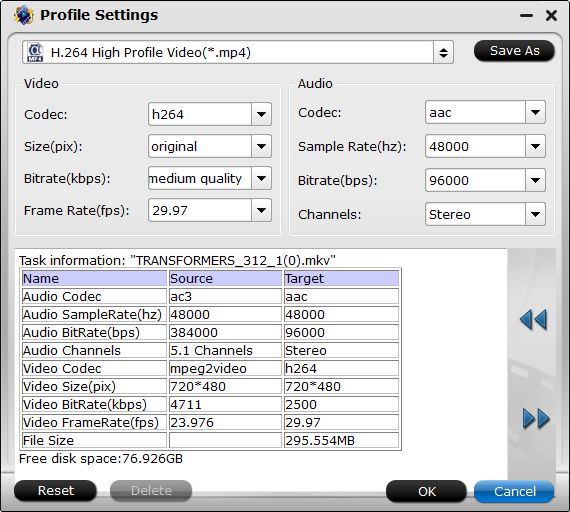
Tip: You can click the "Settings" button and customize proper video/audio parameters including Video size, bitrate and fame rate and mroe. Usually 1920*1080 video size and 30fps video frame rate are recommended for GoPro Studio editing.
Step 3. Start converting video to GoPro Studio
After all necessary settings, hit the "Start conversion" button to start the video to GoPro Studio conversion. Once the conversion process shows in 100%, click "Open" to get the output videos. Create a project and start editing your Videos in GoPro Studio with light speed. Nothing could be simpler or more immediate.
Video Tutorial -How to Get MOV, MKV, WMV, FLV, MP4 into GoPro Studio
Have more questions about how to solve GoPro Studio won't import videos files on Windows/Mac, please feel free to contact us>>
Related Articles
One thought on “Easy Solve GoPro Studio won’t import videos files on Windows/Mac”
Leave a Reply
You must be logged in to post a comment.
Ultimate media solution to convert all SD, HD, 2K, 4K videos to play, edit, share on Windows 10.
Price: $45.95
Thanks!! I definitely enjoying every little bit of it I have you bookmarked to check out new stuff you post…