Move files from computer to Nabi/Hudl/InnoTab/LeapFrog/Kindle, etc.
Mar 24, 2016 06:43 pm / Posted by Charles Brown
Kids Tablets allow you to host many file types in its storage space. You want to make sure the files are in the right format, then you are able to move them from your computer to your Nabi/Hudl/InnoTab/LeapFrog/Kindle for viewing on the move instead of purchasing media contents extra online. Here are some tips on how to put films and TV shows onto Kids Tablets from PC/Mac.
Part I. Prepare files for Kids Tablet
1. For the files are stored in the right format:
Directly copying media files to Nabi/Hudl/InnoTab/LeapFrog/Kindle, etc. from PC/Mac is a way to go.
2. For the files are stored in the wrong format:
You can use a program or utility on your computer to convert the files on your desktop or laptop computer to a Kids tablet compatible format for using on Nabi/Hudl/InnoTab/LeapFrog/Kind Tablet.
a. For example, not every video files can be played on Kids Tablet, such as some widely used MKV (downloaded from Internet or some raw Blu-ray rips in MKV) in AC3 audio and DTS Dolby, WMV files playback on Windows media player, FLV video downloaded from video sharing sites, like YouTube, etc. All of them are not compatible with Kids Tablet. Also, the HD/4K video files might not able to be played smoothly on Kids tablets or they are too large in size to be stored in.
Luckily, here is why the cutting-edge Kids Tablet video converter, iFastime Video Converter Ultimate comes. It breathes new life into your gadget by converting any videos, including .mkv, .mts, .vob, .wmv, .flv, .mpg, .tivo and audio files like FLAC, WMA, M4A, OGG, AC3 to Kids Tablet playable format like MPEG4, H.263, H.264, DivX, MP3, AAC, etc. without video quality loss in a fast processing speed while other regular video converters make you sacrifice video quality during the conversion process and may get stuck halfway, saving you all the video compatibility issues as well as money.
It's no need to worry about the file size and memory because this converter supports compressing HD/4K videossuch as H.265/HEVC, AVI, MOV into SD MP4 and parameters are adjustable for you to optimize video size and quality. Besides, adding ideal subtitles, cutting unwanted areas of a movie or trimming a segment are additional features. All of these can be achieved in few clicks. With intuitive and simple interface, it is surprisingly easy to operate even for novice users.
b. For so many file you can open in Microsoft Office can be saved in one of the formats that Kids Tablet can display; just use the Save As command and select the proper format. The same process can be used to convert photos or drawings to JPG format, using a graphics program such as Adobe Photoshop, Adobe Photoshop Elements, or a Macintosh image editor.
When you process an image for Kids Tablet, consider resizing it. Set the image to about 4 x 6 inches. The resolution can be set at 72 or 96 dpi. Choose Save As, select JPG, and type a new name. That way you don't lose the original larger, higher-resolution file.
Part II. How to move/transfer supported media files to Kids Tablet
Question: How do I move photos, videos, and other media onto my Nabi tablet from a memory card?
Answer:
Method 1. Sync videos, music, photos to Nabi Tablet from PC with nabi Sync
nabi Sync is currently available to download on personal computers running Windows XP with Service Pack 3, Windows Vista, Windows 7 and Windows 8, and Mac computers running OS X Lion or higher.
First, download and install the nabi Sync on your PC.
Then, open the application. You will see the Welcome screen when you launch nabi Sync for the first time. Click Start Now to get started.
Tip: Before you can sync your files, you will need to pair nabi with your PC. To pair Nabi Tablet with your PC, tap the nabi Sync app on nabi, located in Mommy/Daddy Mode, and make sure nabi and your computer are connected to the same Wi-Fi network.
Next, select the files on your computer that you want to sync with Nabi and click Sync.
Finally, your Nabi videos, photos and music will be transferred to your computer, and the content you selected on your computer will be transferred to Nabi. It's that easy!
Method 2. Transfer files to Nabi from Windows PC with a Micro USB cable:
1. Plug the Micro USB cable from your computer to Nabi.
2. A dialog box should appear asking you what you want to do with the new hardware. Select Open Device to View Files. If the box does not show up, you can go to Start Menu > My Computer and double click Removable Disk "No Name."
3. Next, look for a "Music," "Movies" or "Photos" folder, or create your own to organize the files you are saving on Nabi. Select the files you would like to transfer from your computer by dragging and dropping them into the folder.
4. Once all files have been transferred, safely remove your device: Click Safely Remove Hardware on the bottom right side of your computer screen, then click USB Mass Storage > Stop.
5. Open the files by going to the Music or Gallery app on your Nabi.
PS: What types of files can sync with nabi Sync?
nabi Sync is compatible with the following file formats:
- Video: H.263 - 3GPP (.3gp), MPEG-4 (.mp4), H.264 AVC - 3GPP (.3gp), MPEG-4 (.mp4), MPEG-4 SP - 3GPP (.3gp), WVM (.wvm), AVI (.avi), AAC (.3gp) (.m4v) (.mp4)
- Audio: MP3 (.mp3), AAC (.m4a) (.mp4a) (.aac) (.3gp) (.m4v) (.mp4)
- Image: JPEG (.jpg) (.jpeg), GIF (.gif), PNG (.png), BMP (.bmp)
Question: Firstly have to say the Hudl Tablet is fantastic....absolutely love it. It's one of the best kid's tablet. I've been trying to transfer some media files to Hudl like videos and photos from Windows PC for my son. Which will be the easiest way?
Answer:
You can transfer files from your PC to your tablet via the USB connection. First of all, you'll need to connect the device to your computer using the USB cable included in the Hudl box.
Connecting to PC
1. Ensure the Hudl and PC are turned on.
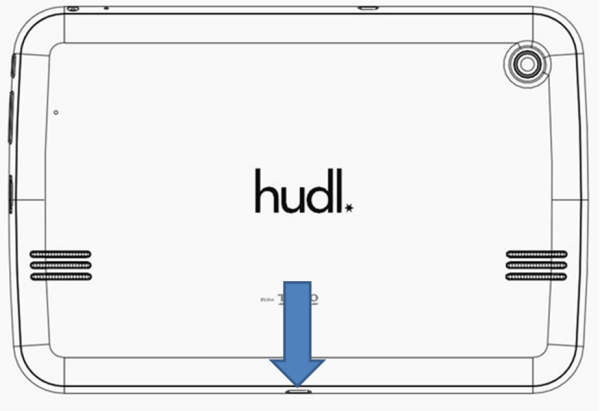
2. Connect the PC and Hudl using the USB cable. Plug the Micro-USB end of the cable into the Power socket on the Hudl.
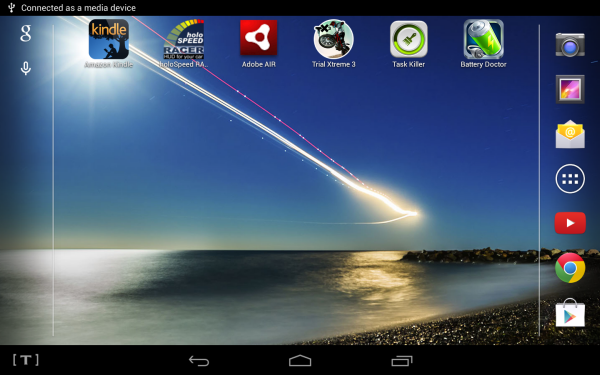
3. Once connected, a notification will appear on the Notification bar at the top left corner of the Hudl stating "Connected as media device".
Transferring Files
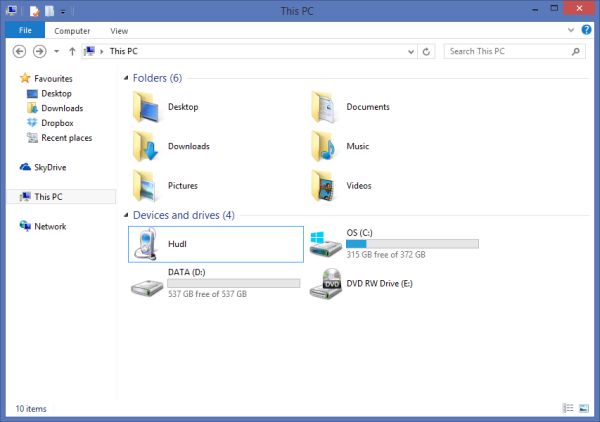
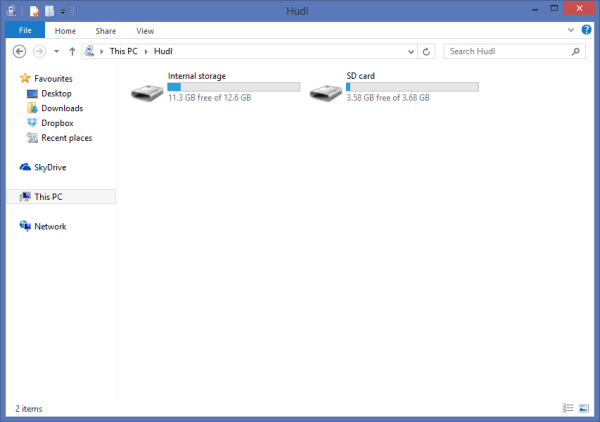
1. On your PC, open "My Computer" or "Windows Explorer". The Hudl will be listed as a "Removable Device".
2. Double click on "Internal Storage" to open the Hudl's main data storage drive. If you have a SD card mounted to the device, this will also be displayed as a drive which you can explore.
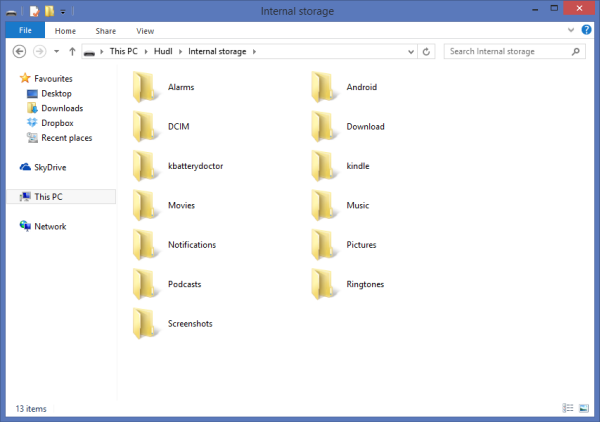
3. "Internal Storage" will display a group of folders. Some of these folders will hold media files such as Movies, Pictures, Music and Podcasts to which you may want to move appropriate files. DCIM holds pictures taken using the Hudl's integrated digital camera.
4. In a new window, open the folder containing the files you wish to transfer over to the Hudl. You will then be able to drag and drop the files over to the relevant folder in the Hudl. You will then be able to play the transferred media files when the Hudl is disconnected from the PC. (Note: You can also transfer files from the Hudl onto the PC in the same way.)
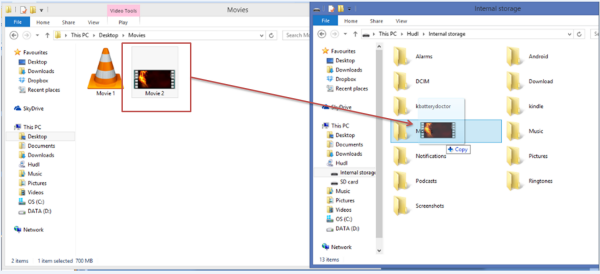
You can also drag files in the opposite direction to copy files and folders stored on the Hudl or mounted SD card back onto the computer.
PS: How to see media contens on Hudl?
1. How to watch movies on your Hudl?
Select the 'Gallery' App from the Home Screen.
Select the Movies folder.
Swipe left or right to view the titles.
Tap on the play button to start viewing the movie.
2. How do you listen to music on your Hudl?
If you want to listen to music that you have saved onto your tablet:
Tap 'All applications' and go to the 'Play Music' App.
Select the 'My Library'.
Choose to browse your music by either Genre, Artist, Album or song.
Alternatively, tap on the magnifying glass icon at the top of the screen to search.
Tap on the music you want to hear, then tap play.
3. How to view pictures on your Hudl?
If you want to view pictures you have saved onto your tablet, or ones that you have taken with the built-in camera:
Select the 'Gallery' App from the Home Screen.
Select the desired folder.
Swipe left or right to view the pictures in that album.
Tap on the picture to view a larger image.
Note: Tesco Hudl(or Hudl 2) Tablet is not compatible with all formats of media files. If a file is not compatible with the device, then it won't play after being transferred. Below is a list of file formats that are compatible with the Hudl:
Music: MP3, WAV, APE, OGG and FLAC.
Video: AVI, MP4, MKV, MOV and FLV.
Image: JPG, BMP, GIF and PNG.
Question: I have just got myself a InnoTab 3S, and presumably due to issues with my computer i can not transfer files between the two via cable, how can I move files between my InnoTab and my computer?
Answer:
You can transfer your own pictures, movies and MP3 songs from your computer to your InnoTab MAX. However, the InnoTab MAX will not be detected by some computer operating systems. For PC users we recommend using a computer with Windows 7 or later. (See InnoTab MAX Manual)
Transferring from a Windows Computer
Connect the InnoTabMAX to your computer using the included USB cable. Use the File Transfer window that pops up on your computer to drag and drop files to their corresponding folders on the InnoTab MAX or an inserted microSD card.
![]()
Earlier generations of Microsoft Windows such as Windows XP may not detect the tablet. This can be resolved by using third party file transfer software (not included) for Android devices.
Transferring from a Macintosh Computer
Visit the official Android website below to download the Android File Transfer software. Follow the instructions on the website to install the software and transfer files: https://www.android.com/filetransfer/
This is a video showing how to copy a movie file to the Innotab tablet. You do not want to use the LLN application to copy movie files. You should only use the LLN application to copy MP3s. Once you connect the Innotab, you need to copy the movie files to the "LLN\MOVIE" directory on the drive mapped to the Innotab.
PS: To convert your video content for the InnoTabMAX, use the following recommended settings:
Format: H.264 main profile video and AAC audio in an MP4 file.
Resolution: 1024x578 if source is 16:9. Other resolutions are supported but are not optimal for the device.
Video bitrate: 2000kbps. Other bitrates are supported but are not optimal for the device.
Audio bitrate: 128kbps constant bitrate. Other bitrates are supported but are not optimal for the device.
Maximum file size: 4GB (over 4 hours of play time using the recommended settings).
For Vtech InnoTab 3S (Check out Vtech InnoTab 3S The Wi-Fi Learning Tablet User Manual here)
Recommended resolution: 480x272 if source is 16:9 and 320x240 if source is 4:3. Other resolutions are supported but are not optimal for the device.
Recommended Video bitrate: 600 Kbps. Other bitrates are supported but are not optimal for the device.
Recommended Audio bitrate:96 Kbps. Other bitrates are supported but are not optimal for the device.
Maximum file size: 2GB (over 5 hours of play time using the recommended setup).
Tips: How to convert videos/movies for the VTech Innotab using FFMPEG (SOLVED)
The VTech Innotab is a young children's tablet for learning. When I picked up two of them from the local Target, we installed the six free games but was rather disappointed with the video capabilities listed in the manual:
File Type: AVI
Resolution: 480 x 272
Video Codec: MJPEG
Video Bit rate: 2400kbps
Frame rate: 15fps
Audio Sampling Rate: 22.05kHz
Audio Channel: Mono
Audio Encoder: PCM
MJPEG is a very poor codec as it produces quite large files and tends to be very blocky with any type of motion. After a bit of research, I discovered that the Innotab would accept MPEG4 video but the audio still had to be PCM mono. So the MPEG4 video file specification:
File Type: AVI
Resolution: 480 x 272
Video Codec: MPEG4 with a video tag of "XVID"
Video Bit rate: variable or a maximum of 3000kbps
Frame rate: 29.997fps
Audio Sampling Rate: 22.05kHz
Audio Channel: Mono
Audio Encoder: PCM
I chose to use ffmpeg as it is available on all major platforms. There are a few steps that need to be performed to create a working video:
Convert the video. We use "-1" for the height as we want to keep the aspect of the original video
ffmpeg -i "input.wmv" -r 65535/2733 -vcodec mpeg4 -vtag XVID -q:v 8 -vf "scale=480:-1" -an -y "video_out.mp4"
Extract the audio to mp3 format. This is necessary as the pcm_s16le codec is very finicky on the audio input
ffmpeg -i "input.wmv" -r 65535/2733 -vn -c:a libmp3lame -ar 22050 -ac 1 -ab 128k -y "audio_out.mp3"
Increase the volume (if necessary). Change the "10" if it is too loud or quiet
mp3gain -g 10 "audio_out.mp3"
Convert the mp3 to PCM and combine with the video to produce the avi file
ffmpeg -i "video_out.mp4" -i "audio_out.mp3" -r 65535/2733 -vcodec copy -map 0:0 -c:a pcm_s16le -ar 22050 -ac 1 -map 1:0 -y video_ready_for_innotab.avi
Question: LeapFrog supports the MP4 format natively, so I don't need to convert my movies to a different format before I transfer them to the device. But how to finish the media transferring?
Answer:
1. Transferring photos and videos from Windows Computers
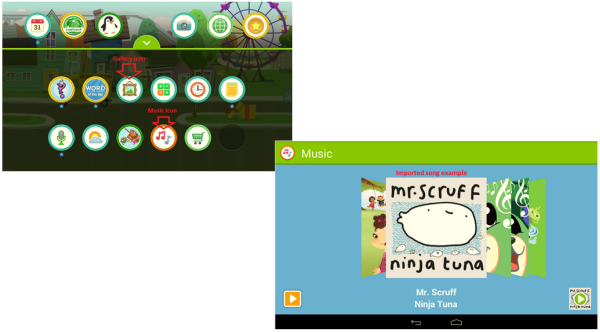
With the LeapFrog Epic tablet connected to your computer, double click the "My Computer" icon on your computer desktop. The LeapFrog Epic tablet will appear as one of your computer's drives. Select desired content from your computer's Music, Pictures, or Videos library and drag the song, photo, or video to the LeapFrog Epic tablet:
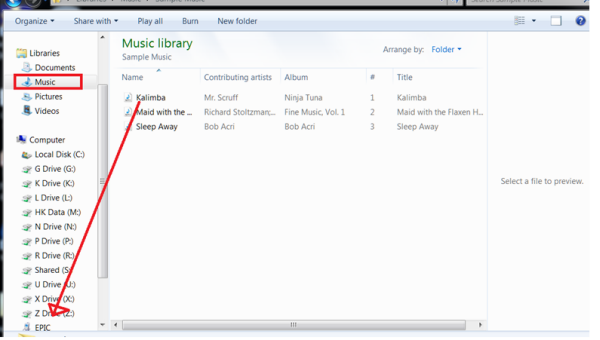
Music dragged from your computer to the LeapFrog Epic tablet will appear in the Music app on the tablet. Photos and videos dragged from the computer to the tablet will appear in the Gallery app on the tablet. Note, videos and music must be in an unencrypted, Android supported format to transfer and play on the tablet.
2. Transferring photos and videos from Mac Computers
To use a Mac computer to manage content on the LeapFrog Epic tablet, download and install on your computer Google's Android File Transfer (AFT) program from https://www.android.com/filetransfer/.
Follow the instructions provided on the download page to install the program.
Once the AFT program is installed on your Mac it should auto launch each time the LeapFrog Epic tablet is connected to your computer.
When your tablet is connected to your computer, the AFT program will show all file folders on the tablet.
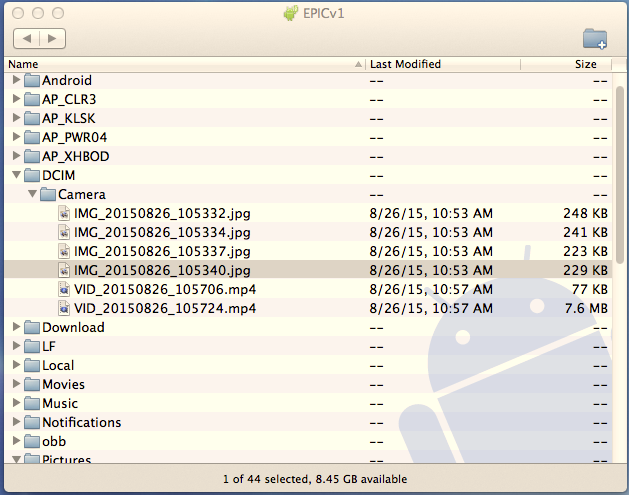
Photos and videos taken with the LeapFrog Epic camera can be easily dragged from the tablet to your computer using the AFT program. Photos and videos on the tablet will be located at DCIM > Camera with photos on .jpg format, and videos in mp4 format:
There are available Youtube tutorials such as the link below which show the process to install the AFT program, then use it to transfer files from an Android tablet to a Mac.
Also learn how to transfer files between LeapFrog Epic tablet and a micro SD card here and transfer files from LeapFrog Epic tablet to a computer in this article.And see how to use Leap Pad Manager.
View LeapFrog Epic's Tech Specs:
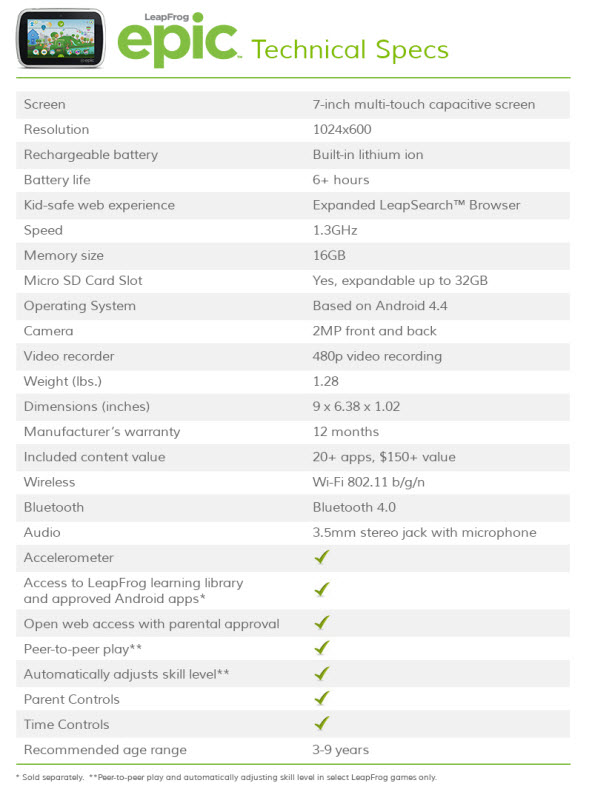
The playable format of LeapFrog Epic has strict requirements:
Video formats: H.263, H.264 AVC, MPEG-4 SP, VP8
Audio formats: MP3, 3GP, MP4, M4A, AAC, WAV, TS, FLAC, OGG, MID, XMF, MXMF, RTTTL, RTX, OTA, IMY.
Image formats: JPG, GIF, PNG, BMP, WEBP.
PS: How to reset the Leappad to factory settings
1. Connect your leapPad to a computer via USB cord
Note: the only way to reset a leapPad is by connecting it to a computer
You should be able to see a LeapPad and computer icon on your LeapPad screen
2. On your computer screen, you LeapPad utility would automaticaly pops up.
3. Click Settings on the far right end of the utility screen.
4. click Reset from the pop up screen. Click OK from the pop up screen and it will take about 10Minutes
5. Click on OK after the process complete its reset then unplug the USB cord and the LepPad will automatically ask you to configure it.
What internet content is available on LeapFrog Epic?
LeapFrog Epic offers 3 tiers of web access to ensure little ones have the best family friendly age appropriate web experience, while giving adults the flexibility of a fully customizable filtering system.
LeapSearch - By default, the LeapSearch web browser offers a kid-safe web content experience with kid-appropriate pieces of content, including videos, images, games and web pages.
Enhanced LeapSearch with Whitelisting - Utilize the parent controls to add access to additional websites or webpages for your child.
Open Browser - Unfiltered web browser. Parents have the ability in parent settings to grant access to a full open internet browser.
Question: Can I transfer a video to my daughter's profile on her Kindle Fire HD7 Kids Edition so she can see it? I have videos that are already ripped and converted for KFHD, I can transfer them to the KFHD Photos folder via USB and play them on my profile. I just can't figure out how to get the videos to show in my daughter's profile. Is this blocked by the Kids Edition software layer or something?
Answer:
Step 1. Connect the Kindle Fire HD to your computer using its USB cable. Avoid plugging the cable into a USB hub whenever possible. Windows installs the appropriate drivers for the Kindle in a few seconds.
Step 2. Press "Windows-X" to open the Power User menu and then click "File Explorer" to launch the File Explorer app.
Step 3. Open the folder that contains the MP4 file you want to transfer to the tablet, select the file and then press "Ctrl-C" to copy it to the clipboard. To select more than one MP4, hold "Ctrl" and click each file until you select all of them. You can select all files and sub-folders in a folder by pressing "Ctrl-A."
Step 4. Open the drive assigned by Windows to your Kindle Fire tablet and then open the "Internal storage\Movies" folder. The drive is usually labeled "Kindle."
Step 5. Press "Ctrl-V" to paste the MP4 file from the clipboard into the Movies folder. The transfer may take a few minutes, depending on the size of the video file.
Step 6. Disconnect the Kindle Fire from your computer after the transfer is complete. Play the video using the Kindle's video player.
Also see how to transfer Music to Kindle here.
Note:Learning for fun? It's not fun that your kids are not allowed to watch some favorite movies on learning Kindle kids tablet. So let's look at Kindle supported file format list below according to Amazon official page:
Kindle Fire Video Formats Supported: MP4, VP8, 3GP, WebM, M4V, 3G2
Kindle Fire Audio Formats Supported: AAC, MP3, MIDI, OGG, WAV
Tips: For the abovementioned file formats, Kindle Fire limits the vertical resolution to a maximum of 1080 pixels and the maximum frame rate to 30 frames per second. Besides, the first generation of the tablet does not support HTTP Live Streaming.
Part III: How to convert unsupported files to Kid Tablet?
Just 3 steps are needed to convert 4K, HD and Common Videos and Movies for playing on Kids tablets.
Get the best Kids Tablet Video Converter downloaded:
1. Import source files
After you install and run iFastime Video Converter Ultimate, open it. As you can see, you can add files by clicking the "Add video" button and browse files from your computer. Batch conversion is supported to save time, so you can add multiple files at once.
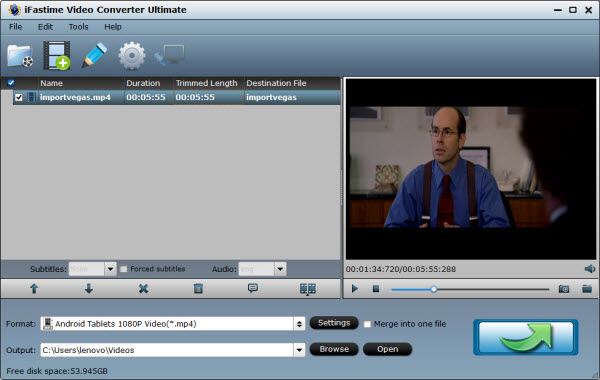
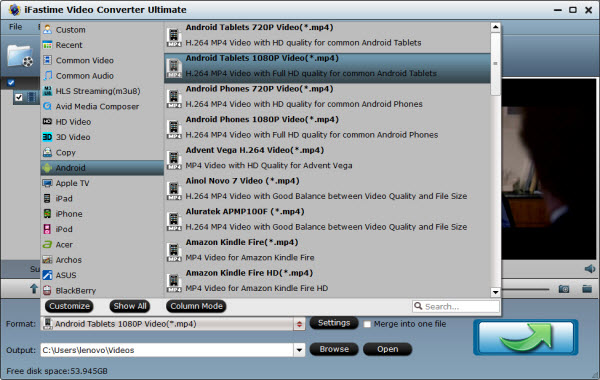
2. Select output format and the destination folder
MP4 is the friendly format for all kids tablets, including Tesco Hudl, Hudl 2, Google Nexus 7, Nabi 2, Nabi, Nook Color, Nvidia Shield, Kindle Fire, Kindle Fire HD, Kindle Fire HDX, Galaxy Tab 3 Kids Edition, DreamTab, Cubby Kids Tablet, ChildPad, Kurio 7, LeapPad Ultra XDi Learning Tablet, InnoTab 3S Plus, etc. Here you can choose MP4, or MP3 as the output video or audio format.
Since iFastime Video Converter Ultimate provides a set of video formats for almost all portable devices, like Android, Samsung Galaxy Tab, Amazon Kindle Fire (HD), etc., you can click "Format" bar and choose "Android Tablets 720P Video(*.mp4)″ or "Android Tablets 1080P Video(*.mp4)″ for your Kids tablet. And also don't forget to choose a folder to save the converted files.
Note:
a. You are free to adjust parameters, like bit rate, frame rate, aspect ratio, etc. to fine tune output video quality. For example, you can set resolution as 1280*720 for Nexus 7, 1024*600 for Nabi 2, 800*400 for Kurio 7 and ChildPad, etc.
b. Its built-in video editor offers you a hassle-free way to trim, crop, add watermark/special effect and insert subtitles.
3. Start converting unsupported files to Kids Tablet
After finishing all the settings, you can now click the "Start conversion" button to begin converting incompatible videos and music to Kids tablet. When the conversion is done, you can get Kids tablet supported video and audio files on your destination folder.
Then use the above methods to transfer the files to Nabi/Hudl/InnoTab/LeapFrog/Kindle, etc.. Now, you see, watching Disney movies or any other Superhero Movies, Kung Fu Panda 3 2016 Movie, Captain America 3: Civil War Movie Trailer, etc. on kids tablets will be a great time for your kids.
Additional Tips:
1. Top 5 Recommended Video Converter Ultimate Tools
There are so many different video converters out there. I've compiled a list of Top 5 Recommended Video Converter Ultimate Softwares that can hopefully aid you in making your decision of a best video converter.
Product Name |
iFastime Video Converter Ultimate |
iSkysoft iMedia Converter Deluxe |
Aimersoft Video Converter Ultimate |
Leawo Video Converter Ultimate |
Tipard Video Converter Ultimate |
Price |
$45.95 |
$49.95 |
$49.95 |
$69.95 |
$79 |
OS Compatibility |
Windows and Mac |
Windows and Mac |
Windows and Mac |
Windows and Mac |
|
System Interface(Difficulty of use) |
Easy to Use |
Easy to Use |
Easy to Use |
Medium |
Medium |
Built-in Editor |
√ |
√ |
√ |
√ |
√ |
Built-in Player |
√ |
√ |
√ |
√ |
|
2D/3D to 3D Conversion |
√ |
√ |
√ |
√ |
|
4K UHD Support |
√ |
√ |
|||
Rip DVDs |
√ |
√ |
√ |
√ |
√ |
Video/Audio Quality |
High |
High |
High |
Medium |
Low |
GPU or Multicore Acceleration |
√ |
√ |
√ |
√ |
√ |
Supported Output Formats |
High |
Medium |
Medium |
Medium |
High |
Batch Conversion |
√ |
√ |
√ |
√ |
√ |
Help & Support |
100% |
85% |
92% |
80% |
60% |
In my opinion, if you're not new to video conversion and are looking for a video converter that offers a little bit of everything, my best recommendation would be iFastime Video Converter Ultimate which is slightly easier to navigate, and it can also backup Blu-ray/DVD movies. Anyway, it's up to you!
2. How to Make Your Tablet Safe for Kids?
A. Get a sturdy case
Tablets come on all shapes and sizes, and so do cases. The Speck iGuy case for the iPad shown above is one option, but if you need to look further afield, here are a few websites where you can buy a variety of cases:
B. Install a Parental Control App
If you would like to restrict what a kid can do with the tablet (block games, inappropriate content, and so on) then you should install a parental control app. I'm not sure I would take this step, but you might want to. There are a lot of websites, Youtube videos, and apps that aren't appropriate for small children.
There are a number of apps which would work. One Android app you could try is Kids Place. I came across it when I reviews the ClicknKids tablet, and on that tablet it blocked access to any app which had not been selected and approved by the parent. I thought it worked well, but if you don't like it there are many other alternatives in Google Play.
Of course if you have a Kindle Fire, that tablet has parental controls built in. So does the iPad.
C. Block in app purchases
We've all read the horror stories about kids running up thousands of dollars in charges, right? You don't want that to happen to you, so you should probably make sure that your tablet asks for a password before any purchases.
On Android tablets, both Google and Amazon have a parental control option under the settings menu which can be set to require a password before any purchases can be made. On the Kindle Fire, this setting is found with the other parental control options.
On the iPad, I would suggest a different approach. I would set up a separate account just for the kid's iPad. This is extra work, but it will allow you to remove any chance that the kid might run up charges in iTunes.
If you need to make purchases for the kid's iPad, you can buy a gift card with the parent account and give it to the child account.
D. Install a Kid Friendly Web Browser
As a final step, I'm going to suggest that you install an alternate web browser. There are any number of child safe web browsers in Google Play and iTunes.
Google Play | 10 Kid Friendly Web Browsers for the iPad
E. Perform a factory reset
If you've been using your old tablet for any length of time, chances are good that there are any number of things on your tablet that you don't want other people to see.
It might be as simple as work emails you don't want anyone to read, or perhaps you don't want your reading habits shared with the world. In any case, the best way to make sure that all of your personal documents are removed is to reset the tablet to factory settings. With most tablets this will wipe all of the internal storage, remove any apps you've installed, and delete any changes you've made to the settings.
The steps involved vary between tablets, but you can probably find the reset option under the Settings menu on your tablet. Just make sure that you save any important files first.
Related Articles:
- Play DVD on Tesco Hudl 3/2/1
- Best Christmas Activities for Kids
- Best Thanksgiving Songs for Children
- How to Play Any Video on Tesco Hudl 3?
- Play 2016 Radio Disney Music Awards on Kids tablet
Have more questions about how to move files from computer to Nabi/Hudl/InnoTab/LeapFrog/Kindle, etc., please feel free to contact us>>
One thought on “Move files from computer to Nabi/Hudl/InnoTab/LeapFrog/Kindle, etc.”
Leave a Reply
You must be logged in to post a comment.
Categories
Ultimate media solution to convert all SD, HD, 2K, 4K videos to play, edit, share on Windows 10.
Price: $45.95
It is highly recommended from my side.