Adjust 3D TV to get best 3D viewing results
Mar 04, 2016 06:37 pm / Posted by Charles Brown
There is no doubt that 3D is an amazing experience we all enjoy! One of the frustrating things about watching 3D at home is how to adjust your 3D TV to get the best 3D viewing experience. There are too many options which make 3D movie enjoyment on 3D TV very confusing and prevent us from exploring all of the excellent options 3D TV offer. Check out my useful tips to learn how to set up a 3D TV for 3D viewing here.
Part I. Adjust 3D TV to get best 3D viewing results
1. Find a good spot to place your 3D TV.
The darker the room, the better, so make sure if you have windows, can still darken the room in the daytime.
2. Have adequate viewing space between you and the 3D TV.
Allow 8 feet for a 50-inch or 10 feet for a 60-inch 3D TV, but make sure the viewing distance you choose is comfortable for both 2D and 3D viewing. 3D is best viewed on larger screen (if you have the space) as it intended to be an immersive viewing experience, not a "looking through a small window" experience. In the case of 3D TV, one cannot determine the optimum 3D TV viewing distance simply by relating the latter to the screen size and the TV screen resolution. One has to keep in mind that the illusion of a third dimension in 3D TV causes the nearest point of the 3D image to appear closer to the viewer than the TV screen itself.
Similarly, the farthest point of a 3D TV image appears farther away from the TV screen, this despite that the TV image is actually being displayed on a flat surface at a fixed distance away from the viewer.
Here, a third factor comes into play that imposes its own constraints on the whole 3D TV viewing distance equation. This is what is referred to in 3D TV technology as the 3D comfort zone.
There is a disparity in 3D TV―known as fundamental disparity―between the eyes convergence point and the eyes focusing point. This disparity is totally unnatural for the brain since in the case of a real 3-dimensional object, these two points reside at the same point in space.
This disparity between convergence and focusing, increases as one moves closer to the 3D TV screen to enjoy to a more aggressive 3D experience. Move further away and you will start losing more of the desired 3D impact.
Fundamental disparity in 3D TV technology is directly related to the image parallax, i.e. to the separation between the left eye image and the right eye image. The value of the image parallax determines the aggressiveness of the 3D viewing experience.
The audience 3D comfort zone refers to that parallax range which results in a 3D viewing experience that is easy on the viewer. Exceed this comfort zone and the brain would start finding it hard if not impossible to properly fuse the left and right eye images into one virtual 3D image. Should this happen, the 3D image would eventually appear as a blurred 2D-image. In some individuals, this may result in disorientation and even headaches.
3. 3D TV Picture Settings.
The brightness, contrast, and motion response of the 3D TV or video projector needs to optimized for 3D. Check your TV picture settings menu. You will have several preset options, typically they are Cinema, Standard, Game, Vivid, and Custom - other choices might include Sports and PC, and if you have a THX certified TV, you should have a THX picture setting option as well (some TVs are certified for 2D and some are certified for 2D and 3D). Each of the above options provides you with preset picture settings for brightness, contrast, color saturation, and sharpness suitable for different viewing sources or environments.
In addition, some 3D TVs and Video Projectors will automatically default to a special preset mode when a 3D source is detected - this may be listed as 3D Dynamic, 3D Bright Mode, or a similar labeling.
Toggle through each and see which provides the best combination of brightness, contrast, color saturation, and sharpness that looks good through 3D glasses without being unnaturally bright or dark. As you toggle through the presets (while viewing 3D content) also note which one results in 3D images with the least amount of ghosting or crosstalk.
As the picture settings are adjusted to make the objects in the image more distinct, it helps reduce the amount of visible ghosting/crosstalk.
However, if none of the presets quite do it, also check the Custom setting option and set your own brightness, contrast, color saturation, and sharpness levels. Don't worry, you won't mess anything up - if you get too far off track, just go the picture settings reset option and everything will return to default settings.
One thing to keep in mind is that most TVs now allow you to make setting changes for each input source independently. In other words, if you have your 3D Blu-ray Disc player connected to HDMI input 1, then the settings made for that input will not affect other inputs.
This means you don't constantly have to change settings. Also, you have the ability to quickly go to a another preset setting within each input. This helps if you use the same Blu-ray Disc player for both 2D and 3D as you can switch to your customized or preferred settings when viewing 3D, and switch back to another preset for standard 2D Blu-ray disc viewing.
4. Ambient Light Settings.
In addition to the picture settings, disable the function that compensates for ambient light conditions. This function goes under several names, depending on the brand of TV: C.A.T.S. (Panasonic), Dynalight (Toshiba), Eco-Sensor (Samsung), Intelligent Sensor or Active Light Sensor (LG), etc... When the ambient light sensor is active, the brightness of the screen will vary as the room light changes, making the image dimmer when the room is dark and brighter when the room is light. However, for 3D viewing, the TV should be displaying a brighter image in either a darkened or brightened room. Disabling the ambient light sensor will allow the TV to display the same picture brightness characteristics in all room lighting conditions.
5. Motion Response Settings.
The next thing to check is motion response. Another problem with a lot of 3D content is that there can be blurring or motion lag during fast moving 3D scenes. This is not as much of an issue on Plasma TVs or DLP video projectors, as they have better natural motion response than an LCD (or LED/LCD) TV. However, for best results on a Plasma TV, check for a setting, such as "motion smoother" or similar function. For LCD and LED/LCD TVs, make sure you enable the 120Hz or 240Hz motion settings. For both Plasma and LCD, even the above setting options may not solve the problem entirely, as a lot depends on how well the 3D was actually filmed (or converted from 2D in post processing), but optimizing a TV's motion response settings certainly doesn't hurt.
6. Note for Video Projectors.
For video projectors, things to check are both the Lamp output setting (set to bright) and other settings, such as Brightness Boost - doing this will project a brighter image on the screen, which should compensate for the brightness level decrease when viewing through 3D glasses. However, keep in mind that while in the short run this works pretty well, it will decrease your lamp life, so when not viewing 3D, you should go in and disable the brightness boost or similar function, unless you prefer that it be enabled for both 2D or 3D viewing.
Also, a growing number of projectors automatically default to a brighter light output (along with some auto adjustment in color and contrast setting) when a 3D input signal is detected. This makes it easier for the viewer, but you may still need to make some further adjustment according to your own preferences.
7. Note on TVs and Video Projectors with the 2D-to-3D conversion feature.
There are a growing number of 3D TVs (and also some video projectors and 3D Blu-ray disc players) that also feature a built-in real-time 2D-to-3D conversion feature. This is not as good a viewing experience as watching originally produced or transmitted 3D content, but it can add a sense of depth and perspective if used appropriately and sparingly, such as with viewing live sporting events. On the other hand, since this feature cannot calculate all the necessary depth-cues in a 2D image correctly, sometimes the depth is not quite right, and some rippling effects can make some back objects look to close and some foreground objects may not stand out properly.
There are two takeaways regarding the use of the 2D-to-3D conversion feature, if your TV, video projector, or Blu-ray Disc player offers it. First, when viewing native 3D content, make sure your 3D TV is set for 3D and not 2D-to-3D as this will definitely make a difference in the 3D viewing experience. Second, because of the inaccuracies in using a the 2D-to-3D conversion feature, the optimized settings you made for watching 3D will not correct some of the internet issues present when viewing 3D-converted 2D content.
8. Now set up a TV for 3D viewing.
NOTE: 3D Ready TVs require the optional TMR-BR100 3D Sync Transmitter to be connected, compatible Active Shutter 3D Glasses and 3D integrated TVs have the transmitter installed in the TV. If you have a 3D Ready TV, follow all of the steps in this procedure. If you have a 3D integrated TV, start with step 3.
a. Turn off the TV.
b. Connect the 3D Sync Transmitter to the 3D Sync input on the back of TV.
Note: Make sure that 3D Menu is displayed on the screen by pressing the OPTION on the remote control, after the connection has been completed.
c. Make sure 3D Sync Transmitter is located in a place where it is free from obstruction.
- For 3D integrated TV : Please do not put any objection in front of 3D Sync Trnasmitter which located on bottom right side of TV.
- For 3D ready TV : Setting the 3D Sync Transmitter on the top center of the TV is recommended as long as it is not being obstructed by the top of a cabinet or entertainment center.
d. Connect the 3D source device to the TV using a High-Speed HDMI cable.
- For more information regarding the HDMI cable required for 3D viewing visit http://www.hdmi.org
- If using a 3D capable Blu-ray Disc (BD) player or PlayStation 3 (PS3) console, insert a 3D movie or game title. If you have subscribed to 3D programming through your cable or satellite provider, tune the receiver or set-top box to the station with 3D programming.
Note: Confirm that your player does not need a software update to be capable of playing 3D BD discs. You can determine if your BD player needs a software update by accessing the customer support website for your particular model. When you have completed software update, please once eject the disc from BD player.
e. Using the supplied remote, turn on the TV and press the INPUT button to select the appropriate HDMI input.
f. Put the 3D Glasses on. When using Active 3D Glasses with the TV for the first time, you need to do registration. If no 3D effect is achieved, perform the next steps below.
g. Press the 3D button repeatedly to select the 3D Display or 3D Format (depends on your TV model/country/region) mode to suit the displayed content. (When using the Touchpad Remote Control, press the Control Bar, slide the touchpad to highlight the 3D button, press the touchpad, slide the touchpad to highlight the desired 3D Display mode, then press the touchpad.)
Note: If the TV does not display the 3D Format menu, your TV may be in SYNC mode. Press SYNC MENU button and select TV Control. The 3D option will now appear when pressing the OPTION button.
h. At this point the image on the TV may appear blurry or out of focus. Put on the 3D glasses and synchronize (sync) them with the TV.
Part II. How to Get 3D Content For Your New 3DTV
You obviously understand that 3D is most certainly not a passing fad, and after konwing all the 3D sources below, you will be armed with the know-how to suitably impress your friends with all the 3D content you'll have. So, where does one actually go about getting 3D content then? Here are 7 recommendations.
1. 3D-BlurayRental.com
If there's a movie that's been released on 3D Blu-ray, chances are good 3D-BlurayRental.com will have it. This movies-by-mail service charges between $4.99 and $7.99 for most rentals, two-way postage included. After you receive your disc, you have seven days to watch the movie. If it's not postmarked by that seventh day, the service will charge an extra $2 per day until you send it back. Until Netflix and/or Redbox get their 3D act together, this is arguably the best and most affordable way to obtain 3D Blu-ray movies.
2. Comcast Xfinity 3D
If you're a Comcast HD subscriber and you have a current set-top box, check your on-demand options. I found about two dozen recent 3D releases available for rental, including "Captain America," "Hugo," "Happy Feet 2," and "Immortals." Each one will cost you $6.99. (Comcast also offers a few channels that provide 24/7 3D content, including ESPN 3D.)
3. Sony PlayStation Network
The Sony PlayStation 3 might just be the ultimate 3D-TV companion. It's not only a 3D-capable Blu-ray player, but also a movie streamer that can pull content from both Sony's library (which includes a smattering of 3D movies and games) and Vudu (see below). I don't own a PS3, so I don't have pricing or selection info. (E-mails to Sony's PR department went unanswered.) If you're a PS3 user, perhaps you can share some details in the comments.
4. Vudu
This Wal-Mart-owned movie-streaming service has yet to really catch on against the likes of Amazon and Netflix, but it currently has one of the largest 3D-movie catalogs anywhere -- an impressive 50 titles at last count.
Unfortunately, many of the titles are available only for purchase, with prices typically set at $21.99. And a lot of the best 3D flicks aren't there, including "Despicable Me" and "Hugo."
5. Broadcast TV
In the UK, Sky 3D is the only 3D specific TV channel at the moment and even then it's only available to Sky customers, which is a crying shame. Those of us on Virgin Media are stuck with a 3D movies on demand option, at the ridiculous price of £6 for a 1-day rental. If anyone is still wondering, it's this kind of pricing that makes people PIRATE MOVIES. Virgin, you officially suck.
In the US, there seems to be a much wider choicer with most cable networks embracing 3D somehow. DIRECTV has a 24/7 3D channel called 3net, as well as m3D and ESPN 3-D, while Comcast has Xfinity 3D that launched last year, and ESPN. We British are definitely getting the bum deal here.
6. PC Gaming Rig + Tridef/iz3D Drivers
I touched on this topic a while ago when addressing the frequently asked question "can my computer do 3D?", but since you're reading an article on getting 3D content for your shiny new 3DTV, I think we can safely assume you do actually have a 3DTV already. The good news is that nearly any modern computer is equipped with a graphics card capable of playing games in a 3D mode suitable for your TV. All you need are some replacement video drivers from TriDef or iz3D, Windows, and of course some games to play on it.
Results will be dependent upon the actual game – some may be more suited to 3D while some will display obvious visual artifacts or oddly placed objects in the 3D viewing space, but you should find something good. First person shooters are generally the best suited, but role play games like Fallout 3 are excellent too (go cross-eyed on the picture below for an example – you should see a 3D image merge in the centre), as well as racing games.
7. Torrents
Without wishing to endorse or condone the downloading of copyrighted material, nor spark a moral debate – if you were so inclined, you could find 3D-BluRay movies just the same as you could any other movie – usually indicated with the tag [3D-SBS] or [half-SBS] – SBS meaning side-by-side. Bear in mind that for 3D HD 1080p content, you're likely to be looking at about 5 to 15 gb download per movie. (Learn Top 10 Best Torrent Movie Download Sites 2016)
Obviously this is 100% illegal, so please make your own moral decisions about breaking copyright law. In conclusion, for my money, the smart way to enjoy 3D on 3D TV at home is to rent or buy 3D Blu-ray discs. That affords you not only the best picture and sound quality, but also the widest selection.
Part III. How to Watch downloaded 3D Movies on 3D TV
And to get 3D video movie downloaded to 3D TV for offline watching or streaming, iFastime Video Converter Ultimate is regarded to the second-to-none choice for you to convert downloaded 3D movies videos in 1080p, 4K Ultra HD to 2D or 3D SBS(Side-by-Side) video to work on 3D TV with its supported format in just a click away, but the audio has to be encoded in AAC or MP3 for stereo. AC3 audio and DTS Dolby don't seem to work.
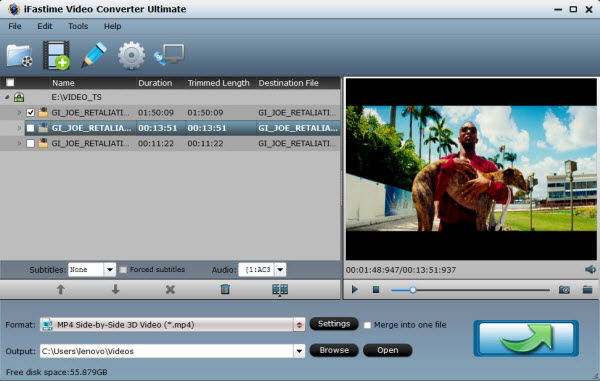
In addition, ripping rental/purchased 3D Blu-ray, DVD is supported. And for VR owners, this converter can also re-encode any 2D/3D movie files to VR Headsets (Samsung Gear VR included) more compatible 3D formats and make 3D movies accepted by your Samsung Gear VR or other any VR Headsets with ease.
Related Articles:
- Watch 3D MTS on Akally 3D VR Headset
- View MKV movies with VR One on iPhone 6S
- Watch 3D Movies on Oculus Rift DK2 via Mac
- Play DVD with iPhone-compatible View-Master VR headset
- View 3D Blu-ray on Google Cardboard via Amazon Fire Phone
Have more questions about how to adjust 3D TV to get best 3D viewing results, please feel free to contact us>>
One thought on “Adjust 3D TV to get best 3D viewing results”
Leave a Reply
You must be logged in to post a comment.
Categories
Ultimate media solution to convert all SD, HD, 2K, 4K videos to play, edit, share on Windows 10.
Price: $45.95
Great job. Too cool!