Solution to Share MP4 on YouTube/Vimeo/Facebook
Aug 16, 2015 12:38 pm / Posted by Charles Brown
Online websites like YouTube/Vimeo/Facebook have been always played an important role in entertainment life. Minutes or hours can go by as you browse through videos uploaded by everyday people like you and me. If you are a movie amateur and have files in MP4 format, why not upload your MP4 movies online so as to make them visible by your friends and family?
Though YouTube/Vimeo/Facebook announced to upload MP4 files, sometime we still fail to upload MP4 online. Why? Here are two possible reasons:
Reason 1:
MP4 is a container format which is commonly used to store video and audio. The audio and video can be encoded in different ways but it still is an .mp4 file. However, YouTube/Vimeo/Facebook only accepts the MP4 file with the specific audio and video codec. That is why some of your MP4 files can upload online, while other MP4 videos can't.
Reason 2:
The MP4 file is too long or large to upload to YouTube/Vimeo/Facebook. As we konw, to share MP4 on YouTube, your uploaded videos are limited to 15 minutes long.
In this case, to successfully upload any MP4 to YouTube/Vimeo/Facebook, we had better compress and turn MP4 to web-compatible FLV/AVI video format. Though there are many Video Compressors, they either compress video in poor output quality or support few video formats. For example, I tried to convert my MP4 to .avi using Format Factory. The avi file was playing OK but then it goes in slow motion for 10 seconds or so and continues as normal again. This happens intermittently over the duration of the 15 minute .avi file. I've researched all over and people keep saying to use iFastime Video Converter Ultimate which is able to resolve the trouble effortlessly.
Overall, this compressor/converter can turn your MP4 videos in the preferred file format for the site you wish to upload it into with a proper resolution like 720p as well as compress your MP4 videos into smaller size. This software is known to work at very high speed of up to thirty times faster than any other software of its type. But more importantly, it converts videos with absolutely no loss in quality. What's more, with the built-in video editor, it's freely for us to trim the videos into multiple segments with short duration. Mac version is here. Simply download the kind that will work for your system. Below is a step by step guide on how to turn MP4 into FLV/AVI video for sharing on YouTube/Vimeo/Facebook with almost no loss of video quality.
Free Download or Purchase iFastime Video Converter Ultimate:
Solution to Share MP4 on YouTube/Vimeo/Facebook
1. Import MP4 files
Drag & drop video files MP4 to the program after launching it. Or click the "Add video" button to locate the MP4 files you want to add.

2. Specify output format
You can just select the "Flash Video > FLV-Flash Video Format(*.flv)", or "HD Video > AVI HD Video(*.avi)" for YouTube, Vimeo and Facebook.
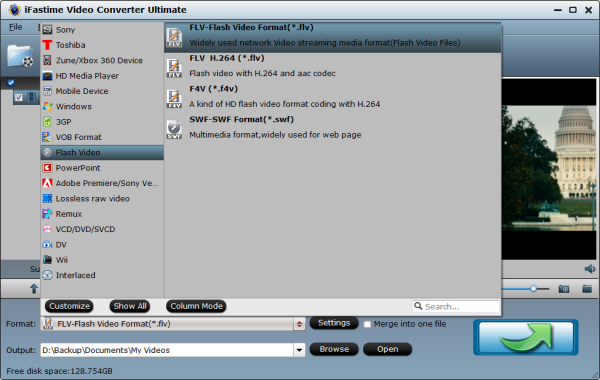
Refer to YouTube, Vimeo, Facebook supported format as below:
Facebook Video Format
MP4, 3G2, 3GP, 3GPP
ASF, AVI, WMV, DAT, DIVX, DV
F4V, FLV, MTS, M2TS, TS
M4V, MOV, MKV, MOD, TOD
MPE, MPEG, MPEG4, MPG
NSV, OGM, OGV, QT, VOB
YouTube Format
MOV, FLV
MPEG4
AVI, WMV
MPEGPS
3GPP
WebM
Vimeo Format
MOV
MPEG4
AVI
WMV
MPEGPS
FLV
3GPP
WebM
3. Trim/Edit MP4 movies
Since YouTube/Vimeo/Facebook has limitations about the uploading video size and length, please pay attention to the video size when encoding MP4 movies. Here I should highlight the trim function on this MP4 Converter program. Just click "Edit" to trim the MP4 videos to get the very part you want. Besides trimming, cropping, adding watermark, adjusting special effect, inserting subtitles are well supported as well.
Tip: If your MP4 video is longer than 15 minutes, YouTube won't support it. What you can do is to click "Split selected task" icon to clip your videos to a proper length.
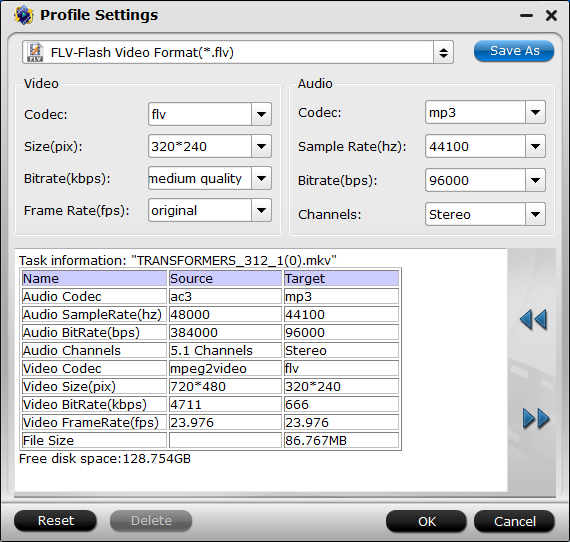
4. Customize the video Settings.
You can also press the Settings button to adjust the video size, bitrate, frame rate, audio sample rate, etc to optimize the quality.
5. Start converting MP4 to YouTube/Vimeo/Facebook
When all these settings are ready, you can click the "Start conversion" button at the bottom right corner to begin the MP4 to YouTube/Vimeo/Facebook conversion. When the conversion is done, you can click on "Open" button to locate the output videos. Now it's time to go to your website to upload your converted video online without any issue.
- Sign into YouTube/Vimeo/Facebook
- Click the Upload link at the top of the page
- Select the converted mp4 files to upload from your computer
Now you can share your MP4 movies on YouTube/Vimeo/Facebook with your friends and family easily.
To convert MP4 video to FLV/AVI format for YouTube, iFastime Video Converter Ultimate is the best software for you and all you need is to drag the result videos for sharing. And you are also able to use converted files as you want for your portable devices, Windows Media Player or video editing programs like Windows Movie Maker.
Have more questions about how to share MP4 on YouTube/Vimeo/Facebook, please feel free to contact us>>
.Related Articles
One thought on “Solution to Share MP4 on YouTube/Vimeo/Facebook”
Leave a Reply
You must be logged in to post a comment.
Ultimate media solution to convert all SD, HD, 2K, 4K videos to play, edit, share on Windows 10.
Price: $45.95
We can expect very good quality in very less time as the speed taken conversion is very less and we can improve the quality of our video to high definition