Introduce of 3 iPhone Modes: DFU Mode, Recovery Mode and Safe Mode
Dec 25, 2015 06:35 pm / Posted by Charles Brown
Recently, we've seen reports here and there of iPhones getting stuck in a restart loop. The black screen with the Apple logo shows up, holds for a while, and then disappears again which turns out white screen of death. While it's not clear yet exactly what's triggering the issue, there is a tried and true way to get your iPhone back to square one: use recovery mode, do a DFU restore or boot to Safe Mode. Confused between iPhone DFU mode and Recovery Mode, safe mode? Read this article to get a clear idea about them.

What is iPhone DFU mode?
DFU stands for Device Firmware Update, means the forced relegation mode of iPhone firmware. It is a means to getting your iPhone to interface with iTunes without iTunes automatically loading the latest version of iOS onto it. For example, if there have been some mistakes when you downgrade your iPhone, you need to get your device into DFU mode to restore or downgrade the firmware.
How to Enter into iPhone DFU Mode?
1st way: Enter DFU with iTunes
Step 1. Launch iTunes on your PC, after which you need to plug in your iPhone 6s with a USB came with it.
Step 2. Power off your device.
Step 3. Press the "Power" and "Home" button simultaneously for 10 seconds.
Step 4. Release the "Power" button other than the "Home" one for another 10 seconds.
Step 5. When a dialogue box comes up as below, it is time to release your fingertip pressing on the "Home" button.
2nd way: Get into DFU with iPhone Data Recovery
No matter to get your iPhone into or out of DFU mode, Wondershare Dr.Fone for iOS plays an significant role. It can not only let you get iPhone get into and out of recovery mode, but also helpful for iOS Data Recovery. In addition to it's strong function and efficiency, its intuitive interface and simple operation also highly feature it. Cannot wait experiencing? Just download and install one for trial.
Free Download or Purchase iPhone Data Recovery:
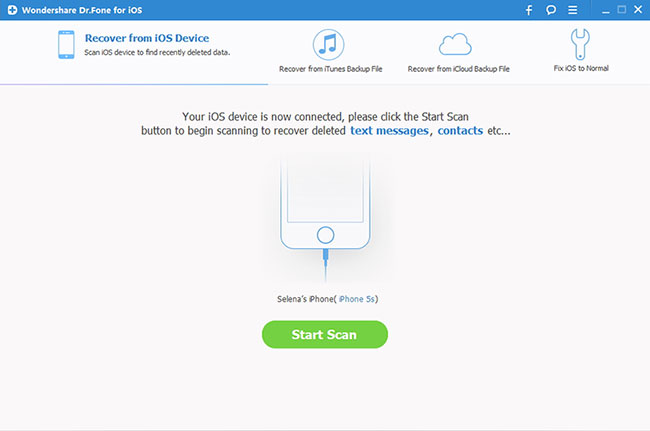
Step 1. Connect iPhone and run iPhone Data Recovery on your computer. Pop-up as below will occur.
Step 2. Click the green Start button on your iPhone and then the Power and the Home at the same time at once for 10 seconds.
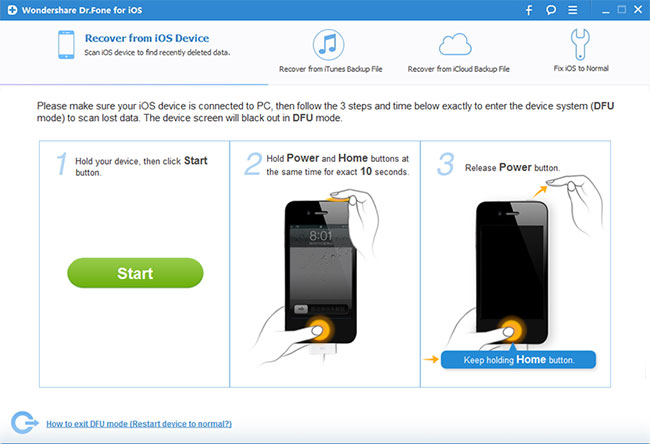
Step 3. After 10 seconds, release the Power button but keep pressing on the Home button for 10 more seconds. Then the connected iPhone will successfully entered DFU mode.
How to Exit DFU Mode?
The 1st Way: Follow the steps below, you can exit DFU mode:
1. Locate the Power and Home button.
2. Hold Power and Home button simultaneously for five seconds and release them.
3. iPhone will automatically shut down and reboot into normal mode.
The 2nd Way: Just close iPhone Data Recovery after you recovered wanted data, then your device DFU mode will exit automatically and restart from normal mode.
The 3rd Way: Click the button "Restart device to normal" at the left-lower corner of iPhone Data Recovery’s window. Then your device will restart to normal.
Note: Your device with iOS 9 needs a whole restart if it is frozen. You can try to press the "Power" and "Home" button at the same time until you can see the Apple logo on your screen.
What is iPhone Recovery Mode?
Recovery Mode boots your iPhone and stops at the Connect to iTunes screen. The recovery mode and iTunes will prevent you from restoring to older firmware than the current firmware. You will keep getting error in iTunes every time you try doing it. This is because iPhone has already booted and knows the current firmware version.
How to put iPhone into recovery mode?
Step 1. Connect a USB cable to your computer, and plug it into your iPhone. Then run iTunes.
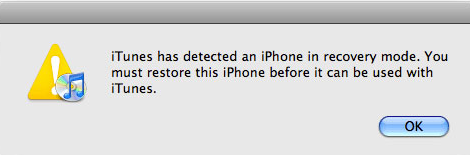
Step 2. Now, hold the "Home" button and the "Power" button on your iPhone together until the Apple logo appear. Then you should release the "Power" button, but still keep holding the "Home" button. After that, your iPhone will enter recovery mode and the screen shown on your iPhone as below.

How to get iPhone out of recovery mode?
1st way: With iPhone Data Recovery
1. Install and run iPhone Data Recovery on your computer. Connect your iPhone to the computer with a digital USB cable and scan.
2. When your iPhone detected by iPhone Data Recovery, it will show you a window below.
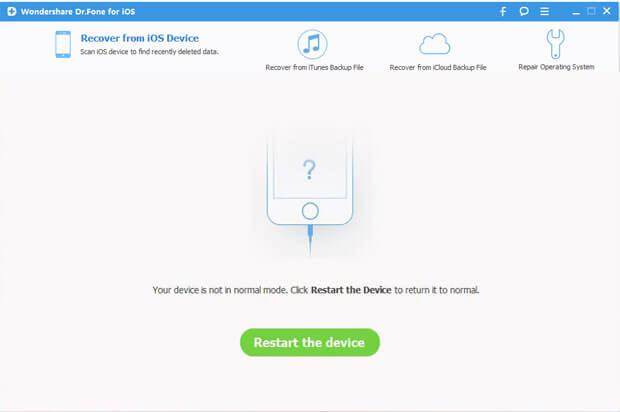
3. Click the "Restart the device" button to recover your iPhone.
Finished! It just need several seconds to make your iPhone back to normal as usual.
2nd way: Via iTunes
Note: Restore iPhone to factory settings or restore with iTunes/ iCloud backup can help iPhone users solve some problems.
Notice: You had better make a backup of your iPhone data before you fix this problem. The data on your iPhone will be deleted when you restore iPhone. In this situation, you can recover your iPhone data from iTunes/iCloud backup file with ease.
Step 1. Connect iPhone and run iTunes
Make sure your USB cable is connected to both the laptop running iTunes and your device.
Step 2. Restore iPhone
a. After iTunes deleted your mobile, a messages will told you that your iPhone is stuck in recovery mode. Then you should restore it, and just tap to restore it.
b. If you could't see the interface after connecting iTunes, you should power off your iPhone. If you cannot power off it in nomal, you should hold the Power button the screen become dark. Then turn on your iPhone again, and try to keep press the Home button until iTunes pops up the message.
What is iPhone Safe Mode?
Safe Mode on the iPhone has been apart of jailbreaking for years now, but many people still don't understand it. If your iPhone is jailbroken, Safe Mode will be invoked when MobileSubstrate (the Cydia support framework) crashes.
How to Boot to Safe Mode?
1st way:
Once you have installed Mobile Substrate boot your iPhone by pressing the power and home buttons simultaneously until it starts up. As soon as the Apple Logo appears, press down on the Volume Up button and hold it. This will disable all of your Cydia tweaks and it will force the iPhone to restart in Safe Mode.
2nd way:
If you find the above a bit too fiddly, go into Cydia and download Safe Mode Launcher. It’s a free app and it will restart your iPhone in Safe Mode with just the tap of one single button.
3rd way:
If you already have SBSettings installed from Cydia, all you need to do is press down and hold the Power button and choose Safe Mode from the menu.
Tips: If you find that your iPhone is trapped in Safe Mode all you need to do is press the Home and Power buttons together for 15 seconds.
More info: iPhone Recovery mode vs DFU mode:
With Recovery Mode, you can only restore and update but can't downgrade; With DFU mode, you can downgrade your iOS/firmware as well.
Related Software:
Wondershare MobileTrans: With it, you can transfer all your iPhone data to Android phones or Symbian smartphones, no matter which network they run on, as long as you use a Mac as a go-between.
Wondershare Dr.Fone for Android: If you lost or delete data on your Android phone carelessly, you can use this app to recover Android phone data easily.
Wondershare TunesGo: TunesGo enables you to transfer your desired music files/playlists from any devices to another, and manage, discover and share your music with ease.
iFastime Video Converter Ultimate: With the product, you can transcode copy-protected Blu-ray/DVD, 4K/SD/HD video in any format to iPhone for playback.
Related Articles:
- Best Flash Player for iPhone 6S (Plus)
- How to Restore Lost Data on iPhone 6S?
- Rip DVD to iCloud for iPad/iPhone/iPod on Mac
- Top 20 Best iOS Data Recovery Software for Win/Mac
- Apple iPhone 6S Plus vs Samsung Galaxy Note 5
Have more questions about 3 iPhone Modes: DFU Mode, Recovery Mode and Safe Mode, please feel free to contact us>>
One thought on “Introduce of 3 iPhone Modes: DFU Mode, Recovery Mode and Safe Mode”
Leave a Reply
You must be logged in to post a comment.
Categories

The professional Wondershare Dr.Fone for iOS is developed to recover all your lost contacts, messages, photos, notes, etc. from iPhone, iPad and iPod touch.
Price: $69.95 $55.96
I benefit from reading this article