Add supported/unsupported video to iTunes Library
Apr 03, 2016 06:33 pm / Posted by Charles Brown
iTunes, developed by Apple Inc., is a popular media player to play, download, manage audios/videos on Mac OS X/Windows and available on iPhone/iPad/iPod. Instead of paying for movies, TV shows or other videos in iTunes store, you can import local files on computer to iTunes 12.3.3/12.3.2/12.1 and watch them with iPhone/iPad on the way to school/work or during journey. Want to know how to import all Kinds of media files from Mac/PC to your iTunes Library easily? This article provides the easy way.

Part I: iTunes Supported Importing Format
Want to add or play your video/audio files via iTunes but failed? Check out the supported file formats of iTunes at first.
iTunes Supported Video Formats

According to Apple, iTunes supports any video format that works with QuickTime and files purchased or downloaded from iTunes store. That means if your video files have a .mov, .m4v, or .mp4 file extension, generally you can play them in iTunes. However, there are also limitations on video codecs, sample rate, etc. So if your .mov, .m4v or .mp4 files are rejected by iTunes, that may be because of a codec problem.
iTunes Supported Audio Formats
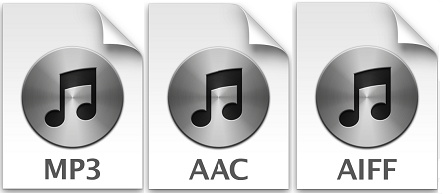
iTunes supported audio formats include: MP3, AAC, AIFF, WAV, Audible .aa files and iTunes purchased M4A and M4P music files. iTunes can convert between MP3, WAV, AAC, AIFF, Apple Lossless.
Part II: Add supported video to iTunes Library
Requirement: iTunes (the latest version iTunes 12.3.3 is recommended); iTunes Store account; Internet access (if necessary)
Note: Before importing or adding videos to iTunes, you need to check if the format of the video you want to add is supported by iTunes. Beyond that, you should also make sure the files can be played in QuickTime (not all .mp4 files will play in Quicktime, for example).
- Right-click on the video you want to check and select "Properties" (Windows) or "Get Info" (OS X).
- Look for the "Type of file" or "Kind" entry. If the file is an .mkv, .wmv, or .avi file, it will need to be converted.
- Test the file in QuickTime. If the file is a supported format, load it up in QuickTime to make sure it plays. If it doesn't play, you'll need to convert it.
1. Rename any video files with multiple periods in the name. Oftentimes videos downloaded from torrents will have multiple periods in the name to denote who ripped and encoded the video. Remove any of these extra periods, as they can cause problems when trying to import into iTunes. Right-click on the file and select "Rename" to edit the name.

2. Launch iTunes. Make sure that you are running the latest version.
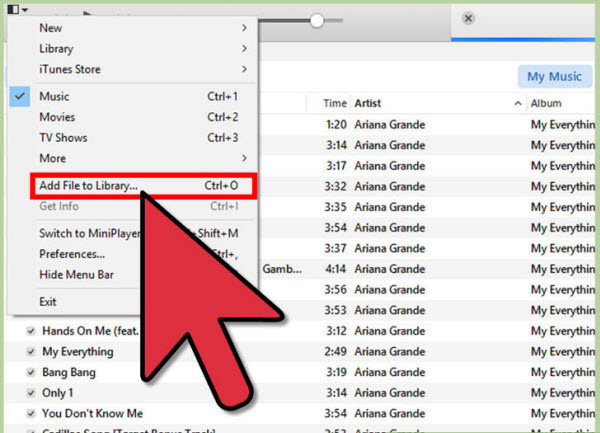
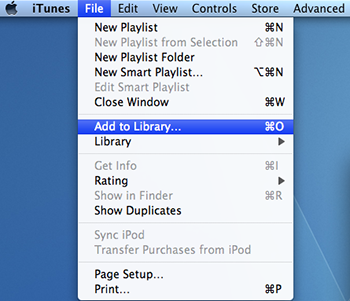
3. Import the video. Click the File menu (Windows) or iTunes menu (OS X) and select "Add File to Library" (Windows) or "Add to Library" (OS X). Browse for the converted video and select it.
- If you are using Windows and don't see the File menu, press the Alt key.
- You will not receive any error or confirmation when adding a video file.
For Windows:
For Mac:
4. Click the "Movies" button. This is located in the row of buttons along the top of the iTunes window, and looks like a film strip.

5. Click the "Home Videos" tab. Any movie you import will be added as a "Home Video". If you don't see the video that you just imported, it wasn't properly converted to an iTunes-compatible format.

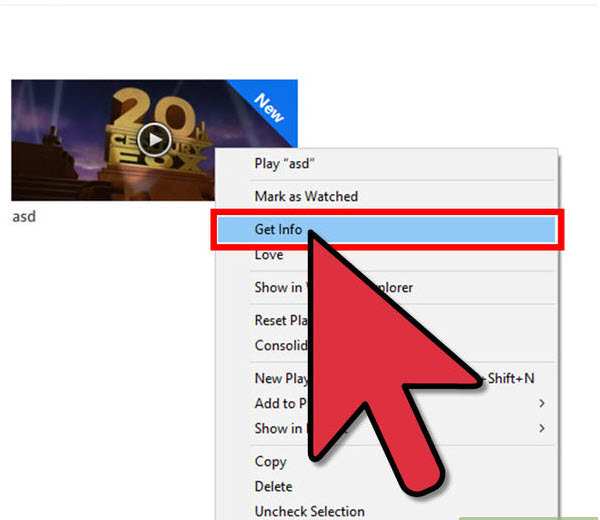
6. Move the video to your "Movies" or "TV Shows" library. It can be difficult to find the video you want if they're all sorted into the "Home Video" library. Moving them to the proper spot will make it easier to watch or sync the videos later.
- Right-click the video and select "Get Info".
- Click the "Options" tab in the window that appears.
- Click "Home Video" next to "media kind" to select the library that you want to move it to.
- Click OK to save the changes. You will now be able to find the video in the proper library.
7. Sync your movies to your iOS device like iPad, iPhone, iPod, Apple TV, etc. Now that the files are in iTunes, you can sync them to your iOS device. Click here for details on syncing.

If the video does not sync to your device, you'll need to create a version in iTunes that your device supports. Click File and select "Create New Version". Select the device that you are syncing the video to, and then wait for the conversion to complete.
By default, adding items to your iTunes library places a pointer to each file in the iTunes folder; the original file remains in the current location. For information about copying files to the iTunes folder instead of creating pointers to them, see Change where your iTunes files are stored.
Part III: Add unsupported video to iTunes Library
Have trouble in importing MP4, MOV, AVI, VOB, Tivo, DIVX, MPEG, FLV, MVI, MKV, 3GP, WTV and more video files in iTune for playing? Why?
Reason One: Though Apple announced to support MP4, MOV, M4V, we still encounter issue when adding them into iTunes Library since these formats are container formats which may contain codecs that are not compatible with iTunes.
Reason Two: iTunes doesn't natively support AVI, VOB, Tivo, DIVX, MPEG, FLV, MVI, MKV, 3GP, WTV, etc as input formats.
Reason Three: If the file is an unprotected WMA file and you have Windows Media Player Series 9 or later installed, iTunes makes a copy of the file and adds it to your iTunes library. The original WMA file remains unchanged. You can't add protected WMA files or protected WMV files to iTunes. (Learn how to Transfer iTunes Songs to Android)
How to Make iTunes Supports More Videos?
There are three widely used methods to allow iTunes to support or play various video files:
Method one: Use VLC
You can install some third party players like VLC which supports many popular video formats. It is surprising that VLC is packed with hidden features, and a video converter is one of them. Yes, you can use VLC to convert videos.
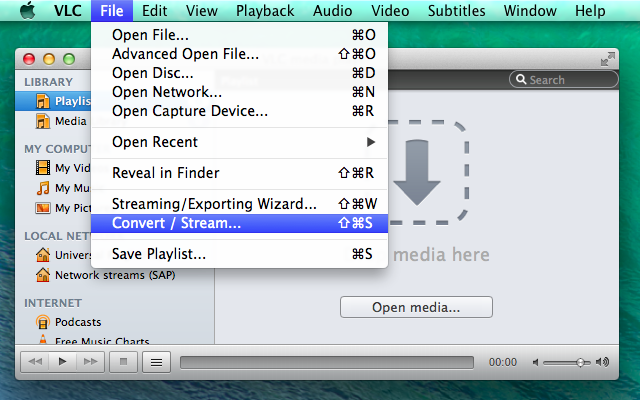
To get started on Windows, click the Media menu and select Convert / Save. On a Mac, click the File menu and select Convert/Stream.
Add the media file you want to convert, ensure the profile is set to Video – H.264 + MP3 (MP4), and save the output to a file. You can also customize the conversion profile settings if you like, but this isn't necessary.
This wizard looks a bit different on Windows, but it's the same basic process — add a file, choose a codec, select a destination, and start the process. Once VLC is done transcoding the video, you'll get an MP4 or M4V file you can import to iTunes and transfer to your mobile devices.

Method two: Use Handbrake
Download and install Handbrake. This is a free, open-source video conversion program without any adware, available for Windows and OS X. It is also one of the easiest and quickest ways to convert video files to an iTunes-compatible format.You can download HandBrake from handbrake.fr. It is best to avoid websites that claim to convert videos for you online. They often have file size limits and uploading and downloading the video can take a significant amount of bandwidth.
1. Launch Handbrake. After installing, you should be able to find a shortcut on your desktop or in your Applications folder. It may look a little confusing, but you'll be ignoring most of the advanced options when performing quick conversions for iTunes.
2. Click the "Source" button. This is located in the upper-right corner, and will prompt you to select a file to convert.
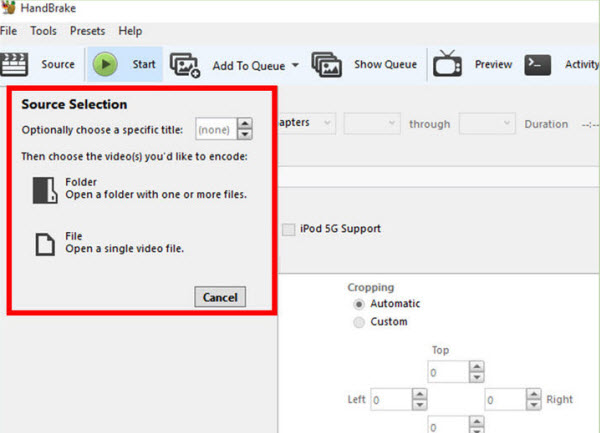
3. Select how you want to add the file(s). If you have multiple files you want to convert, select the Folder option. All of the files will need to be located in the same folder. If you are converting a single video, select the File option and browse for the file.
4. Click the .Browse button next to the Destination field. This will allow you to set a destination folder for the converted video. You will need to type a name for the file as well.

5. Select the "Universal" preset in the right frame. If you don't see the Presets frame, click the Presets menu and select "Show Presets Panel". The "Universal" preset will convert any video into an .mp4 format that can be imported into iTunes.

6. Click the "Start" button. HandBrake will begin converting the file into the new format. This will take a few minutes, and longer videos such as full-length movies may take up to half an hour or more.
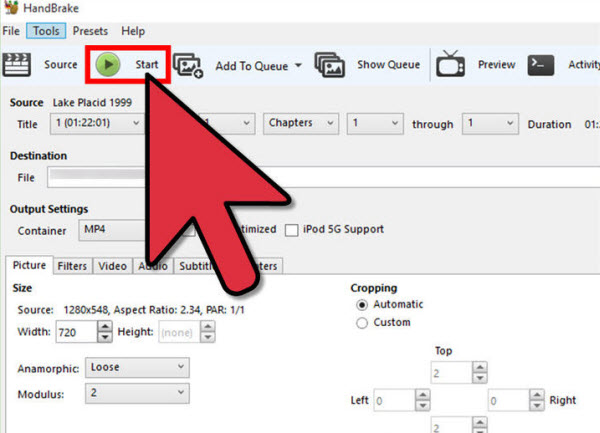
7. Test the converted video. Once the video has been converted, play it in QuickTime to ensure that the conversion went smoothly. In most cases, you should notice very little or no loss in quality
Method three: Use iFastime Video Converter Ultimate
To solve incompatibility problem of iTunes, iFastime Video Converter Ultimate for Mac is an alternative to Handbrake which is another once-and-for-all way to turn all your home video library in Blu-ray, DVD, MP4, MOV, AVI (DivX, Xvid), VOB, Tivo, DIVX, MPEG, FLV, MVI, MKV, 3GP, WTV, etc. to a necessary format for iTunes with a few mouse clicks.
In addition, it can extract audios MP3, AAC, AC3, WAV, FLAC for adding to iTunes with no effort at all. The best Video Converter Ultimate is a swift, easy and adaptable digital video/audio converter, Blu-ray/DVD ripper and copy for Mac (Mac OS X 10.11.4 available). If you want to convert videos existing on your Windows to iTunes videos, just download iFastime Video Converter Ultimate on PC.
Free Download iFastime Video Converter Ultimate:
Steps to convert unsupported Videos to iTunes Supported formats
Step 1. Adding various video files as input
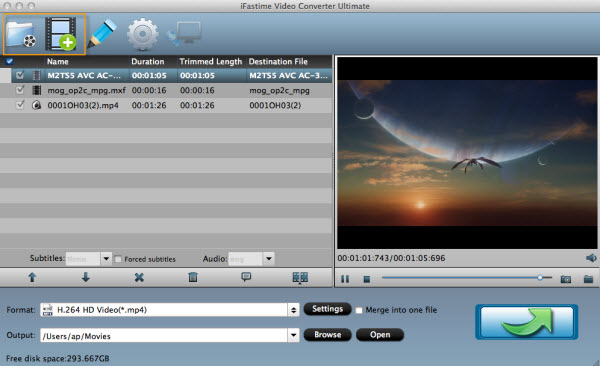
Install and open "iFastime Video Converter Ultimate" on your system. Then Click on "Add video" icon or you can simply "Drag" and "Drop" your file into the software. From your "Browser" you can select the unsupported file and press "Open" to add source files. Batch conversion is supported to save your time.
Step 2. Set your output format
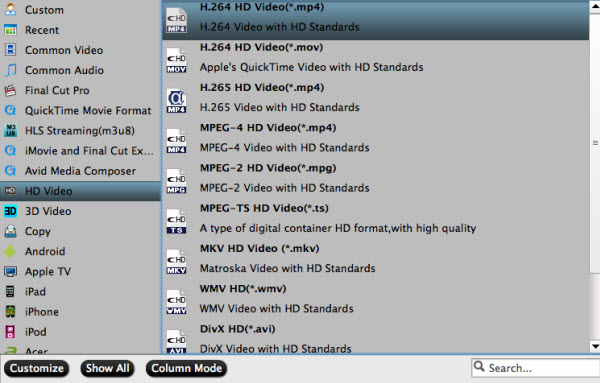
Select "Format" and from dropdown menu, and choose "H.264 HD Video(*.mp4)" or "H.264 HD Video(*.mov)" from "HD Video". What's more, some video presets for Apple software, Apple devices, etc. are also provided for you like iPad, iPhone, iPod, Apple TV.
Tip: The Mac video converter enables users to adjust audio and video settings before converting video to iTunes. Click "Settings" button, then you will enter the following interface, on which you are allowed to customize size, bit rate, frame rate, sample rate, and audio channel to your required ones.
Step 3. Convert Video files to iTunes Supported format
After select your output format now just click on "Start conversion" button. By clicking on "Open" you will find an output file. This Output file is fully combatable with the iTunes. In this way, you can import all video files like MP4, MOV, AVI, VOB, Tivo, DIVX, MPEG, FLV, MVI, MKV, 3GP, WTV to iTunes for syncing to iPhone, iPad, iPod and Apple TV or other Apple products without any hassle.
Additional Tip: How to transfer files between PC and Mac
PC and Mac can be a total different running OS, if you want to transfer files from PC to your Mac, the easies method to transfer these files is over WiFi. But that will need you to make your computer on the same network, here we will describe three ways to help you transfer your files from PC to you Mac.
Method One: Via Wifi
This is especially convenient for technical rookies, which you don't need any additional hardware or cables.
1. Using Cloud Services
This will be the easiest way for you to go for. If your files are not very large and want to save the money for external hard disk, this way will be the best choice. When using the cloud services to transfer files, you can install the applications on both Mac and Windows. Then drag or copy your files onto the could drive, these files will then sync with your second system without any extra operation. Open the application in the second system, you can copy synced files from cloud drive to your system hard disk to make sure a local copy on your system hard disk.
Here recommend you several free Could Services Applications:
Dropbox:
Features:2GB up to 18GB
Compatible in almost all platforms like Mac, Windows , Android , iOS
Box.net:
Features: 10GB free
Maximum uploading size is 250MB, not good for movie files transfer
Google Drive:
Features: 15GB free
Only need a valid Gmail to install the applications in your PC and Mac
Microsoft SkyDrive:
Features: 7GB Free
Offered by Microsoft, Mac and Windows are both supported to install and shard files
2. Using Email
This way doesn't need any additional setup or knowledge. Send the email attachment from one machine and open the email in second machine and download the attached file.
Done! Very easy, isn't it? But for large file up to GBs this may not do as well as the Could Service.
Method Two: Transfer files by Network
This way is not suitable for two machines in a remotely distance not like the Could Service , which can do the remote transfer. If you have a PC and a Mac at your home, then you can go for this way. The example below demonstrates Windows PC as the host.
Step 1. different Windows version, you have to go for different setting ways
* Windows XP: Control Panel-> double click Network Setup Wizard and run it.
* Windows Vista: Control Panel -> Network and Sharing Center -> Expand the File Sharing drop down -> click on "Turn on File and Printer Sharing"
* Windows 7: Control Panel -> Network and Sharing Center -> Choose Homegroup and Sharing options -> Change Advanced Sharing Settings -> click "Turn on File and Printer Sharing".
Step 2. Connet Mac to Windows machine
If you have set your Windows properly and both computers are on the same network, then open the Finder window on Mac, on the left pane under the "Shared" you can see shared machines. Select the name of the windows machine and click to open up the folder. You can drag and drop files into this folder to share between MAC and Windows.
If you are unable to see the Windows machine on MAC finder, then Click on Finder -> Go -> Connect to Server (Command+K). Type in the prefix smb:// followed by the ip address or hostname of the windows machine. (like smb://192.168.1.101 or smb://windowspc )
Method Three: Transfer files by Disks
There are plenty of flash drives on the market range from 16 GB to 256GB for a reasonable price. But one thing need to make clear before you using this way, which is no matter you use hard disk or flash drive formatted, they have to be FAT32. Only in this format, both Mac and Windows can accept.
Drawbacks on this format are that FAT32 can only support 4GB maximum, no security will also make it not such favored. If you just want to transfer your FLAC files from time to time, then you can select this way.
Related Aritcles:
- iPhone Won't Play MP4 Solution
- Best Flash Player for iPhone 6S (Plus)
- Rip DVD to iPhone 6S (Plus) with Handbrake
- Make Ringtone for iPhone 6S (Plus) for Free
- MKV (AC3) movies no audio issues on iPad (Pro/Mini/Air)
Have more questions about how to import all Kinds of media files to iTunes, please feel free to contact us>>
Categories
Perfectly handle an extensive list of video file types with impressive output quality on Mac OS X.
Price: $45.95