Tutorial of Playing DVD on iPhone SE with Ease
Mar 28, 2016 06:54 pm / Posted by Charles Brown
The recently released iPhone SE wins great popularity in the Apple's 2016 March Event as it has surpassed many portable devices in regard of entertaining functions: equipping with a far stronger processor for surfing the Internet and playing game, giving a better camera for 4K video shooting and new "Hey Siri" features. Though iPhone SE doesn't offer a big screen as iPhone 6/6 Plus/6S/7, it is enough to watch DVD movies on iPhone SE with 4-inch display in 1136x640-pixel resolution at 326 ppi on the go.
Possible to Play DVD on iPhone SE?
Since iPhone SE doesn't hold a DVD-ROM, like other mobile phones by far, playing DVDs directly on iPhone SE is irrealizable. Many guys share their question and experience on forum, such as:
Question 1: Loading DVDs onto my iPhone SE?
"I am very new to iPhone SE and so I would like some help on getting my DVD movies onto my pre-ordered iPhone SE. Any suggestions? Thanks."
Question 2: Looking for a good DVD Player/DVD drive for iPhone SE?
"I am wondering if there is a DVD player available for the iPhone SE. Or is there a External DVD drive that I can hook up to iPhone SE?"
How to Play DVD Movies on iPhone SE?
For watching DVD movies on iPhone SE, we should to know what video format can play on iPhone SE:
Video formats supported:
H.264 video up to 4K, 30 frames per second, High Profile level 4.2 with AAC-LC audio up to 160 Kbps, 48kHz, stereo audio in .m4v, .mp4, and .mov file formats;
MPEG-4 video up to 2.5 Mbps, 640 by 480 pixels, 30 frames per second, Simple Profile with AAC-LC audio up to 160 Kbps per channel, 48kHz, stereo audio in .m4v, .mp4, and .mov file formats;
Motion JPEG (M-JPEG) up to 35 Mbps, 1280 by 720 pixels, 30 frames per second, audio in ulaw, PCM stereo audio in .avi file format.
Audio formats supported:
AAC (8 to 320 Kbps), Protected AAC (from iTunes Store), HE‑AAC, MP3 (8 to 320 Kbps), MP3 VBR, Audible (formats 2, 3, 4, Audible Enhanced Audio, AAX, and AAX+), Apple Lossless, AIFF, and WAV.
Although iPhone SE is a great phone for playing DVD movies, unfortunately it only supports a few video formats like widely used MP4, and the movies on DVDs (VOB) are not playable on iPhone SE. What's more, there is No external USB DVD drive for iPhone SE DVD playback. So what if you want to play DVD movies on iPhone SE? Here are three solutions for you:
Solution 1. Download a powerful iPhone DVD Player: DVD Player FREE
Put a DVD into any Mac or Windows DVD drive, and watch it live on your iPhone with DVD Player FREE! Sounds wonderful? Just follow the simple steps below to see how to do it!
1) Download the server file:
www.floatingcube.com/DVDPlayer/
2a) On a Mac, open the dmg file, drag the Server file into Applications folder.
2b) Run the Server file. It will minimize into the top bar, and you should see a DVDPlayer icon.
3) Insert DVD into the Mac's drive. (Do not autorun the Mac's DVD Player.)
4) Run the iPhone application.
MINIMUM REQUIREMENTS
1) Mac OS X 10.6 (Snow Leopard) and above with DVD drive, Windows XP or better.
2) iPhone 3GS and above (Here iPhone SE is OK)
3) Running on the same WiFi subnet (i.e. 1 Wifi router and not a complicated public Wifi system)
BUY THE FULL VERSION WITH MONEY BACK GUARANTEE
Buy the full version of DVD Player to remove advertising, get life-time support and free updates and features!
TROUBLESHOOTING
View the complete installation and troubleshooting instructions at www.floatingcube.com/forums
Solution 2: Convert DVD to iPhone SE friendly Video Formats
If you are having troubles with using DVD Player FREE or think it is complicate to run a server on Mac, here is another solution;
Ripping DVD to iPhone SE that runs iOS 9.3, so that you can play it with any different media player. Ithas at least the following advantages:
* Make use of existing DVDs and the excellent features of the phone;
* Watch high definition movies on the go, during a travel or commuting;
* Avoid confusing apps/software extras on the phone;
* Get iPhone SE away from viruses, adware, spyware, etc during online video playing.
If you are a Mac user, please choose iFastime Video Converter Ultimate for Mac to help you easily achieve this, a popular choice of public and editors. Why choose it?
* It is fast in ripping DVD to iPhone SE supported formats
* It can keep original effect including surround sound and picture quality.
* It supports various DVDs including common commercial DVDs
* It is made for iPhone: With ready-made iPhone profile settings, it enables you to convert DVD files to playback on iPhone SE, iPhone 6S, iPhone 7/7 Plus, etc.
* It can extract music/picture out of DVD: It can help you extract audio from DVD movie to save in MP3 format
* It can compress DVD: Besides ripping DVD to iPhone, it can also compress DVD to H.264, AVI, WMV, MOV, FLV, etc.
Tip: If you are running Windows PC, iFastime Video Converter Ultimate is your chocie, both of them are very cheap, only $36.76 at 2016 Easter Deal, here is a download link.
Now just follow the easy guide below to convert and transfer DVD movies to iPhone SE for entertainment.
How to Convert DVD to iPhone SE with a few clicks
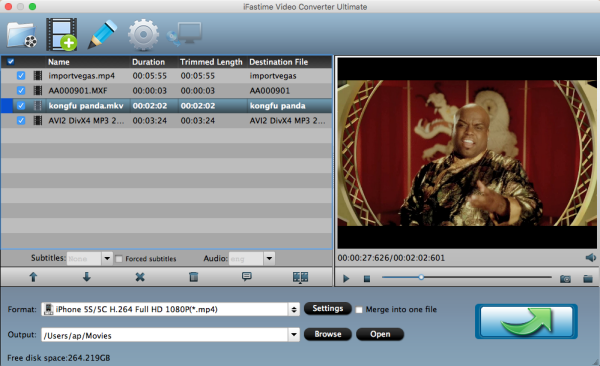
Step 1. Load DVD files
Insert DVD in your computer DVD-ROM, click the DVD disc button to import your DVD movies. The software will quickly analyze the DVD and list all the DVD title. The DVD ripper will auto check and select the main movie title of DVD movie.
Tip: Once the files are loaded, you can select the subtitles and audio track you prefer. On the right windows, you can preview your files and take snapshots of your favorite movie scenes.
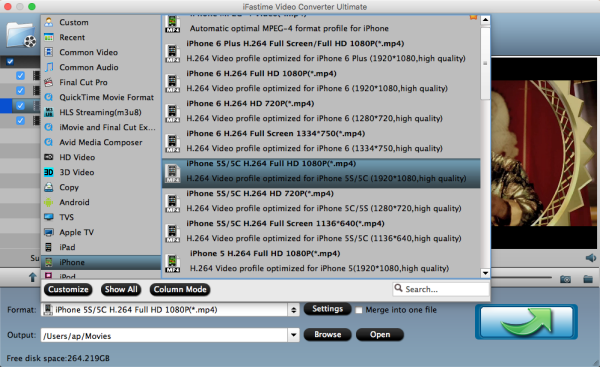
Step 2. Choose output video format for iPhone SE
Click "Format" bar, here I recommend you "iPhone > iPhone 5S/5C H.264 Full HD 1080P(*.mp4)". The output videos could fit on iPhone SE perfectly.
Tip: If you like, you can click "Settings" to change the video encoder, resolution, frame rate, etc. as you wish.Keep in mind that some of the settings can be tweaked to improve the video quality but it's a balance between quality and size. Using the settings we suggested, a 120-minute DVD encoded to about a 1.3GB MP4 file.
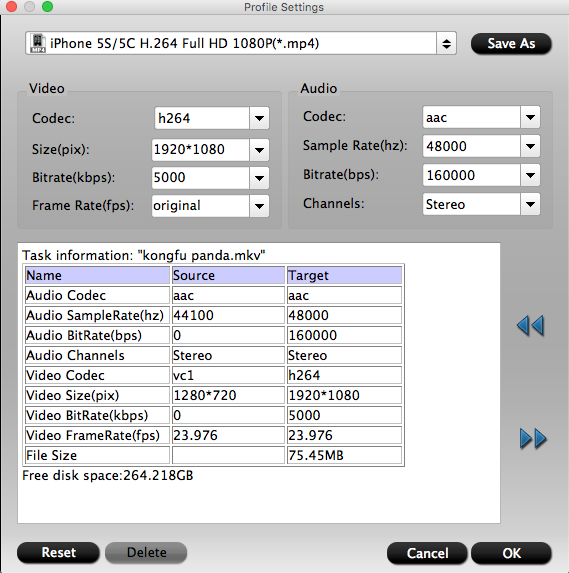
According to my experience, if you are keen on high video quality, you may choose the bitrate 1280x720. But it will take longer time and will output larger file, so it is not a compromised choice. Besides, the bitrate 800 to 1000 is low in quality. So 480X320 is recommended for ripping DVD to iPhone SE.
Step 3. Start Ripping DVD to MP4 for iPhone SE
At last, click the "Start converson" button to begin converting DVD movies to iPhone SE playable video(MP4). When the conversion is over, click "Open" to locate the ripped MP4 video files. After that, you can connect your iPhone SE to computer via a USB device and transfer the videos to your iPhone SE via iTunes for enjoyment on the gorgeous screen anywhere. It will deliver all-day use to most people.
In addition to DVD, you can also convert Blu-ray and transcode SD/HD/4K Video files to iPhone SE friendly format .mp4 with the best video/audio parameter settings with iFastime Video Converter Ultimate for Mac.
Solution 3. Record DVD Movie to Computer for iPhone SE playback
Step-by-Step Instructions:
Step 1. Record from DVD to Computer
1.) Download and install a free program called VLC Player. This is a program that plays DVDs, as well as a zillion other kinds of files people might send you.
2.) Download and install a free program called Handbrake. Handbrake and VLC come in 64-bit and 32-bit versions, be sure to load the same version of each if you are asked. 64-bit is better if you have a newer computer. As I understand it, VLC is the player that plays the DVDs, and then Handbrake is the recorder that formats that into something you can store on your computer. Once you install VLC player, you won't see it again, except when playing video files not related to playing DVDs.
3.) Stick a DVD in your computer. (If your DVD player program starts automatically, quit it.)
4.) Open the Handbrake program on your computer.
5.) As Handbrake opens, a file selection box appears. Select the DVD, which will look something like "DVD_TITLE," and click Open. (If it doesn't appear automatically, click the top left Source button to select the source from which to record.)
6.) Handbrake will glance over the disc for about a minute, during which it can't do anything. It will say something like: "Source: Scanning title 12 of 24..."
7.) As soon as it is no longer gray, hit the green Start button on the top left.
8.) Handbrake will take about a half hour to record the DVD into your computer. It tells you the time left as ETA along the bottom, just above the progress bar.
9.) When done, you'll get a message that Handbrake is done. You've recorded your disc to your computer.
10.) Eject your DVD; you're done with it.
11.) Got more DVDs? Repeat from step 3 if you like (Click "Source" to select the new DVD), or read on to be sure you've got this working correctly. I have no problem working on my Mac and recording DVDs at the same time; I can input a couple of dozen a day, which is all I've shot so far.
12.) Quit Handbrake if that's your last DVD to record.
Notes:
a. Picture Settings
Don't change any of the encoding settings! They are perfect as-is.
My copy of Handbrake defaults to a constant quality RF: 20, which means most movies encode as M4V files of about 1GB. Some movies will be as little as 500 MB, and others may come out as 2GB or more; it all depends on how much detail and motion is in the movie.
Movies shot on camcorders tend to have everything in focus and are shot at 60 field-per-second video rates, so they make big files. Movies shot on DSLRs or 35mm film have much less in focus, and usually run at 24 or 23.98 frame-per-second rates, so they make smaller files.
If you must twiddle with settings, for my content generated as 60-feild interlaced video, I prefer to hit Picture Settings on the top bar, select Filters in the black box that opens, move the slider from Decomb to to Deinterlace, and select Slower. Removing interlace artifacts from video-sourced DVDs also reduces their encoded file size, since it removes jaggy-edge interlace motion artifacts. If you shoot your DVDs on 35mm film or a DSLR at 24 or 23.98 fps, leave this alone; interlace only happens with conventional video sources.
If you do chose to set the deinterlace filter, thankfully it resets back to its Decomb default for the next copy. Be sure to set it each time if you're recording from video-based DVDs.
If you shoot your DVDs in 4:3, it will fit the iPad's screen perfectly. If you shoot in 16:9, 1.85:1 or 2.40:1, you'll have black bands across the top and bottom, unless you hit the enlarge button during iPad playback, in which case you're only seeing the center.
b. File Destination
Select your preferred destination location for your recorded file under Destination if you like. Once set, it will record the rest of your DVDs there.
If you think you're clever, you also could set the destination to the location used by iTunes to store movies (Users > You > Music > iTunes > iTunes Music > Movies), which would save you from copying to iTunes and then deleting the original, but if you're this clever, you probably wouldn't be reading this.
c. File Names and Titles
Most DVD recorders make titles that come up in CAPITAL_LETTERS. If you prefer the titles to read normally (Like This Title), then retype the title as you want it in the Destination box between "/VIDEO/" and ".m4v." If you're not a video whiz, best to change this after you've gotten the whole process working a few times, since if you screw up the punctuation, the file might not work.
Step 2. Copy New File to iTunes
1.) Find the file that was just recorded on your computer, and drag and drop it on the iTunes icon.
2.) You might see a progress bar as the file copies into iTunes.
3.) The movie will start playing in iTunes when it's done copying.
4.) You may have your iTunes set differently, but iTunes usually copies this file into its own location, so you may delete the original file from the location to which Handbrake recorded it.
5.) You now may play your movie all you want on your computer.
6.) This, and all the other DVDs you record on your computer, appear when you click "Movies" near the top your left-side iTunes Library bar. iTunes can become where you store all your movies, just as iTunes does for music.
Now you can play them all from your Mac if you like.
Step 3. Copy Movie to iPhone SE
1.) You need to have iTunes and your iiPhone SE set to synchronize to your computer with iTunes. See Secrets of iTunes or ask at the Apple Store if you need help; you probably set this back when you bought your iPhone SE.
2.) When you connect your Phone SE to your computer, click on its icon on the left side of iTunes.
3.) Click on "Movies" along the top bar in iTunes.
4.) Be sure "Sync Movies" is checked to copy your movies into your iPhone SE.
An iPhone SE will only hold about as many movies as it is rated in GB. Therefore, a 16GB device might hold 16 DVDs. This means that you probably won't be able to copy your entire DVD library to your device at once, and you will have to select which movies you want at any one time.
5.) Check "Automatically include all" if your device has enough memory (look along the bottom for a bar graph), or don't check it and select below which movies you want recorded into your iPhone SE.
6.) Click "Sync" at the bottom, and the movies will copy into your device. It will take a few minutes for each movie.
7.) You may select different movies or each of your devices at the "Movies" tab along the top.
8.) To change the movies on your device, connect your device, change the selections under the Movies tab, and hit Sync again. it will take a few minutes per new movie to copy them.
Step 4. Play videos on iPhone SE
1.) Select the "Videos" application on your home screen.
2.) Select your movie, and hit Play.
3.) Much better than if your iPhone SE actually did have a DVD slot, it just starts playing instantly without needing to click any menus. Movies play faster, easier and more conveniently than they ever did as DVDs!
Now choose the best way to realize playing DVD movies on iPhone SE. But for me, the second solution is preferred due to its simple procedure. Good luck!
Tip 1: How to Play Your iPhone SE video on Your TV
To play video from your iPhone SE on your TV or HDTV, get the Apple Component Video Cable.
Potential gotchas are 1.) the cable is 6 feet long, so you'll want a remote control for your device, and 2.) not every possible kind of device and TV work with that particular cable. For primitive TVs lacking RGB inputs and only having one yellow "Video" connector, use the Apple Composite Video Cable. To connect to an HDTV with an HDMI cable, use the Apple Digital AV Adapter.
Tip 2: About iOS 9.3- 5 Things You Need to Know
iOS 9.3 Problems
It's still early but we're already hearing about problems with Apple's latest upgrade including a serious activation issue that Apple will address with a new iOS 9.3 build.
iOS 9.3 users are complaining about several different issues including battery drain, issues finding the new Night Shift feature, issues with the vibration function, activation problems (this seems to be the most common problem thus far), missing App Store, and iPad 2 owners are saying that the update bricked their device. It appears that iPad 2 users aren't alone.
iOS 9.3 Activation Problems
According to Apple, activation issues are affecting owners of the iPhone 5s and older and owners of the iPad Air and older. They're so bad that the company recently confirmed plans to issue another iOS 9.3 update From iMore:
“Updating some iOS devices (iPhone 5s and earlier and iPad Air and earlier) to iOS 9.3 can require entering the Apple ID and password used to set up the device in order to complete the software update,” an Apple spokesperson told iMore. “In some cases, if customers do not recall their password, their device will remain in an inactivated state until they can recover or reset their password. For these older devices, we have temporarily pulled back the update and will release an updated version of iOS 9.3 in the next few days that does not require this step.”
It's not clear when an update will roll out though you'll want to be on the lookout over the weekend and next week. In the meantime, you'll want to consult Apple's support document as it comes with fixes for this ongoing issue.
Note that that the above issues aren't the same as the activation problems that were plaguing some GSM iPad 2 users. Those problems have been fixed with a brand new iOS 9.3 build that started rolling out last night to the GSM iPad 2.
We've been using the iOS 9.3 update for a few days now but we haven't discovered any experience-breaking bugs. We were able to activate all of our devices just fine.
That said, you're always taking a risk (especially if you own an older device) installing the iOS 9.3 on your phone or tablet.
That's why we recommend taking a few steps to prepare yourself, and your device, for iOS 9.3. A little prep work will go a long way toward preventing problems.
Where to Find Feedback About iOS 9.3
It's important for everyone, those who have already upgraded to iOS 9.3 and those who haven't, to keep an eye on feedback about the update's performance.
As we push away from the release date, you'll want to dig for feedback about performance on your device, particularly if you're coming from something older than iOS 9.2.1 (you can't go back to anything else) and using an older device like the iPhone 5 or iPhone 4s.
So where will you find this feedback about iOS 9.3 performance and potential problems? Well, you can start here.
We've put together some reasons to and not to install the iOS 9.3 update right now. If you're on the fence, start there.
We've also started releasing our impressions of iOS 9.3 updates for popular devices. We've started with the iPhone 6s, iPhone 6s Plus, iPhone 5s, and iPad and we'll be posting more shortly.
If those aren't enough, we recommend keeping an eye on YouTube, Apple's discussion forums, and the MacRumors forums for additional feedback about the iOS 9.3 update.
This feedback will alert you to potential issues and also, potential benefits.
How to Fix iOS 9.3 Problems
If you've run into an iOS 9.3 problem, there's no need to panic. There's a good chance there's a fix out there for your issue. (Including those activation problems.)
If an iOS 9.3 problem pops up on your iPhone, iPad or iPod touch, start with our list of fixes for common iOS 9 problems. Our list features fixes for the most common iOS 9 problems including abnormal battery drain, Wi-Fi issues, and problems with Bluetooth.
If you can't find a fix there, you should head on over to Apple's discussion forums for iPhone, iPad, Apple Music, and more. There, you'll find a library of fixes and a helpful community that can and will point you in the right direction.
If you can't find a fix online, you can get in contact with Apple Support via Twitter or schedule an appointment to see a Genius at an Apple Store.
You Can Downgrade to iOS 9.2.1
You can also downgrade to the iOS 9.2.1 update for a short time.
Apple is still signing off on the iOS 9.2.1 update which means you can drop back down to the update if you decide that iOS 9.3 isn't to your liking.
Remember, Apple will, at some point, stop signing off on iOS 9.2.1 which will leave you stranded on iOS 9.3. This typically happens one to two weeks after an update's release.
What's Next
Apple hasn't confirmed the next iOS update though a report suggests that a bug fixer could be on the way in the future.
A report from MacRumors hints at the potential for an iOS 9.3.1 update. Nothing is confirmed but it could be that Apple rolls out a smaller bug fixer before it rolls out its next milestone upgrade.
The company hasn't announced an iOS 9.4 update and iOS 10 isn't expected to debut until the summer at WWDC 2016.
So if you encounter a problem with iOS 9.3, you're on your own. For now.
Have more questions about how to tutorial of Playing DVD on iPhone SE with Ease, please feel free to contact us>>
Related Articles

Perfectly handle an extensive list of video file types with impressive output quality on Mac OS X.
Price: $45.95