Hassle-free Guide to Rip Blu-ray with Subtitles
Nov 27, 2015 03:48 pm / Posted by Charles Brown
Blu-ray movies do not always include one subtitle track. Chances are that you need retain preferred subtitles for foreign films on your Blu-ray to better understand the movie. Here's how to easily rip Blu-ray with keeping preferred subtitles, regardless of where you're getting them.
To rip Blu-ray with subtitles you prefer, actually you can turn to iFastime Video Converter Ultimate. The software could not only rip Blu-ray to AVI, H. 264/H.265 MP4, H. 264/H.265 MKV, FLV, MOV etc. with selected subtitles, but also create videos only with forced subtitle. Besides, it even enables you to freely choose which chapters you want to rip. For Mac users, iFastime Video Converter Ultimate for Mac will do a great job in ripping video from Blu-ray with optional subtitles. How powerful the program it is, right? Now I will show you the full guide on how to convert Blu-ray with desired subtitles. Check out.
Free Download or Purchase iFastime Video Converter Ultimate:
How to rip a Blu-ray with preferred subtitle
Step 1: Load Blu-ray Movies
Simply click the "Load file(s)" button on program toolbar to load Blu-ray movies from disc. Inserting the Blu-ray disc into Blu-ray drive is needed before the loading. All imported Blu-ray movies could be previewed on program right viewing window. All titles of the original Blu-ray movies could be seen on program left panel. And in every title, you can see various chapters. Just check the titles or chapters you want to rip.
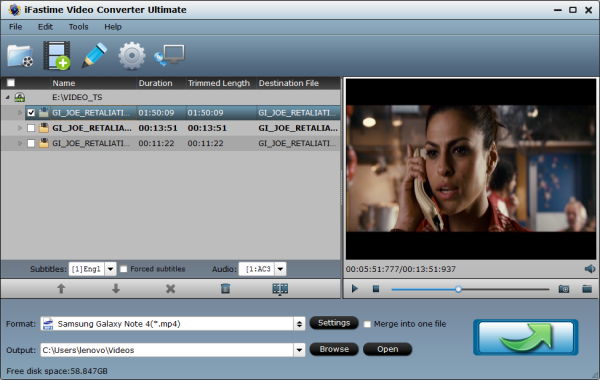
Step 2: Select Desired Subtitles for Output
Because the subtitles are not hardcoded on the Blu-ray video, so we can choose the subtitles which you want to keep. Thus you can rip the Blu-ray and keep subtitles on your own to meet your requirement. Just click the drop down menu after "Subtitles" to select your desired one.

Tip 1: If you just want to have subtitles for the foreign language parts and no subs for English parts, what to do?
Check the chapters you want to rip, and set Forced subtitles for each chapter follow this way: specify English in "Subtitle" pull-down list, and then check "forced subtitles" before converting. When "forced subtitles" is checked, the subtitles appear on the screen only when foreign languages other than English are spoken.
Tip 2. If there is no subtitle in your original Blu-ray, you can even insert plug-in SRT, SSA, ASS subtitles.
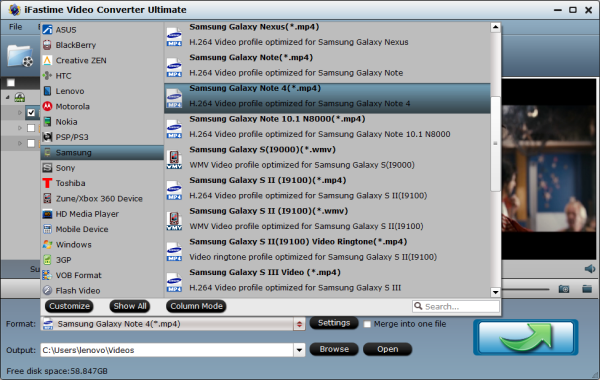
Step 3: Choose an output format
Tap Format bar and choose your desired format. As you see, regular video formats like AVI, MP4, WMV, FLV, MKV, MOV, etc. and commone audio files like AC3, FLAC, etc. are provided. Meanwhile, lots of video presets for portable devices like iPhone, iPad, Galaxy Tab, etc. are offered to let you get videos with the best settings to fit your device.
Step 4: Convert Blu-ray with subtitles
As all settings are done, you could click bottom-right button "Start conversion" to convert Blu-ray with desired subtitles. Once the conversion finished, you can get the ripped video with the subtitles as you wanted. And just share your movies with families and friends.
One Tip for you guys: The program could handle DVD movies, ISO files and SD/HD/4K videos as well.
Have more questions about how to rip Blu-ray with Subtitles in Windows/Mac effortlessly, please feel free to contact us>>
.Related Articles
One thought on “Hassle-free Guide to Rip Blu-ray with Subtitles”
Leave a Reply
You must be logged in to post a comment.

Ultimate media solution to convert all SD, HD, 2K, 4K videos to play, edit, share on Windows 10.
Price: $45.95
I used to be able to find the good Blu-ray ripper to play Blu-ray with subtitles. Thanks.