Solutions for TV- plugged in DVD player showing in black and white
Mar 10, 2016 06:18 pm / Posted by Charles Brown
DVDs are ubiquitous in the entertainment world today, and DVD players can be purchased for less than the price of a nice dinner. Hooking up a DVD player to your TV will give you access to countless hours of movie-watching bliss, but in practice you still meet occasions that DVD Player only displays black and white picture after you connected DVD player to TV via cables, you can follow the solutions to solve this problem.
Solution 1:
If your TV is a rear projection DLP TV and is does have a color wheel which could certainly have failed. You need to check the color setting in the TV to make sure it is not all the way down which would give you black and white on all sources.
Solution 2:
You can also use VIDEO instead of COLOR STREAM. Just change it in the TV menu, plug the red and while at the back of TV where it says VIDEO.
Solution 3:
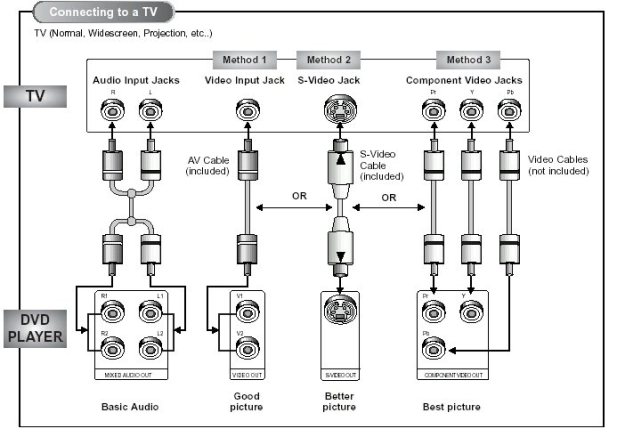
Check your cables to see if you have plugged to wrong port for the video and audio, you can switch them to see if it turn normal.
Diagram
Connect with DVI
Connecting with HDMI

Solution 4:
If all the cables are plugged to right ports, the problem may lies in your cable. Maybe they are broken, or they have compatible problem to the players and TV, this is often occurred between players and TVs in different brand. Sometimes, old cables can become frayed and the plugs can start coming loose. This can lead to a poor or nonworking connection. Try a new cable to see if your problem can be fixed. You can choose to pick high quality cables from Amazon, which are carefully selected by professor.
Solution 5:
These are commercial bought DVD? If not the DVD Player doesn't understand your codec. (If it is an MPEG-2 progressive movie DVD, you will get a much better picture with analog component or HDMI at 480p or 480i settings. Analog component is the easier path) In this case, to get DVD playable on TV without black and white issuse, you'll need to convert DVD to TV compatible video format for playback first.
Best DVD to TV Ripper for Playing DVD Movies on Big-Screen TVs
iFastime Video Converter Ultimate, as the best DVD to TV converter, is winning more and more credit. Built-in 200+ video/audio codec, it can rip DVDs to any video formats supported by TV with removal of copy-protections, CSS, region code, RCE, Sony ArccOS, UOPs, Disney X-project DRM and deliver possible highest video/audio quality.
Thanks to NVIDIA CUDA and ATI Stream (AMD APP) acceleration technology, this DVD to TV ripper can convert full-length DVD movie in a matter of minutes. There are many successful brands of TVs which have their special product design patterns, but this DVD to TV ripper is sufficiently powerful to optimize DVD to make it perfectly match different TVs like Sony TV, LG TV, Panasonic TV, Samsung TV. In addition to DVD, it supports transcoding Blu-ray, ISO, MP4, Tivo, AVI, MKV, FLV, VOB, etc.
If you're using a Mac, simply turn to iFastime Video Converter Ultimate for Mac (El Capitan compatible), which has the same function as the Windows version. Now refer to the tutorial below for converting and playing DVD on TV with no efforts whether it is connected to DVD player or not.
To rip dvd to TV, please download the magic DVD Converter for TV by clicking button below. It is provided by iFastime. Install it to your PC after the download is completed.
Rip and Play DVD on TV with or without DVD Player
1. Import DVD
Run Best DVD to TV Ripper and Import DVD Disc. Click "Load file(s)" icon to load DVD disc from ROM, or DVD folder, ISO files. It will recognize the main movie automatically with no need to make a choice from a mound of titles. See, the main movie has been ticked off. And, furthermore, you can select audio track and subtitle on the drop-down box of Audio/Subtitle for output, and use the Play button to check the preview in the Main Movie zone.

Note: Adding external subtitle is available, meaning you can add subtitle to MP4 if you want rip DVD to TV in MP4 format.
2. Set Output format for TV
Click "Output Format" drop-down list and select an optimized TV for output. There are many options under Format menu, like Samsung TV, LG TV, Sony TV, Panasonic TV. Choose a optimized format for your TV set. We can learn that most TV is compatible with H.264 codec MP4 video format best, so choose H.264 MP4 for playing DVD on other TVs including Seiki TV, Sharp TV, Vizio, JVC TV, and Toshiba TV.

3. Start DVD to TV conversion
Click "Start conversion" Button to Start DVD conversion for TV. After the quick conversion, click "Open" to quick locate the ripped DVD movie; and then stream DVD to TV, if you TV set has a usb port, please transfer the DVD Movie to USB storage then plug the drive in your TV for playback. Or stream them via DLNA servers. In this way, you won't encounter any DVD playback issue on TV, the TV- plugged in DVD player showing in black and white problem will also be avoid. Hope they can solve your DVD player to TV black and white playback problems.
Annoying Problems will Never Happen:
Just got a new Toshiba HDTV (model no. 39L1350U) and am trying to hook up the DVD player. Got sound, but it only shows a black and white picture. The only way I get any picture at all is by plugging the yellow of the standard AV cable into the green jack. I know this is not right, but don't know where to plug in the yellow connection since there is no yellow jack on the back of the TV. Am I going to need a different cable? My DVD player is an old Sony.
Hello. The TV I have is a samsung plasma HDTV. I have a venturer rts2628v dvd/vcr combo. I'm using S-Video/Stereo Audio Cable to watch dvd's. The sound & picture looks good, but the movies is shown in black and white. How do I make it so it shows in color? If anyone can help me out I'd really appreciate it.
My LG TV displays black and white all the time, on any source cable, tv, etc. I tried plugging in my dvd player or any game consel same problem. Picture quality is perfect but only displays black and white. For sometime i heard what sounded like spinning disk, i dont know if these tv's are equipped with a color wheel??? Please help. Thank you.
Is there an easy way to play the DVD-movies of my son so he can watch it on our new Panasonic TV? Me and my family used to pay to access online movies, but now I think DVD is a better source. I don’t want to buy another DVD player considering of my broken one. How to avoid black and white problem?
How to Hook Up a DVD Player to TV:
Most modern TVs and DVD players make the setup process a breeze. Here are 5 easy ways (Learn more in this page):
1. Setting Up your DVD Player
a. Plug in the DVD player and make sure it turns on. Before trying to hook up your player, make sure it is plugged in and turns on when you press the "power" button. Usually a small light or welcome message appears when the DVD player is working correctly.
b. Determine what type of connection you need. There are at three common ways to connect a DVD player, and each needs a different cable to work. Your DVD player should come with all of the appropriate cords, but you need to check which connections your TV accepts as well. Look into your owner's manuals or check the TV and DVD Player yourself to see what connections you can use. The three most common are.
- HDMI: The most modern connection, HDMI resembles a longer, thinner USB cord. HDMI connections are the highest quality connections and you only need one cord for both the audio and video.
- A/V Cables (Three-Prong): Standing for Audio/Visual cables, this the most common connection for DVDs. There are three prongs at either end-- red, yellow, and white -- and they match up to corresponding colored inputs on both the TV and DVD player.
- Component Cables: Sporting better quality than A/V cables but less than HDMI, component cables are a set of five colored prongs attaching to five matching inputs on both the TV and the DVD player.
- If possible, use and HDMI cable, as they are the easiest to install and have the best quality video.
- Do not stack different electronic equipment on top of one another -- they can quickly heat up when in use and damage the electronics.
e. Turn off the DVD player and TV before you connected them. This prevents the likelihood of electric shocks and protects the equipment.
f. Know that the same procedures work for a projector. Most projectors have the same set of inputs as TVs, so don't be intimidated if you want to hook up a projector instead.
- Some projectors use a "DVI Input" instead of the three connections listed above. If so, follow the same procedure as "Connecting with an HDMI Cable," substituting a DVi cable for an HDMI.
2. Connecting with an HDMI Cable
a. Plug the first end of the cable into the HDMI socket on the DVD player. Look for the "HDMI" or "HDMI Out" label and fit the cable securely into the socket.
- This is the highest quality connection for audio and video and is typically found only on modern DVD players.
- If there is an input number, like "HDMI 1," remember it for later. This is the setting your TV must be set at to see your movies.
- There are a lot of different HDMI cords available, but unless you want pristine, perfect picture then any length and type of cord will work just fine as long as it reaches.
d. Power on the DVD player and TV. Insert a DVD so that you can test both the picture and the audio.
e. Switch the TV to the correct input using the "source" button on your TV or Remote. Sometimes labeled "input," this button allows you to switch where your TV gets the video and sound information. The input you choose on the TV should match the input you used for the cables.
- If there is not a label or you don't know what input to use, leave the DVD player on and test each input for 5-10 seconds to see where the video appears.
3. Connecting with A/V Cables (3-Prong)
a. Plug in one end of the A/V Cables to the Output sockets on the DVD player. The sockets are color-coded to match the cable (Red, White, and Yellow). Look for the "Output" or "Out" group. The Red and White sockets (Audio) may be separated from the Yellow one (Video).
- The set of sockets are typically grouped together with a border or line indicating the included sockets.
- The input sockets are usually grouped together, and are often marked by a border or a line separating the group from the other Inputs.
- The Red and White sockets (Audio) may be separated from the Yellow one (Video). The labels should indicate which socket goes with which Input.
- The Yellow video plug may be a separate cable from the Red and White audio cable.
d. Power on the DVD player and TV. Insert a DVD so that you can test both the picture and the audio.
e. Switch the TV to the correct input using the "source" button on your TV or Remote. Sometimes labeled "input," this button allows you to switch where your TV gets the video and sound information. The input you choose on the TV should match the input you used for the cables.
If there is not a label or you don't know what input to use, leave the DVD player on and test each input for 5-10 seconds to see where the video appears
f. Ensure that A/V or cables are plugged in correctly. If you are only getting video or only getting audio, or you aren't getting any signal at all, your cable may be plugged in incorrectly. Check to make sure that each colored plug is attached to the correctly colored socket.
- If the video is not showing up, ensure that the Yellow plug is connected to the correct Input on the TV and Output on the DVD player.
- If the audio is not coming through, ensure that the Red and White cables are plugged into the correct Input on the TV and the correct Output on the DVD player.
4. Component Cables (5-Prong)
a. Plug all five cords on one end into the corresponding sockets on the DVD player. The sockets are color-coded to match the cable (Green, Blue, Red, White, Red) and are typically grouped and labeled. Look for the "Output" or "Out" group. The Green, Blue, and Red sockets (Video) may be separated from the Red and White pair (Audio), so make sure all five cords are plugged in.
You will notice that a component cable has two Red plugs, which can make things confusing. To figure out which is which, lay the cable out flat so that all of the prongs line up. The order of colors should be Green, Blue, Red (video), White, Red (audio).
- Some component cables only have the Green, Blue, and Red video plugs. You will need a separate Red and White plug audio cable in order to hear your DVDs, like the one found in the A/V section above.
b. Plug the other side of the cables into the input sockets on the TV. Like on the DVD player, these will be color-coded to match the cable and grouped into Input groups. Look for the "Input" or "In" group. They are typically numbered to indicate which Input you select on the TV
c. Make sure your connections are snug and matched to the right color. Match the colored plugs on the cable to the colored sockets on both the DVD player and TV.
d. Power on the DVD player and TV. Insert a DVD so that you can test both the picture and the audio.
e. Switch the TV to the correct input using the "source" button on your TV or Remote. Sometimes labeled "input," this button allows you to switch where your TV gets the video and sound information. The input you choose on the TV should match the input you used for the cables.
- If there is not a label or you don't know what input to use, leave the DVD player on and test each input for 5-10 seconds to see where the video appears
- If the video is not showing up, make sure that the Green, Blue, and Red video cables are plugged into the correct Input on the TV and the correct Output on the DVD player.
- If the audio is not coming through, ensure that the Red and White cables are plugged into the correct Input on the TV and the correct Output on the DVD player.
- Double check that the Red cables are plugged into the correct sockets. If they are in the wrong ones, both the audio and video will be messed up.
Related Articles:
- Connecting an iPad, iPhone to a TV
- Set up and Connect Apple TV to TV
- How to set up a 3D TV for 3D viewing?
- Create 3D movies for Samsung 3D TV from Kodi
- Watch Movies on TV Stored on External Hard Drive
Have more questions about how to fix DVD Player with TV displays black and white issuse, please feel free to contact us>>
Categories

Ultimate media solution to convert all SD, HD, 2K, 4K videos to play, edit, share on Windows 10.
Price: $45.95